How To Bake Phyllo Pastry
Are you ready to embark on a culinary adventure that will leave your taste buds dancing with delight? As a professional chef with a passion for all things pastry, I am thrilled to guide you through the art of baking phyllo pastry. Originating from the Mediterranean region, this delicate and flaky dough has been tantalizing palates for centuries. Whether you’re a seasoned baker or a novice in the kitchen, I guarantee that by the end of this journey, you’ll have mastered the art of creating irresistibly crispy layers that will elevate your culinary repertoire to new heights. So, roll up your sleeves, dust off your rolling pin, and let’s dive into the captivating world of phyllo pastry!
How to Bake Phyllo Pastry: A Delicate and Delicious Crispy Treat
Phyllo pastry, also known as filo pastry, is a light and delicate dough that can be used to create a wide variety of sweet and savory dishes. With its flaky layers and buttery taste, phyllo pastry is a true culinary delight. In this guide, we will show you how to bake phyllo pastry to perfection, ensuring a crispy and mouthwatering result every time.
Ingredients:
– Phyllo pastry sheets
– Melted butter or cooking spray
– Desired filling (such as cheese, spinach, or fruits)
– Optional: herbs, spices, or sweeteners for added flavor
General Information:
– Difficulty: Moderate
– Preparation time: 30 minutes
– Cooking time: 30 minutes
– Serves: Varies depending on the recipe
Instructions:
Step 1: Prepare the Phyllo Pastry
Start by thawing the phyllo pastry according to the package instructions. Phyllo pastry can be quite delicate, so handle it carefully to avoid tearing the sheets.
Once thawed, you can gently unroll the pastry and cover it with a damp cloth to prevent it from drying out. Phyllo pastry dries out quickly, so it’s essential to keep it moist during the assembling process.
Step 2: Brush with Butter or Cooking Spray
Before layering the phyllo sheets, brush each layer with melted butter or lightly coat with cooking spray. This step helps to achieve a golden brown and crispy texture. Be generous but not excessive with the butter to avoid making the pastry too greasy.
Alternatively, you can use cooking spray as a lighter option. Ensure to coat each sheet evenly, especially the edges, to prevent them from becoming dry or brittle during baking.
Step 3: Layer the Phyllo Sheets
For most phyllo pastry recipes, you will need multiple layers of phyllo sheets. Place one sheet at a time in your baking dish, gently pressing it down. Repeat this process, brushing each layer with butter or cooking spray, until you have the desired number of layers.
Keep in mind that a typical phyllo pastry recipe may range from 6 to 12 layers, depending on the desired thickness and texture. Thicker layers will result in a more substantial and chewier pastry, while thinner layers create a lighter and flakier texture.
Step 4: Add the Filling
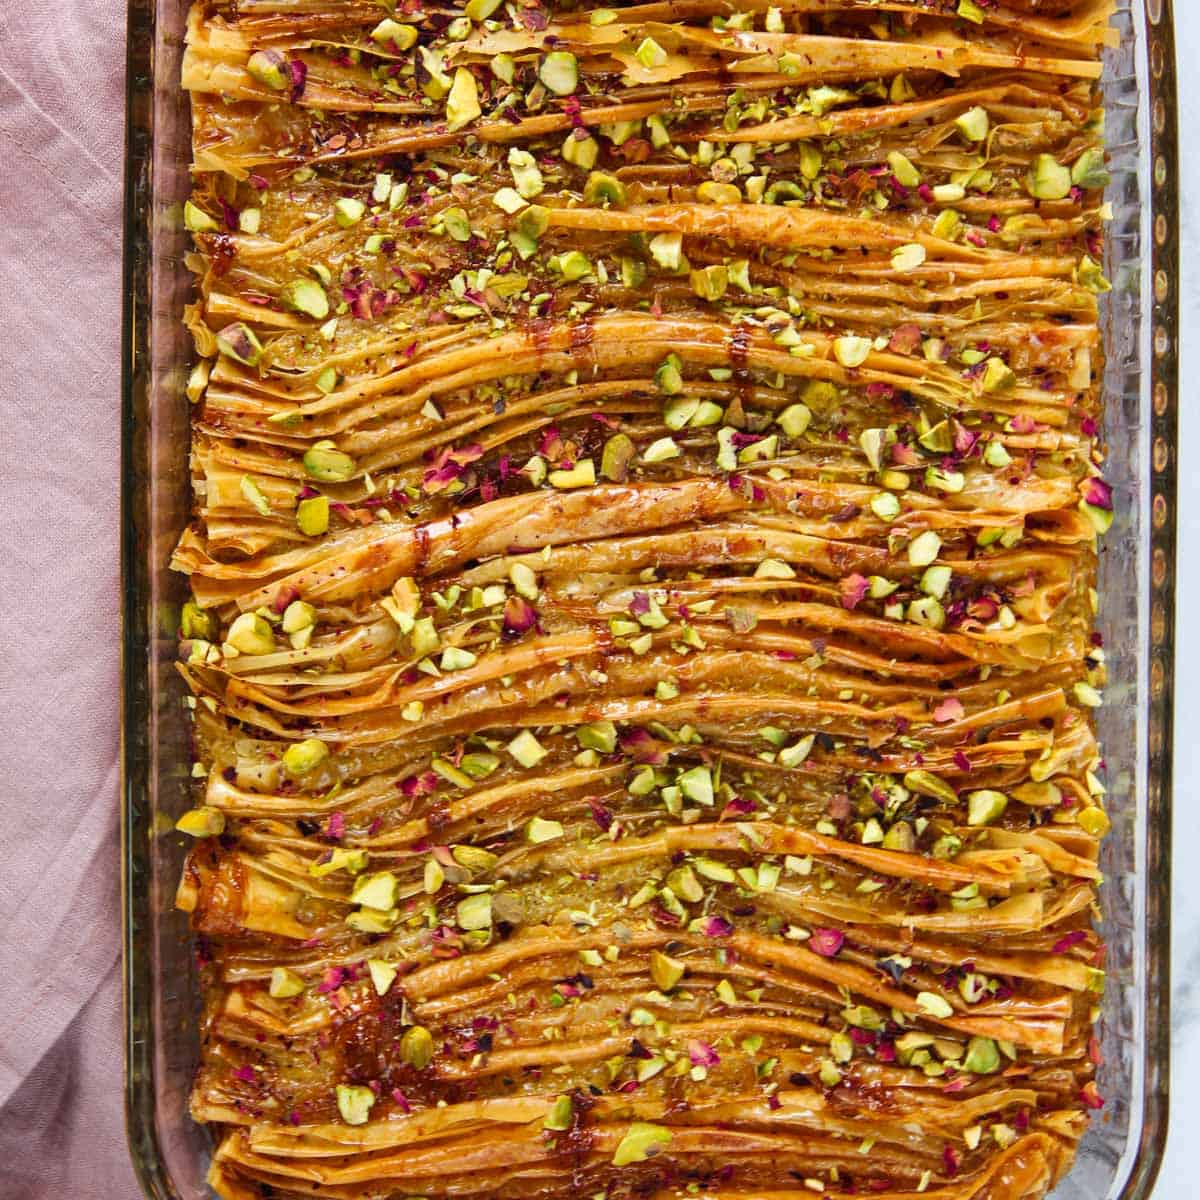
Once you have layered the phyllo sheets, it’s time to add the filling of your choice. Whether you’re craving a savory spanakopita with spinach and feta cheese or a sweet baklava with honey and nuts, the filling possibilities are endless.
Spread the filling evenly over the phyllo layers, being careful not to overload it. Too much filling can lead to a soggy pastry, so use moderation. Remember to leave a border of phyllo pastry around the edges to ensure a crisp and golden finish.
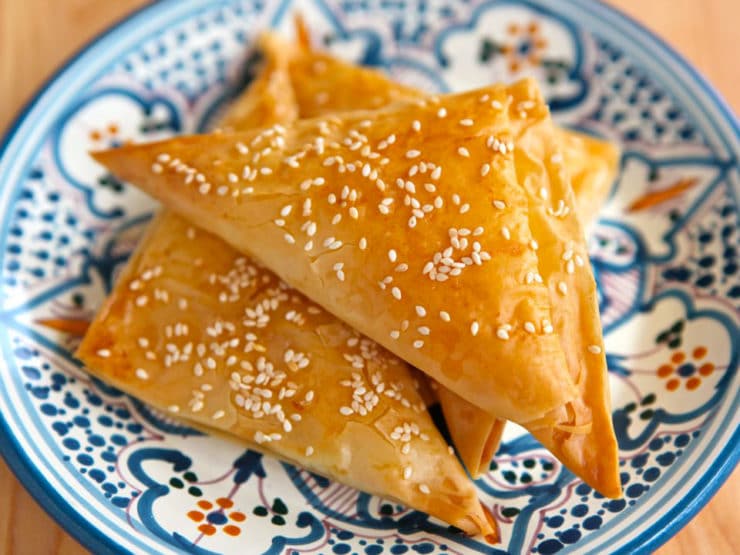
Step 5: Fold and Shape
To seal the phyllo pastry and create a neat presentation, you will need to fold and shape it accordingly. Follow the specific recipe instructions for the desired shape, whether it’s folding into triangles, rolling into cylinders, or folding into squares.
Take your time with this step, ensuring that the edges are secure and the filling is well-contained. A properly shaped phyllo pastry will not only look visually appealing but also bake evenly.
Step 6: Bake to Perfection
Preheat your oven to the recommended temperature stated in your recipe. Place the assembled phyllo pastry on a baking sheet or in a baking dish, depending on the recipe.
Bake the phyllo pastry for the specified time or until it turns a beautiful golden brown color. Keep a close eye on it during the last few minutes of baking to prevent it from becoming too dark or burning.
Step 7: Serve and Enjoy!
Once baked, remove the phyllo pastry from the oven and let it cool slightly before serving. Phyllo pastry is best enjoyed fresh and warm, allowing you to fully savor its crispy and flaky texture.
Serve the phyllo pastry as a delightful appetizer, main course, or dessert, depending on the recipe you chose. Accompany it with a side salad, dipping sauce, or a dollop of whipped cream for an extra touch of flavor.
Now that you know the secrets to baking phyllo pastry, it’s time to unleash your creativity and explore the endless possibilities of this versatile ingredient.
Remember, practice makes perfect, and don’t shy away from experimenting with different fillings, shapes, and flavors. Whether you’re a seasoned chef or a beginner in the kitchen, baking phyllo pastry will always be a rewarding and delicious culinary adventure. Enjoy every bite!
Phyllo pastry is a delicate and versatile pastry often used in Greek and Middle Eastern cuisines to create delicious sweet or savory dishes. While making phyllo pastry from scratch may seem daunting, it can be a fun and rewarding experience that will impress your friends and family. However, there are a few important things to keep in mind to ensure your phyllo pastry turns out light, flaky, and perfect every time. So, put on your apron and let’s dive into the essential tips for mastering this delicate pastry.
1. Temperature is Crucial:
When working with phyllo pastry, temperature plays a critical role in achieving the desired texture. The dough should be kept cool at all times to prevent the butter from melting, which is what creates the flaky layers. Make sure to work in a cool room and handle the dough swiftly to avoid overheating. If the dough becomes too soft, refrigerate it for a few minutes before continuing. Additionally, it’s equally important to keep the dough covered with a damp cloth while you’re working to prevent it from drying out.
2. Roll It Out with Finesse:
Rolling out phyllo pastry requires a gentle touch and a bit of finesse. Start with a lightly floured surface and a well-floured rolling pin. Divide your dough into smaller portions and keep the remaining dough covered to maintain its moisture. Roll the dough from the center outward using light pressure, lifting and rotating it occasionally to ensure an even thickness. Aim for paper-thin layers, as the phyllo pastry should be translucent when cooked. Don’t worry if it tears or becomes uneven; it’s all part of the charm of homemade phyllo pastry.
3. Layer and Brush Like a Pro:
Assembling the layers of phyllo pastry is essential for its characteristic texture and taste. Remember to generously brush melted butter or olive oil between each layer to ensure a deliciously flaky result. Use a pastry brush to evenly distribute the fat, making sure to reach the edges and corners. This step not only adds flavor but also helps to separate the layers, resulting in a delicate pastry that shatters with each bite. Be patient and take your time; it’s well worth the effort.
4. Experiment with Fillings and Flavors:
One of the most enjoyable aspects of making phyllo pastry is the opportunity to get creative with fillings and flavors. Whether you prefer a sweet or savory option, the possibilities are endless. Classic fillings may include spinach and feta cheese, apple and cinnamon, or a nutty baklava. Don’t be afraid to experiment with different spices, herbs, or even fruits to give your phyllo pastry a unique twist. Remember to adjust the baking time and temperature depending on the filling, as different ingredients may require different cooking times.
In conclusion, making phyllo pastry from scratch is a delightful culinary adventure that rewards both the palate and the soul. By keeping the temperature cool, rolling the dough with precision, layering and brushing like a pro, and experimenting with various fillings and flavors, you’ll be well on your way to mastering this delicate pastry. So, don your apron with confidence, unleash your creativity, and enjoy the process of creating phyllo pastry that will leave everyone in awe of your culinary skills. Happy baking!
Frequently Asked Questions
Welcome to our FAQ section on baking phyllo pastry, also known as filo pastry. If you’re new to working with phyllo dough or need some tips and tricks for successful baking, you’ve come to the right place! Below are some frequently asked questions about baking phyllo pastry and our answers to help you perfect your phyllo creations.
1. How do I prevent phyllo pastry from drying out?
Phyllo pastry can dry out quickly, which can cause it to crack and become difficult to work with. To prevent this, it’s essential to keep the dough covered with a damp kitchen towel or plastic wrap while you work. Only uncover the portion of the dough you are using at the moment, and keep the rest covered to retain its moisture.
Additionally, work swiftly to minimize the exposure of the dough to air. The longer it’s exposed, the higher the chances of it drying out. If you have any unused phyllo dough left, make sure to wrap it tightly in plastic wrap and store it in the refrigerator to use within a few days.
2. How can I achieve a crispy phyllo crust?
To achieve a crispy phyllo crust, it’s vital to brush each layer of phyllo pastry with melted butter or oil. This helps moisten the dough, adds flavor, and creates a protective barrier that prevents excessive moisture from making the pastry soggy.
Another helpful tip is to preheat your oven to the correct temperature before baking the phyllo pastry. This ensures that the dough bakes evenly and becomes crisp. Avoid over-baking, as it can make the phyllo pastry too brittle. Keep an eye on the pastry while it bakes to achieve that perfect balance of crispness.
3. Can I freeze phyllo pastry?
Absolutely! Phyllo pastry freezes well and can be great to have on hand for impromptu baking. Before freezing, make sure the phyllo pastry is completely sealed with plastic wrap or in an airtight container to prevent freezer burn.
When you’re ready to use the frozen phyllo pastry, thaw it in the refrigerator overnight. Once thawed, handle it carefully as frozen phyllo dough can be more delicate. Follow the instructions for your recipe, and enjoy your freshly baked phyllo treats!
4. How can I fix phyllo pastry that tears or breaks?
Don’t worry if your phyllo pastry tears or breaks while working with it – it happens to the best of us! To fix it, simply layer another piece of phyllo pastry on top, slightly overlapping the tear. Brush it with melted butter or oil as usual, and continue with your recipe.
If the tear is more significant, you can also patch it up using a small piece of phyllo dough. Brush the patch with butter or oil to ensure it sticks, and continue layering as instructed in your recipe. Remember, a few imperfections won’t affect the taste or final result!
5. How long should I let phyllo pastry rest before baking?
Resting phyllo pastry is recommended to allow gluten in the dough to relax, resulting in a more tender and flaky texture. Ideally, let the prepared phyllo dough rest for about 30 minutes before baking. This resting period also helps the layers to settle and prevents excessive shrinkage during baking.
While waiting, cover the dough with a damp kitchen towel or plastic wrap to prevent it from drying out. Once the resting time is up, you’re ready to bake your phyllo pastry to perfection!