How To Bake Oysters Easy
Welcome, fellow culinary enthusiasts! Today, we embark on a delightful journey into the world of seafood delicacies. Specifically, we shall dive into the realm of oysters – those exquisite treasures of the ocean that captivate our palates with their briny flavor and velvety texture. As a professional chef, I am thrilled to guide you through the art of baking oysters, unraveling the secrets to creating a dish that is both elegant and effortless. So, join me as we uncover the simple yet mesmerizing techniques that will enable you to master the art of baking oysters with ease. Get ready to tantalize your taste buds and impress your guests with this delightful seafood sensation!
How to Bake Oysters Easy: A Delectable Seafood Delight
Are you a fan of seafood? Do you love the rich and briny flavors of oysters? If so, then you’re in for a treat! In this recipe, we’ll show you an easy and foolproof way to bake oysters to perfection. Whether you’re hosting a dinner party or simply craving a delicious appetizer, these baked oysters are sure to impress your guests and satisfy your taste buds. So put on your chef’s hat and let’s get cooking!
Ingredients:
- 12 fresh oysters, shucked
- 1/2 cup unsalted butter, melted
- 3 cloves garlic, minced
- 1/4 cup fresh parsley, chopped
- 1/4 cup Parmesan cheese, grated
- 1/4 teaspoon salt
- 1/4 teaspoon black pepper
- Lemon wedges, for serving
General Information:
- Making Difficulties: Easy
- Preparation Time: 15 minutes
- Cooking Time: 10 minutes
- Servings: 6
Instructions:
Step 1: Preheat the oven and prepare the oysters
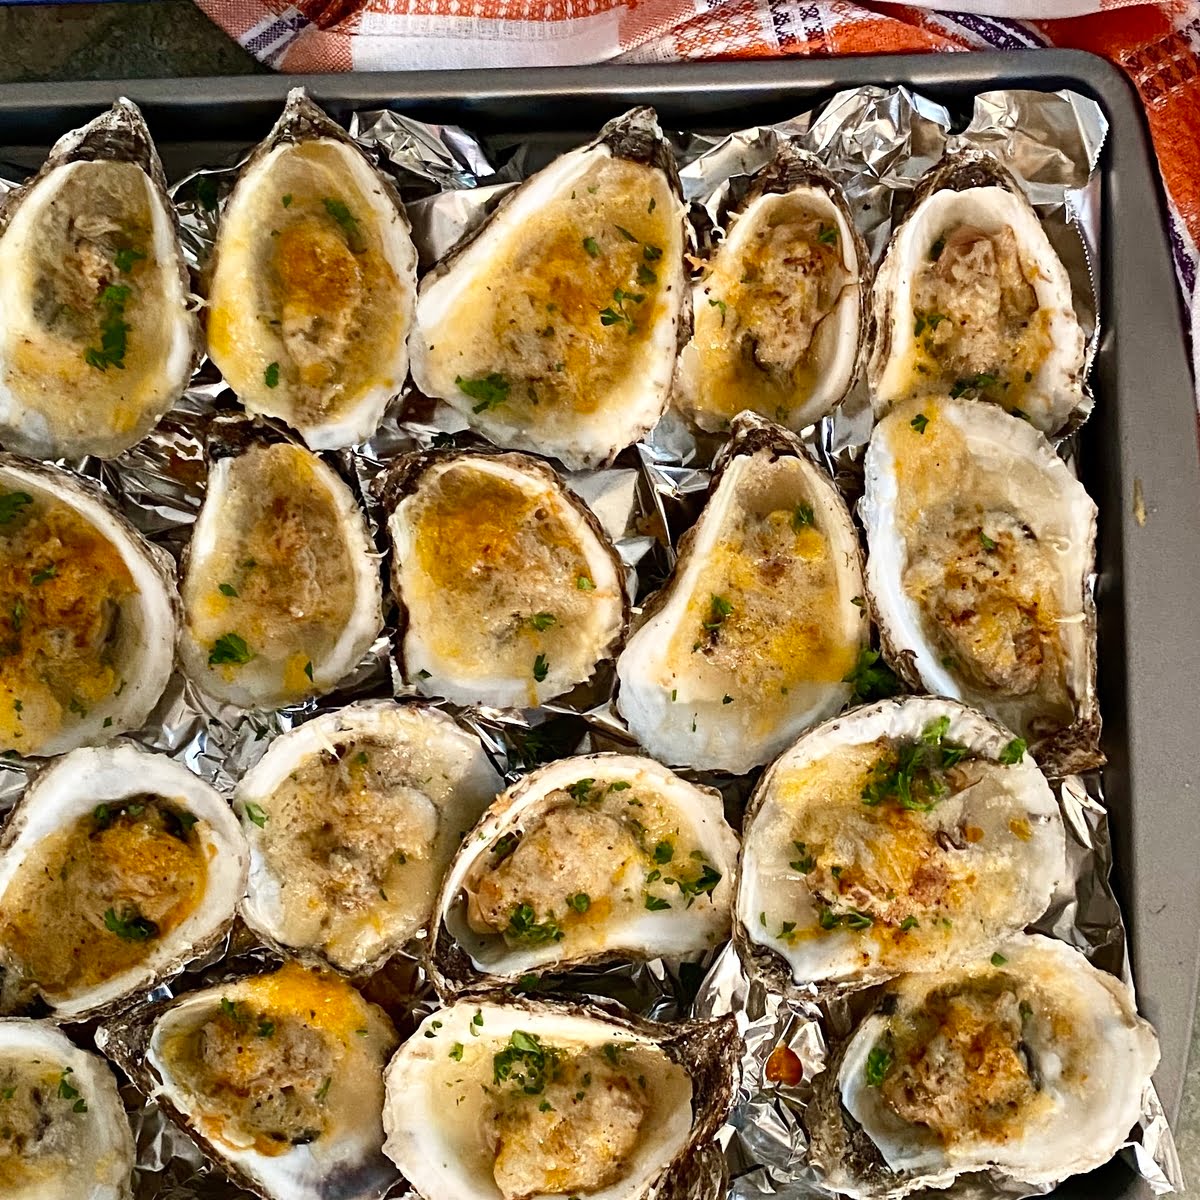
Gently preheat your oven to 375°F (190°C). While the oven is heating, take a baking sheet and line it with aluminum foil or parchment paper for easy cleanup. Arrange the shucked oysters on the prepared baking sheet, making sure they are in a single layer and not touching each other.
Step 2: Prepare the garlic herb butter
In a small bowl, combine the melted butter, minced garlic, chopped parsley, grated Parmesan cheese, salt, and black pepper. Mix well until all the ingredients are evenly incorporated. The garlic herb butter will add a burst of flavor to the oysters as they bake.
Step 3: Generously brush the oysters with the garlic herb butter
Using a pastry brush or a spoon, generously brush each oyster with the prepared garlic herb butter mixture. Make sure to coat each oyster evenly, ensuring that the flavors penetrate the meat. The butter will keep the oysters moist and infuse them with a rich, savory taste.
Step 4: Bake the oysters to perfection
Place the baking sheet with the buttered oysters in the preheated oven. Bake for approximately 10 minutes, or until the oysters are cooked through and the edges start to curl. Keep a close eye on them to avoid overcooking, as oysters can become tough and rubbery when cooked for too long.
Step 5: Serve and enjoy!
Once the oysters are done baking, remove them from the oven and let them rest for a minute or two. Serve the baked oysters hot, accompanied by lemon wedges for an added zing of freshness. These delightful morsels can be enjoyed as an appetizer, a centerpiece for a seafood feast, or even as a light main course.
Step 6: Tips and variations
Baking oysters is a simple process, but here are a few tips to ensure your dish comes out perfectly every time. Firstly, make sure to shuck the oysters properly, removing any bits of shell and preserving the delicious liquor. Secondly, don’t be afraid to get creative with the toppings. You can experiment with different herbs, spices, or even cheese to customize the flavor to your liking. And finally, remember that oysters are best enjoyed fresh, so bake only the amount you intend to consume immediately.
Step 7: Store any leftovers
If, by some miracle, you have leftover baked oysters, store them in an airtight container in the refrigerator. They can be reheated in a preheated oven for a few minutes until warmed through. However, keep in mind that reheated oysters are never as good as freshly baked ones, so it’s best to enjoy them immediately if possible.
There you have it, an easy and foolproof recipe for baked oysters. With just a few simple steps, you can enjoy these delightful treats in the comfort of your own home. So gather your ingredients, preheat your oven, and get ready to indulge in a seafood feast that will wow your taste buds. Bon appétit!
Important Things to Keep in Mind When Making This “How to Bake Oysters Easy” Recipe
Planning to whip up a delicious batch of baked oysters? Look no further! These succulent treats are the epitome of culinary delight. However, before you get started in the kitchen, there are a few important things to keep in mind. From selecting the freshest oysters to mastering the perfect bake, these tips and tricks will ensure an unforgettable dining experience.
First and foremost, it’s essential to choose the freshest oysters available. Opt for live oysters that are tightly closed – a surefire sign of their vitality. Their shells should be clean and free from cracks. If you’re unsure about their freshness, give them a gentle tap – a live oyster will immediately close its shell. Don’t forget to check the “Best Before” date if you’re using pre-shucked oysters. Always aim to use them as soon as possible to preserve their flavor and quality.
When it comes to shucking live oysters, safety is key. Protect your hands by using a sturdy oyster shucking knife or a thick kitchen towel. Hold the oyster firmly with one hand and insert the knife into the hinge, applying gentle pressure until you feel it give. Twist the knife and pop the shell open. Take care to avoid any shell fragments falling into the oyster – you don’t want an unpleasant surprise in your dish! If you’re new to shucking, it’s worth watching a tutorial or seeking guidance from an experienced cook.
Now that you have your fresh oysters ready, it’s time to prepare the perfect bake. Preheat your oven to a high temperature, around 450°F (230°C), ensuring it’s hot enough to create that irresistible golden crust. While some recipes call for breadcrumbs or cheese toppings, a classic and simple butter-and-garlic combo will always bring out the flavors of the oysters. Melted butter mixed with minced garlic, a squeeze of lemon juice, and a pinch of salt and pepper will elevate this dish to new heights of savory perfection.
Once your oysters are coated in this delectable mixture, arrange them on a baking tray lined with rock salt or a bed of coarse sea salt. This helps keep the oysters level and stable, ensuring they retain all their delicious juices while baking. Pop them into the preheated oven for about 10-12 minutes or until the edges start to curl. Remember, overcooking can lead to rubbery oysters, so keep a watchful eye on them! When they’re beautifully golden and sizzling, remove them from the oven and let them cool for a minute before serving.
Baking oysters is an art that requires attention to detail and a love for seafood. By keeping these important tips in mind, you’ll be well on your way to creating a mouthwatering dish that will impress even the most discerning oyster connoisseurs. So, gather your ingredients, don your apron, and get ready to embark on a culinary adventure that celebrates the taste of the ocean. Bon appétit!
Frequently Asked Questions
Looking to learn an easy way to bake oysters? We’ve got you covered! Here are answers to some common questions about baking oysters that will help you make a delicious dish with minimal effort.
1. How long should I bake oysters for?
When baking oysters, it’s important to cook them just enough to ensure they are safe to eat, but not overcook them and make them tough. Generally, oysters should be baked at a high temperature of around 450°F (230°C) for about 10-12 minutes. The exact cooking time may vary depending on the size of the oysters and your preference for doneness. Keep an eye on them and remove them from the oven as soon as the oyster edges start to curl.
Remember, oysters continue to cook even after they are removed from the oven, so it’s better to slightly undercook them and let residual heat finish the job. Overcooked oysters can become rubbery and lose their natural flavor.
2. Should I shuck the oysters before baking?
Yes, it’s recommended to shuck the oysters before baking them. Shucking refers to the process of opening the oysters’ shells to access the meat inside. To shuck an oyster, you’ll need an oyster knife or a short, sturdy knife with a pointed tip. Insert the knife at the hinge of the oyster and gently twist and pry it open. Once it’s open, use the knife to detach the oyster meat from the shell.
By shucking the oysters before baking, you allow the heat to cook the meat evenly and infuse it with any seasoning or toppings you choose to add. It also makes it easier to enjoy the oysters once they are cooked, as they will already be separated from the shell.
3. What are some easy flavoring options for baked oysters?
Baked oysters offer endless opportunities for delicious flavor combinations. Here are a few easy options you can try:
– Classic: Brush the oysters with melted butter, sprinkle them with garlic, lemon juice, salt, and pepper, and top with a sprinkle of Parmesan cheese.
– Asian-inspired: Drizzle the oysters with a mix of soy sauce, sesame oil, minced ginger, and chopped scallions. Garnish with toasted sesame seeds.
– Mediterranean twist: Top the oysters with a mixture of chopped tomatoes, garlic, fresh basil, olive oil, and a sprinkle of feta cheese.
– Bacon lovers: Wrap each oyster with a slice of bacon before baking for a smoky and savory flavor.
Feel free to get creative and experiment with different flavors and ingredients to find your favorite combination!
4. Are there any safety precautions I should take when baking oysters?
Yes, it’s important to follow some safety precautions when baking oysters. Here are a few tips to keep in mind:
– Purchase fresh oysters from a reputable source and make sure they are alive before cooking. Discard any oysters that don’t close when tapped.
– Scrub the oyster shells thoroughly before shucking to remove any dirt or debris.
– Keep the oysters refrigerated until you are ready to cook them.
– After baking, discard any oysters that did not open during the cooking process, as they may not be safe to eat.
By following these precautions, you can ensure that your oysters are safe and delicious.
5. Can I bake oysters without an oven?
Absolutely! If you don’t have access to an oven, you can still enjoy delicious baked oysters. One popular alternative method is using a stovetop grill or a barbecue grill. Preheat the grill to medium-high heat and place the shucked oysters directly on the grates. Cover the grill and cook for about 5-6 minutes, or until the oyster edges start to curl.
Another option is using a broiler in your oven. Place the shucked oysters on a broiler pan or a baking sheet, and set the broiler to high heat. Position the pan about 6 inches away from the broiler and cook for approximately 6-8 minutes, or until the oysters are cooked to your desired doneness.
Both of these methods will give your oysters a delicious smoky flavor, similar to the results achieved with baking in an oven.
:max_bytes(150000):strip_icc()/easy-butter-and-herb-baked-oysters-4049551-hero-01-11bfc0f1661f4045a19d7749aa6b34f2.jpg)