Vectorize Image is the process of converting a raster image into a vector format using software tools to create mathematically plotted lines and shapes. By following specific steps such as opening the image, selecting the desired part, adding a threshold layer, converting the selection into a path, and saving the image as an SVG file, you can successfully vectorize an image.
There are also various free online tools available for vectorizing images, such as Amadine, Vectorizer. AI, Vector Magic, and Online Image Vectorizer. Vectorizing an image allows for scalability and clearer quality, making it suitable for various purposes, including graphic design and printing.
Credit: www.youtube.com
Exploring Vectorizing Images
Explore the art of vectorizing images with ease. Convert raster graphics into scalable vectors effortlessly using software tools like Inkscape or Gravit Designer. Try image vectorization today by following simple steps such as selecting and tracing desired elements. Feel the power of vectorizing images for free.
Vectorizing Vs. Raster Graphics
Vector graphics are composed of paths, whereas raster graphics are made up of pixels. Unlike raster images, vector graphics can be scaled without losing quality. They are crisp and clear at any size, making them ideal for logos, illustrations, and other design elements requiring scalability. On the other hand, raster graphics, such as JPEG or PNG files, can lose quality when enlarged.
What Is Vectorizing An Image
Vectorizing an image involves converting raster (bitmap) images into vector graphics. This process utilizes mathematical formulas to represent shapes and lines. As a result, vector images are resolution-independent and can be scaled to any size without loss of quality. This makes them perfect for various applications, including printing, embroidery, and digital design.
Best Free Vectorizer Tools
When it comes to vectorizing images, several free online tools are available, such as Inkscape, Gravit Designer, SVG-edit, LibreOffice Draw, and Fatpaint. These tools enable users to convert raster images into scalable vector graphics effortlessly.
How To Vectorize An Image
- Open your image in a vector editing software.
- Select the specific part of the image you want to vectorize.
- Add a threshold layer to enhance contrast and define edges.
- Utilize the color range command to select tonal areas.
- Convert the selection into a path using the software’s tools.
- Create a solid color layer to give your vectorized image vibrant colors.
- Save the vector image in SVG format for further use.
Vectorizing an image involves a series of steps, ensuring the preservation of details and the creation of a scalable graphic suitable for various design purposes.
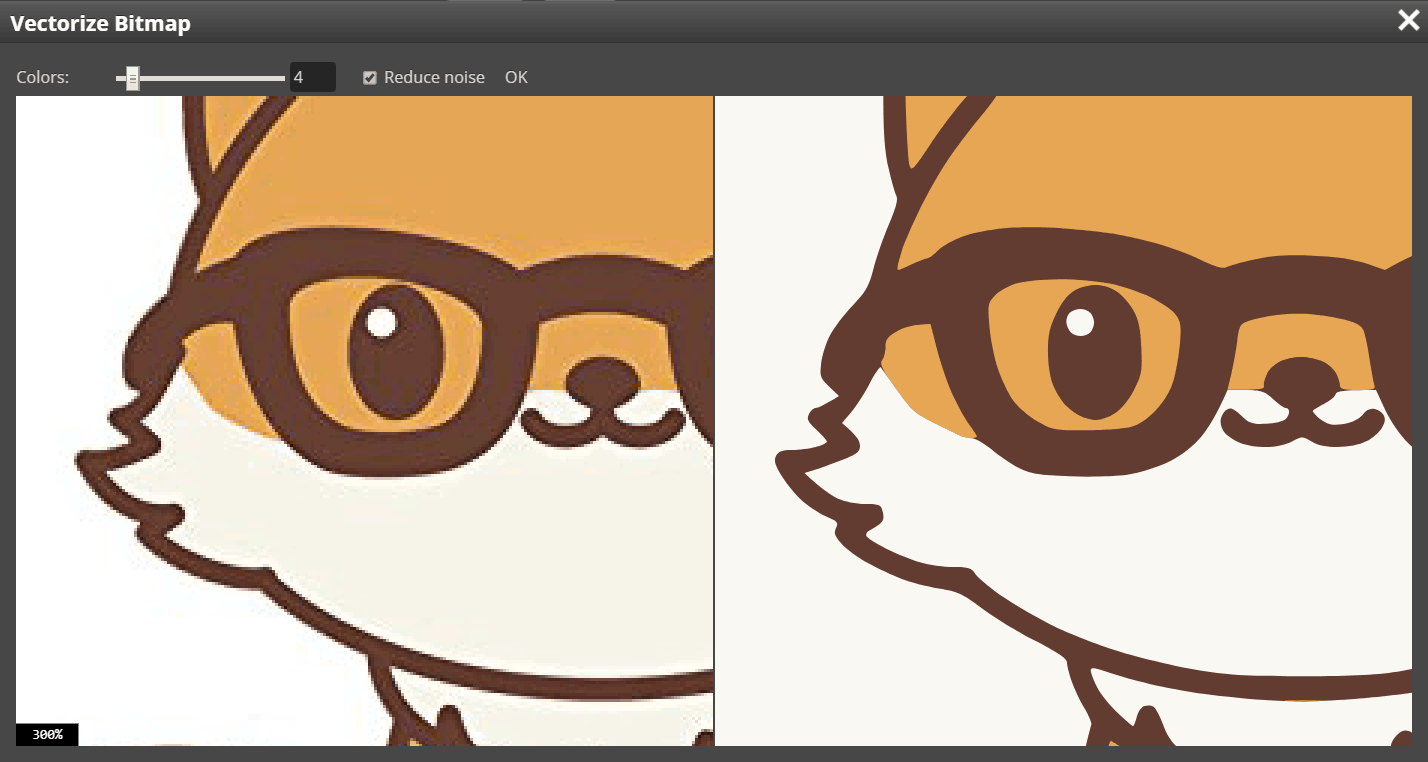
Credit: blog.photopea.com
Methods Of Vectorizing
Vectorizing an image involves converting pixel-based raster images into mathematically plotted lines and shapes. This process allows for scalability and clarity, making it an essential technique for creating high-quality graphics. There are various free online tools available to aid in vectorizing images, such as Vector Magic and Vectorizer.
AI, offering a seamless conversion process.
If you want to convert a raster image into a vector image, there are several methods you can use. Some of the most popular methods include using software tools, an online image vectorizer, and free vectorization tools. Let’s explore each of these methods in more detail:
Using Software Tools
If you prefer to work with desktop software, you can use popular programs like Adobe Illustrator, CorelDRAW, or Inkscape to vectorize your images. These software tools offer a wide range of features and tools specifically designed for vector graphic creation and editing.
With software tools, you have full control over the vectorization process. You can manually trace the image or use automatic tracing algorithms to convert your raster image into editable vector paths. This method gives you the flexibility to fine-tune the vectorization settings and achieve the desired results.
Online Image Vectorizer
An online image vectorizer provides a convenient and accessible way to convert your raster images into vector graphics without the need for any software installation. Websites like Vector Magic and Vectorizer.AI offer intuitive interfaces where you can upload your images and perform vectorization in just a few simple steps.
Online image vectorizers use advanced algorithms and artificial intelligence to analyze your images and convert them into scalable vector formats like SVG, EPS, or AI. These tools also allow you to adjust certain settings, such as the level of detail or smoothness, to ensure the best vectorization results.
Free Vectorization Tools
If you’re looking for free vectorization tools, there are several options available. Programs like Inkscape, Gravit Designer, SVG-edit, LibreOffice Draw, and Fatpaint offer a range of features for vectorization and editing, without the need for a paid subscription.
These free tools often have intuitive interfaces and tutorials to help you get started with vectorization. While they may not have all the advanced features of professional software, they can still produce high-quality vector graphics that are suitable for various purposes.
Whether you choose to use software tools, an online image vectorizer, or free vectorization tools, it’s important to remember that vectorizing an image requires careful attention to detail. Paying attention to the details and adjusting the settings can help you achieve the best results and create stunning vector graphics from your raster images.
Step-by-step Vectorization Process
Easily vectorize images with a step-by-step process: open the image, select the desired areas, add a threshold layer, convert the selection into a path, create a solid color layer, and save the vector image as an SVG file. Transforming raster graphics into vector files has never been simpler.
Vectorizing an image is a technique used in graphic design to convert raster images into scalable and editable vector files. This process is essential for creating high-quality graphics that can be resized without losing clarity. In this section, we will walk you through the step-by-step vectorization process, using Adobe Photoshop.
Opening And Selecting Image
First, open your image in Adobe Photoshop. Click on “File” in the menu bar and choose “Open” to browse and select the image file you want to vectorize. Once the image is opened, use the selection tools, such as the lasso or marquee tool, to select the specific part of the image you want to vectorize. Selecting the right area is crucial to achieve accurate vectorization.
Adding Threshold Layer And Selecting Tonal Areas
To add a threshold layer, go to the menu bar and choose “Layer” > “New Adjustment Layer” > “Threshold”. Adjust the threshold level to convert the selected area into distinct black and white tonal areas. This step helps in separating different shades or colors present in the selected area, making it easier for further processing.
Converting Selection Into A Path
With the tonal areas defined, it’s time to convert the selection into a path. To do this, right-click on the threshold layer and select “Create Clipping Mask”. Then, right-click on the layer with the threshold mask and choose “Rasterize Layer”. Next, go to the menu bar and select “Image” > “Image Trace” > “Make”. This command will convert the selected tonal areas into a vector path.
Creating Solid Color Layer
Now it’s time to add color to the vectorized path. Create a new layer by clicking on “Layer” > “New” > “Layer” in the menu bar. Select a color from the swatches or use the eyedropper tool to pick a color from the original image. With the new layer selected, use the paint bucket tool to fill the vector path with the chosen color. This step adds depth and vibrancy to your vectorized image.
Saving As An Svg File
Finally, it’s time to save the vectorized image as an SVG (Scalable Vector Graphics) file. SVG files are widely used for web and print purposes as they retain their quality regardless of the size. To save as an SVG file, go to the menu bar and select “File” > “Save As” and choose the SVG format from the drop-down menu. Give your file a name and select a location to save it on your computer. Now you have a fully vectorized image ready to be used in various graphic design applications.
Benefits And Applications Of Vectorizing
Vectorizing images offers a plethora of benefits and diverse applications, making it an essential technique for various industries. Let’s delve into the advantages and applications of vectorizing images to understand its significance in design and printing.
Advantages Of Vector Images
Vector images offer remarkable advantages that make them highly desirable in the design and printing industry. They are scalable without loss of quality, ensuring crisp and clear visuals at any size. Additionally, they are editable, enabling effortless modification of shapes, colors, and other elements, thus providing flexibility in design creation.
Applications In Design And Printing
Vectorizing finds extensive applications in design and printing. It is widely used in creating logos, icons, illustrations, and typography as it allows for precise and high-quality output. Moreover, vector images are indispensable for large-format printing, such as banners, billboards, and signage, due to their scalability and superior quality.
Tips And Tricks For Effective Vectorization
When vectorizing images, selecting the appropriate tools is crucial. Ensure to use software like Adobe Illustrator, Inkscape, or VectorMagic for efficient vectorization.
Comprehending various file formats is essential. Learn about SVG, PDF, and JPEG formats to optimize vectorization outcomes.
Preserving image quality during vectorization is paramount. Avoid unnecessary changes that may affect the overall quality of the image.
Credit: www.cre8iveskill.com
Frequently Asked Questions On Vectorize Image
How Do You Vectorize An Image?
To vectorize an image, follow these steps: 1. Open your image. 2. Select the part you want to vectorize. 3. Add a Threshold layer. 4. Use the Color Range Command to select tonal areas. 5. Convert your selection into a path.
6. Create a solid color layer. 7. Save the image as an SVG file.
Can You Vector An Image For Free?
Yes, you can vectorize an image for free using online tools like Inkscape, Gravit Designer, and Vectorizer. AI. Simply upload your image, select the portion to be vectorized, and save the file as SVG.
What Does It Mean To Vectorize A Photo?
Vectorizing a photo means converting it from a pixel-based raster image to a vector image with mathematically defined lines and shapes.
How To Use Vectorizer Ai For Free?
To use vectorizer AI for free, upload your image, let Vectorizer analyze it, then download in preferred format.
Conclusion
Vectorizing an image involves converting raster images into scalable vector graphics, allowing for easier manipulation and size adjustments. Various tools and software like Inkscape, Gravit Designer, and Vectorizer. AI offer free online vectorization services, making it accessible to all. By following simple steps, anyone can achieve impressive results and enhance their visual content.