Screenshot in Excel
To take a screenshot in Excel, you can use the Windows Logo Key + PrtScn button or Fn + Windows logo key + Space Bar. Another option is to use the Snipping Tool with the Windows + Shift + S keyboard shortcut.
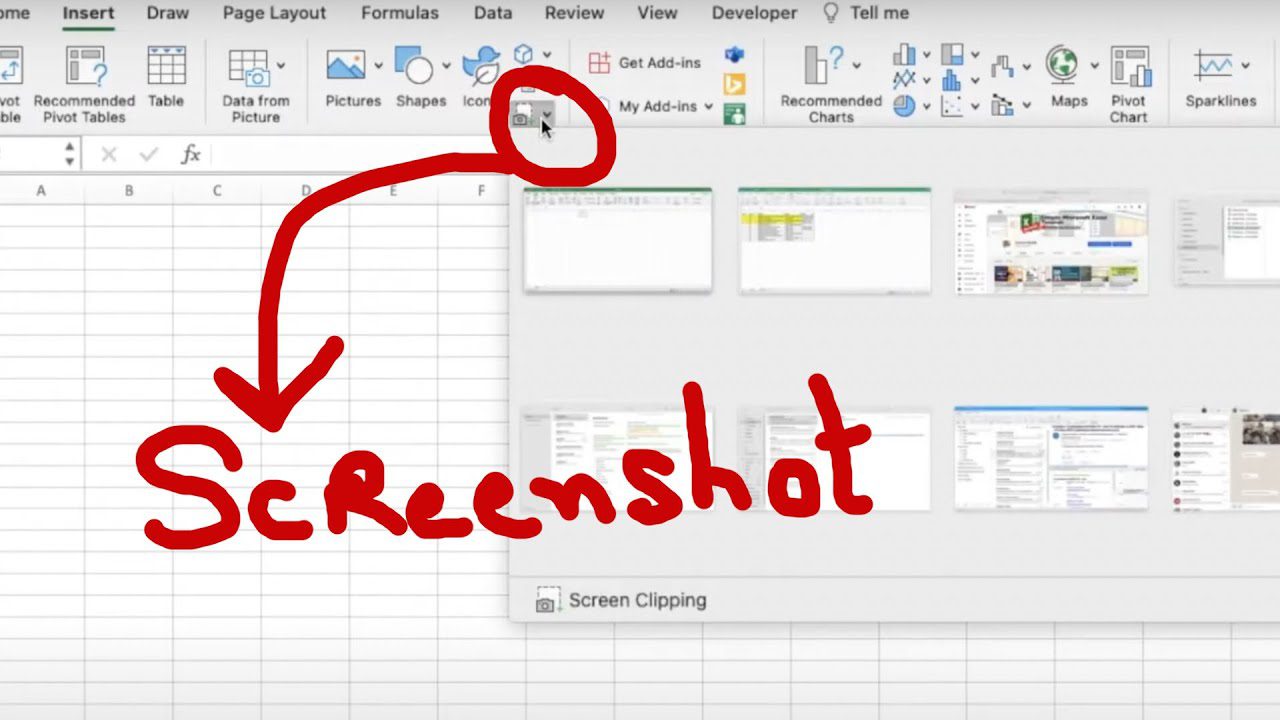
Additionally, you can use the Insert feature in Excel to capture a screen clipping directly. To do this, click on the Insert option and then select the Screenshot button, followed by the Screen Clipping option. These methods allow you to capture and insert screenshots or screen clippings into your Excel spreadsheets easily and quickly.

Credit: makingdatameaningful.com
Shortcuts For Screenshot In Excel
In this section, we will explore the shortcuts for taking screenshots in Excel. Utilizing these shortcuts can enhance the efficiency of your work in Excel, enabling you to capture and insert screenshots seamlessly. Let’s delve into the various shortcut options available for taking screenshots in Excel:
Shortcut Key For Taking A Screenshot
When it comes to taking a screenshot in Excel, you can use the Windows Logo Key + PrtScn button as a convenient shortcut for print screen. Alternatively, if your device lacks the PrtScn button, you may utilize the Fn + Windows logo key + Space Bar combination to capture a screenshot, which can then be printed.
Shortcut For Snipping Tool In Excel
If you prefer using the Snipping Tool for capturing specific areas or shapes in your Excel spreadsheets, you can employ the Windows logo key + Shift + S shortcut. This combination allows you to select the desired area for the screenshot, with the captured image automatically copied to your clipboard for easy insertion into your Excel document.

Credit: business.tutsplus.com
Capturing Screenshots In Excel
Capturing screenshots in Excel is easy with simple shortcuts like Windows Logo Key + PrtScn or Fn + Windows logo key + Space Bar. You can also copy data as a picture or use the Snipping Tool for precise screen clippings.
Enhance your Excel skills today!
Inserting Screenshots
Inserting screenshots in Excel is a convenient way to capture and incorporate visual information directly into your spreadsheets. Whether you want to include a screenshot of a webpage, a specific section of a document, or an image from another application, Excel offers easy and efficient methods to accomplish this.
Inserting A Screenshot Or Screen Clipping
To insert a screenshot or screen clipping in Excel, follow these simple steps:
- Open your Excel spreadsheet and navigate to the location where you want to insert the screenshot.
- On the Ribbon, go to the Insert tab.
- Click on the Screenshot button in the Illustrations group.
- A drop-down menu will appear, displaying available screenshots and screen clippings.
- To insert a screenshot of the entire screen, click on the desired image from the drop-down menu.
- If you want to insert a specific section of the screen, choose Screen Clipping from the drop-down menu.
- Your mouse cursor will change to a crosshair. Click and drag the crosshair to select the desired section of your screen.
- Release the mouse button to insert the selected screen clipping into your spreadsheet.
By following these steps, you can easily add relevant visuals to provide additional context and enhance the presentation of your data in Excel.
Enhancing Excel Sheets With Screenshots
Enhance your Excel sheets by seamlessly incorporating screenshots and screen clippings to visually complement your data. From capturing the entire screen to specific areas, learn the convenient shortcuts and methods to effortlessly integrate visuals into your Excel spreadsheets. Elevate your Excel experience with these simple yet powerful techniques.
How To Make An Excel Sheet A Screenshot
When it comes to enhancing your Excel sheets with screenshots, making an Excel sheet a screenshot can be a useful feature. By doing so, you can conveniently embed screenshots within your spreadsheet, providing visual context and making your data more comprehensible. Let’s explore how to make an Excel sheet a screenshot:
- Open the Excel spreadsheet you want to capture.
- Search for the Snipping Tool or Snip & Sketch utility on Windows. You can either search for them in the Start menu or use the “Windows + S” keyboard shortcut and type their names.
- Once you have the Snipping Tool or Snip & Sketch utility open, select the area of the Excel sheet you want to capture as a screenshot by dragging the cursor around it.
- Release the cursor to capture the selected area as a screenshot.
- The screenshot will be saved to your clipboard automatically. You can then paste it into your Excel sheet using the “Ctrl + V” keyboard shortcut.
How To Screenshot An Excel Spreadsheet
Sometimes, you may need to capture a screenshot of the entire Excel spreadsheet to provide a comprehensive view of your data. Here’s how you can do it:
- Open the Excel spreadsheet you want to capture.
- Press the “Windows Logo Key + PrtScn” button on your keyboard. This shortcut serves as the print screen function on most devices.
- The entire Excel spreadsheet will be captured as a screenshot and saved to your default Screenshots folder.
- To retrieve the screenshot, navigate to the Screenshots folder on your computer and locate the captured image.
- You can then insert the screenshot into your Excel sheet by either copying and pasting it or using the “Insert > Pictures” function.
With these simple steps, you can easily incorporate screenshots into your Excel sheets, allowing for a more dynamic and visually appealing presentation of your data. Screenshots not only enhance the overall appearance of your spreadsheet but also make it easier for others to understand your data by providing visual context.
Useful Tools And Resources For Screenshot In Excel
When it comes to capturing screenshots in Excel, utilizing the right tools and resources can greatly enhance your experience and efficiency. Here are some valuable options for taking and managing screenshots within Excel:
Technology For Teachers And Students
The technology sector continues to evolve, welcoming an array of tools tailored to the needs of teachers and students. Excel screenshots are no exception, with innovative applications that simplify the process and boost productivity.
Microsoft Support
Microsoft’s extensive support system offers an abundance of guidance on capturing and utilizing screenshots in Excel. From basic functionalities to advanced features, their resources can be invaluable for both beginners and experienced users.
Earn & Excel
For those looking to elevate their Excel skills, Earn & Excel provides comprehensive tutorials on leveraging screenshots effectively. Their expert guidance can help users harness the power of visual aids within their spreadsheets.
Makeuseof
MakeUseOf offers a wealth of insights into the best practices for utilizing screenshots in Excel. Their detailed articles and tutorials provide actionable tips for seamlessly integrating visuals into your spreadsheet work.
Automate Excel
Automation is a game-changer in the world of Excel, and this extends to screenshot management. By incorporating automation tools, such as macros and scripts, users can streamline the process of capturing and organizing screenshots within their Excel documents.
Troubleshooting And Additional Tips
When encountering issues with taking, saving, or editing screenshots in Excel, it’s essential to have some troubleshooting steps and extra tips up your sleeve. Here are some solutions to common problems:
What To Do If Prtscn Button Is Not Available On The Device
- If your device lacks the PrtScn button:
- Use Fn + Windows logo key + Space Bar as an alternative.
- This key combination helps in taking screenshots without the PrtScn button.
Saving And Editing Screenshots In Excel
- To save a screenshot:
- Select the content you want to capture.
- Go to the Clipboard group under the Home tab and choose Copy as Picture.
- Follow the on-screen instructions to save the screenshot.
- For editing screenshots:
- Open the screenshot in Excel and make necessary adjustments.
- Ensure to save your edited screenshot for future use.

Credit: earnandexcel.com
Frequently Asked Questions Of Screenshot In Excel
What Is The Shortcut Key To Take A Screenshot In Excel?
The shortcut key to take a screenshot in Excel is Windows Logo Key + PrtScn or Fn + Windows logo key + Space Bar.
How Do You Copy As A Screenshot In Excel?
To copy a screenshot in Excel, select the cells or object you want to copy, go to the Home tab, click the arrow next to Copy in the Clipboard group, and choose Copy as Picture. Then, click OK in the Copy Picture dialog box.
How Do You Make An Excel Sheet A Screenshot?
To take a screenshot in Excel, press the Windows Logo Key + Shift + S. Select the area for your screenshot, and it will be copied to your clipboard. Then paste it into an image editor or document.
What Is The Shortcut For Snipping Tool In Excel?
Press Windows logo key + Shift + S for the Snipping Tool shortcut in Excel. Capture your desired area, and the screenshot will automatically save to your clipboard.
Conclusion
Incorporating screenshots in Excel can significantly enhance your data presentation and documentation. By using the various methods discussed you can efficiently capture, insert, and utilize screenshots to effectively communicate your information. Whether you prefer keyboard shortcuts or utilizing specific tools, Excel provides numerous options for you to elevate your data visualization and reporting abilities.