To replace the belt on a Samsung dryer, follow the manufacturer’s instructions for your specific model. Additionally, you can refer to online tutorials or seek professional help for an effective installation process.
Samsung dryers are reliable machines, and replacing the belt ensures they continue to function optimally. Samsung dryers are popular for their durability and efficiency. Over time, the dryer belt may wear out, leading to issues such as the dryer not spinning or starting.
In this comprehensive guide, we will walk you through the process of installing a new belt on your Samsung dryer. Whether you opt for a DIY approach or seek professional assistance, understanding the installation procedure is vital for maintaining the performance of your appliance. Let’s explore the steps involved in replacing the belt on a Samsung dryer.

Credit: m.youtube.com
Exploring Samsung Dryer Belt Installation
When it comes to maintaining your Samsung dryer’s optimal performance, understanding how to install a new dryer belt is essential. The dryer belt is responsible for rotating the drum, allowing your clothes to dry evenly. In this guide, we will explore the steps involved in replacing a Samsung dryer belt, ensuring your appliance continues to function effectively.
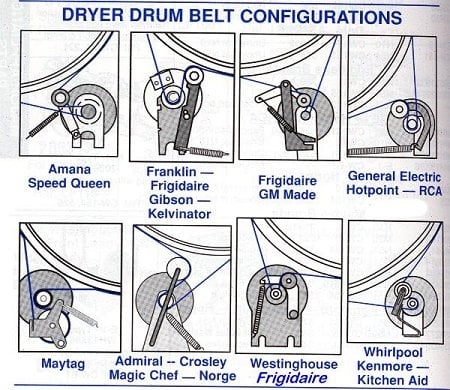
Before you begin replacing the dryer belt, it’s important to familiarize yourself with the Samsung dryer belt diagram. This diagram illustrates the placement and tension of various components, such as the tensioner pulley, idler pulley, drum belt, and drive belt. Having a clear understanding of the diagram will ensure a smooth and successful belt replacement process.
When selecting a replacement dryer belt for your Samsung appliance, it’s crucial to choose the right one. Measure the existing belt’s length and width, ensuring the replacement matches these measurements. Additionally, check the compatibility of the belt with your specific Samsung dryer model. Opting for a high-quality and compatible replacement belt will guarantee optimal performance and longevity.
Now that you’re equipped with the necessary knowledge, let’s dive into the step-by-step process of replacing a Samsung dryer belt:
- Disconnect the dryer from the power source to ensure safety.
- Remove the top panel and control panel to access the internal components.
- Detach the front panel and control panel support bracket to expose the drum and belt.
- Meticulously remove the existing belt, taking note of its path and orientation.
- Place the new belt on the drum, ensuring the grooved side is facing inward to grip the drum effectively.
- Thread the belt through the idler pulley and drive pulley, following the zig-zag pattern illustrated in the diagram.
- Carefully reassemble the front panel, control panel support bracket, and top panel.
- Double-check all connections and make sure the belt is properly aligned.
- Reconnect the power source and test the dryer to ensure it is functioning correctly.
By following these steps diligently, you can easily replace the dryer belt in your Samsung appliance, ensuring it continues to provide efficient drying performance. Remember to consult the manufacturer’s instructions and diagrams for your specific model if you encounter any difficulties during the process.
Understanding The Samsung Dryer Belt Diagram
Key Components Of The Diagram
When it comes to replacing your Samsung dryer belt, understanding the diagram is crucial. The diagram typically includes key components such as the tensioner pulley, idler pulley, dryer drum, and belt tensioner. These components play a critical role in ensuring the proper functioning of the dryer belt.
Importance Of Proper Alignment
Proper alignment is vital when installing the Samsung dryer belt. It ensures that the belt functions efficiently and prevents any unnecessary wear and tear on the components. The diagram provides a visual representation for aligning the belt correctly, promoting smooth operation and longevity of the dryer.
Choosing The Right Dryer Belt Replacement
When it comes to selecting the right dryer belt replacement for your Samsung dryer, it’s crucial to identify the correct belt type and ensure proper installation. Failure to choose the right belt or install it correctly may lead to inefficiencies or even equipment damage. To help you make an informed decision, we’ve outlined essential guidelines for selecting the correct belt type and ensuring its proper installation.
Identifying The Correct Belt Type
Before diving into the replacement process, it’s essential to identify the correct belt type for your Samsung dryer. Different dryer models may require specific belt types based on their design and functionality. This can include considerations such as belt length, width, material, and compatibility with the dryer’s drum and pulley system. Carefully consult your dryer’s manual or look up the specific model details to ensure you procure the appropriate replacement belt. By choosing the correct belt type, you can ensure optimal performance and longevity for your Samsung dryer.
Guidelines For Ensuring Proper Installation
Proper installation of the dryer belt is vital to its functionality and the overall performance of the appliance. To ensure a successful replacement, follow these guidelines:
- Refer to the manufacturer’s instructions or online resources for a step-by-step guide on the replacement process.
- Inspect the dryer’s drum and pulley system for any signs of wear or damage that may necessitate additional repairs.
- Ensure the belt is aligned and positioned correctly on the drum and pulleys, following the recommended installation direction for your specific model.
- Double-check the tension of the belt to prevent slippage or misalignment during operation.
- Tighten all components securely to avoid any potential issues during the dryer’s operation.
By adhering to these guidelines, you can effectively replace and install the dryer belt, promoting efficient performance and optimal functionality for your Samsung dryer.
Credit: thedailyguardian.com
Step-by-step Guide To Replace A Samsung Dryer Belt
If your Samsung dryer is not spinning or starting, it may be time to replace the belt. Luckily, with a few simple steps, you can easily replace the dryer belt and get your appliance working like new again. In this step-by-step guide, we will walk you through the process of replacing a Samsung dryer belt to get your laundry routine back on track.
Tools Required For The Replacement
Before you begin the belt replacement process, gather the necessary tools to ensure a smooth and easy repair. Here are the tools you’ll need:
- Screwdriver
- Putty knife
- Patience!
Disassembly Process Of The Dryer
To access the belt, you’ll need to disassemble the dryer. Follow these steps:
- Remove the top panel: Using a screwdriver, remove the screws securing the top panel and lift it off.
- Remove the control panel: Locate and remove the screws holding the control panel in place. Carefully disconnect any wires connected to the panel.
- Remove the front panel: Look for the screws or clips holding the front panel in place and remove them. Take off the front panel and set it aside.
- Remove the control panel support bracket: Locate the bracket holding the control panel support in place and unscrew it. Remove the bracket and keep it aside.
Removing The Old Belt
Now that you have access to the belt, it’s time to remove the old one. Follow these steps:
- Locate the tensioner pulley: Identify the tensioner pulley, which keeps the belt taut. Use a putty knife to release the tension by pushing the pulley toward the motor.
- Remove the old belt: Once the tension has been released, slip the old belt off the drum and motor pulley. Take note of the belt’s path for easier installation of the new one.
Installing The New Belt
With the old belt removed, it’s time to install the new one. Follow these steps:
- Loop the new belt: Begin by looping the new belt around the drum, making sure the ribbed side is facing inward to grip the drum.
- Attach the belt to the motor pulley: Next, loop the belt around the motor pulley and the tensioner pulley, creating a zig-zag formation.
- Ensure proper tension: Use a putty knife to push the tensioner pulley back into position, creating tension on the belt. The drum should rotate smoothly when rotated by hand.
Reassembling The Dryer
With the new belt in place, it’s time to reassemble the dryer. Follow these steps:
- Reattach the control panel support bracket: Secure the control panel support bracket back in place with screws.
- Put back the front panel: Line up the front panel and carefully reattach it using screws or clips.
- Reinstall the control panel: Connect any wires to the control panel and secure it back in place with screws.
- Replace the top panel: Lower the top panel back onto the dryer and secure it with screws.
With these steps completed, your Samsung dryer should be ready to go. Test it out by running a small load to ensure everything is functioning properly. If you experience any issues or have further questions, consult the manufacturer’s manual or reach out to a professional technician for assistance.
Additional Resources And Troubleshooting
When it comes to installing a Samsung dryer belt, having access to additional resources and troubleshooting tips can be beneficial. If you encounter any issues during the installation process, it’s important to know where to turn for guidance.
Helpful Videos For Visual Guidance
- Understanding the Samsung Dryer Belt Diagram
- How To Replace & Change a Dryer Belt – DIY Repair Clinic
- Dryer Drum Belt – How it Works & Installation Tips
- How to Change a Clothes Dryer Belt: An Easy Repair Guide
Common Issues And Solutions
- Does it matter which way the dryer belt goes on?
- How do you line up a dryer belt?
- Are dryer belts hard to replace?
- How do you put the drum back on a Samsung dryer?
Seeking Professional Help If Needed
If you encounter difficulties or are unsure about any step of the Samsung dryer belt installation, seek professional help to ensure the job is done correctly. Replacing a Samsung dryer belt involves multiple steps that may require technical expertise.

Credit: www.justanswer.com
Frequently Asked Questions On Samsung Dryer Belt Install
Does It Matter Which Way The Dryer Belt Goes On?
For most dryers, the grooved side of the belt should face inward for proper drum grip. Loop the belt in a zig-zag on the idler and drive pulleys. Check out Repair Clinic’s diagrams for your specific model.
How Do You Line Up A Dryer Belt?
To line up a dryer belt, make sure the grooved side of the belt is facing inward to grip the drum. Loop the belt on the idler pulley and drive pulley in a zig-zag formation. Refer to handy diagrams from Repair Clinic.
com for specific dryer models. Replacing a dryer belt is straightforward with the right tools and patience.
Are Dryer Belts Hard To Replace?
Replacing a dryer belt is a straightforward DIY task. With basic tools and patience, it can be done easily.
How Do You Put The Drum Back On A Samsung Dryer?
To put the drum back on a Samsung dryer, follow these steps: 1. Loop the belt on the idler and drive pulley in a zig-zag formation. 2. Slide the new belt around the drum, ensuring the grooved side faces inward.
3. Reassemble the dryer in reverse order.
Conclusion
Replacing the belt on your Samsung dryer is a relatively straightforward process that you can easily tackle yourself. By following the proper steps and using the right tools, you can get your dryer back up and running in no time.
Just remember to consult the diagrams and instructions provided by reputable sources like Repair Clinic and Appliance Parts Pros. With a little patience and effort, you’ll have your Samsung dryer working like new again.