Remove Wrinkles Photoshop
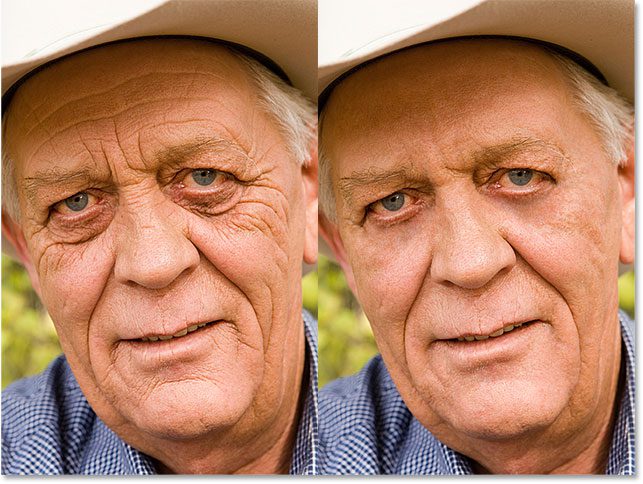
To remove wrinkles in Photoshop, use the Spot Healing Brush Tool to brush over the area. Start with the major wrinkles, painting out the creases from the edge.
Now, let’s delve into the details of how you can remove wrinkles using various tools and techniques in Photoshop. Whether it’s for a natural look or flawlessly ironing clothes, Photoshop offers a range of options for wrinkle removal. With the right tools and a step-by-step approach, you can easily achieve smooth and wrinkle-free results in your photos.
Additionally, we’ll explore how to smoothen cloth backdrops and reduce wrinkles to enhance the overall look of your images. From removing fine creases to smoothing rough skin, you’ll find comprehensive guidance to achieve professional-looking results in Photoshop.

Credit: www.photoshop-bootcamp.com
Exploring Techniques To Remove Wrinkles In Photoshop
Learn the art of removing wrinkles in Photoshop with precision using advanced healing tools. Smooth out imperfections effortlessly for a flawless finish in your images. Master techniques like spot healing and clone stamp to achieve professional-looking results.
Utilizing The Spot Healing Brush Tool
When it comes to removing wrinkles in Photoshop, one of the most effective tools in your arsenal is the Spot Healing Brush tool. This handy tool allows you to seamlessly heal blemishes, wrinkles, and other imperfections in your photos with just a few simple clicks.
The Spot Healing Brush tool works by analyzing the surrounding pixels and blending them together to create a smooth and natural-looking result. To remove wrinkles using this tool, simply select the Spot Healing Brush from your Photoshop toolbar, adjust the brush size to match the size of the wrinkle, and then click and drag over the wrinkle area.
Remember to start with the significant wrinkles and gradually work your way towards smaller creases, ensuring that you paint outwards from the edge. This technique will help you achieve a more natural and seamless result.
Using The Healing Brush Tool
Another powerful tool at your disposal is the Healing Brush tool. This tool works by sampling an area of your image and blending it with the surrounding pixels to remove wrinkles and other imperfections.
To use the Healing Brush tool, first, select the tool from your Photoshop toolbar and then hold down the Alt key (Option key for Mac users) to sample a clear area of your image that is similar in texture and tone to the area you want to retouch. Once you’ve sampled the area, simply click and drag over the wrinkle to remove it.
Remember to sample frequently to ensure that you are blending the wrinkles seamlessly into the surrounding skin. This technique may require a bit more time and precision than the Spot Healing Brush tool, but it’s worth it to achieve a flawless result.
Implementing The Clone Stamp Tool
If you’re looking for more precise control over your wrinkle removal process, the Clone Stamp tool is your go-to option. This tool allows you to manually clone areas of your image and apply them to areas with wrinkles, effectively removing them.
To use the Clone Stamp tool, select it from your Photoshop toolbar and then, while holding the Alt key (Option key for Mac users), click on an area of your image that you want to clone. Then, release the Alt/Option key and click and drag over the wrinkled area, painting in the cloned pixels and effectively smoothing out the wrinkles.
Remember to adjust the brush size and opacity of the Clone Stamp tool to match the areas you’re working on, as this will help you achieve a more seamless result. Take your time and pay attention to detail to ensure that your cloned pixels blend naturally with the surrounding skin.
Spot Healing Brush Tool
Now, let’s focus on the Spot Healing Brush Tool for effectively removing wrinkles in Photoshop. Once you’ve set the brush, zoom in on the wrinkle and brush over the area. Start with the significant wrinkles and make sure to paint out the creases, beginning from the edge.
Process Overview
To effectively use the Spot Healing Brush Tool, follow these steps:
- Set the brush size
- Zoom in on the wrinkle
- Brush over the area
- Start with significant wrinkles
- Paint out the creases from the edge
Painting Wrinkles Effectively
Painting wrinkles effectively in Photoshop with the Spot Healing Brush Tool involves focusing on the following:
- Start with setting the brush size
- Zoom in on the specific wrinkle
- Brush carefully over the area
- Begin with the most prominent wrinkles
- Ensure to paint out the creases from the edge
Healing Brush Tool
Introductory paragraphThe Healing Brush Tool in Photoshop is a powerful and versatile tool for removing wrinkles. This tool allows you to seamlessly blend textures, tones, and color from one area of an image to another, effectively reducing the appearance of wrinkles and fine lines. Whether you’re working on portrait photography or product images, the Healing Brush Tool can help you achieve a smoother, more youthful look with just a few simple steps.
Heading: Copying Background LayerCopying Background Layer
In Photoshop, before using the Healing Brush Tool for wrinkle removal, it’s essential to create a copy of the background layer. This ensures that your original image remains intact, giving you the flexibility to revert to the original if needed. To copy the background layer, simply right-click on the background layer in the Layers panel and select “Duplicate Layer.” This step will create a new layer that you can work on without altering the original image.
Targeted Wrinkle Removal
Now that you have a copy of the background layer, you can use the Healing Brush Tool to target specific wrinkles for removal. Zoom in on the area containing the wrinkles and select the Healing Brush Tool from the Photoshop toolbar. Adjust the brush size and hardness as needed, then carefully brush over the wrinkles, starting from the outer edges and working towards the center. The Healing Brush Tool will sample texture and color from the surrounding area, blending away the wrinkles for a smoother appearance.
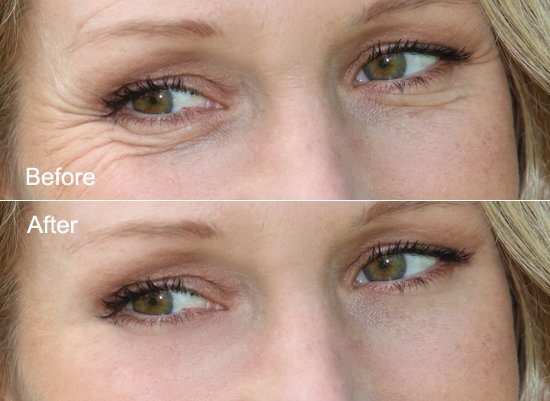
Credit: clippingpathservice.com
Clone Stamp Tool
Easily remove wrinkles in Photoshop using the Clone Stamp Tool. This powerful tool allows you to seamlessly remove wrinkles and achieve a natural look.
The Clone Stamp Tool is a powerful feature in Photoshop that can be used to remove wrinkles and fine lines from digital images. This tool allows you to clone a specific area of the image and replicate it onto another area, effectively covering up the wrinkles and giving the image a more rejuvenated and youthful appearance. Using the Clone Stamp Tool, you can easily remove wrinkles by selecting a source area that has a similar texture and tone to the area with wrinkles. Then, simply brush over the wrinkles, carefully blending the source area with the target area. This technique allows you to effectively eliminate the wrinkles without leaving any visible traces.Lighten Mode Application
One effective way to refine the details in wrinkle reduction using the Clone Stamp Tool is by utilizing the Lighten Mode. This mode allows you to lighten the target area by applying the source area to it, resulting in a smoother and more even skin texture. To apply the Lighten Mode, select the Clone Stamp Tool and set the brush size to match the area you want to retouch. Choose a source area close to the wrinkles but without any visible signs of aging. Then, while holding the Alt key, click on the source area to select it. Release the Alt key and carefully brush over the wrinkle, using short strokes and taking note of the direction of the surrounding skin texture. Repeat the process until the wrinkles are significantly reduced and the skin looks more youthful and smooth.Refining Details In Wrinkle Reduction
Refining details when using the Clone Stamp Tool for wrinkle reduction requires precision and attention to detail. Here are a few tips to help you achieve optimal results:- Zoom in on the image to get a closer view of the wrinkles and fine lines.
- Use a small brush size to ensure accuracy and control.
- Choose a source area that matches the skin tone and texture of the target area.
- Blend the edges of the cloned area with the surrounding skin to avoid a noticeable clone effect.
- Adjust the opacity and flow of the Clone Stamp Tool to achieve a more natural result.
- Regularly compare your progress to the original image to ensure a realistic outcome.
Achieving Natural Look In Adobe Photoshop
Creating a natural look in Adobe Photoshop involves mastering techniques to remove wrinkles while maintaining realism. Achieving flawless skin texture and enhancing authenticity through wrinkle removal are essential elements in creating a natural appearance.
Creating Smooth Skin Texture
- Begin by selecting the Spot Healing Brush Tool.
- Zoom in on the wrinkle area and carefully brush over it.
- Paint out creases from the edges for a seamless finish.
- Focus on significant wrinkles for a more refined result.
Enhancing Realism With Wrinkle Removal
- Use the Healing Brush Tool to reduce wrinkles.
- Choose the Lighten Mode with the Clone Stamp Tool for a natural look.
- Retouch specific areas such as eyebrows to enhance realism.
- Repeat the process for other facial features to maintain consistency.

Credit: m.youtube.com
Frequently Asked Questions On Remove Wrinkles Photoshop
Can You Erase Wrinkles On Photoshop?
Yes, you can remove wrinkles in Photoshop using tools like the Spot Healing Brush and Clone Stamp. These tools help smoothen and retouch unwanted wrinkles from photos.
How Do You Unwrinkle In Photoshop?
To unwrinkle in Photoshop, use the Spot Healing Brush Tool or Clone Stamp Tool to paint over the wrinkles. Adjust the brush size and zoom in for best results. Then, erase the wrinkles by brushing over them, beginning from the edge.
How Can I Remove Wrinkles From A Picture?
To remove wrinkles from a picture in Photoshop, use the Spot Healing Brush Tool and the Healing Brush Tool. Zoom in on the wrinkle, brush over the area, and paint out the creases starting from the edge. Repeat the process for other wrinkles.
Resize the brush to match the width of the wrinkle.
How Do I Get Rid Of Crumpled In Photoshop?
To remove wrinkles in Photoshop, use the Spot Healing Brush Tool. Zoom in on the wrinkle and brush over the area to erase it. Start with major wrinkles, painting out creases from the edges.
Conclusion
To summarize, removing wrinkles in Photoshop is a simple and effective way to enhance the appearance of your photos. By utilizing tools such as the Spot Healing Brush, Healing Brush, and Clone Stamp, you can smooth out wrinkles and achieve a more youthful look.
Whether you’re retouching portraits or editing clothing images, these techniques can make a significant difference. Don’t let wrinkles detract from the beauty of your photos – use Photoshop to remove them easily and naturally.