Quickbooks Online Delete Company
To delete a company in QuickBooks Online, navigate to https://app.qbo.intuit.com/app/purgecompany and follow the prompts to confirm and proceed with the deletion process. Are you thinking of deleting your company in QuickBooks Online?
Whether you’re reorganizing your business or need a fresh start, deleting a company data in QuickBooks Online can be done using the purge feature. This process allows you to permanently remove all financial data associated with the company. We’ll provide step-by-step guidance on how to efficiently delete a company in QuickBooks Online.
By the end, you’ll have a clear understanding of the procedure and be able to execute it seamlessly. Let’s dive into the specifics of deleting a company in QuickBooks Online.
Credit: quickbooks.intuit.com
How To Cancel A Company File
QuickBooks Online offers a simple process to cancel a company file, whether you are looking to cancel your subscription, purge company data, or delete a full subscription. Follow the steps below to efficiently manage your company files in QuickBooks Online.
Cancel Subscription
To cancel your subscription in QuickBooks Online, log in to your account and navigate to the subscription settings. Locate the Cancel Subscription link and follow the on-screen instructions to complete the cancellation process.
Purge Company Data
Purging company data in QuickBooks Online is essential for maintaining a clutter-free workspace. Access the Purge Company Data option in your account settings and carefully review the prompts before proceeding with the data purge.
Cancelling A Full Subscription
If you are considering cancelling a full subscription in QuickBooks Online, visit the subscription management section and select the appropriate option for Cancelling a Full Subscription. Confirm your decision and follow the final steps to complete the cancellation process successfully.
How To Erase Your Quickbooks Online Data
Deleting your company data in QuickBooks Online is a crucial task that requires careful consideration. Whether it’s due to reorganization, starting anew, or any other reason, understanding the steps to erase your data is essential. Here, we will delve into the process of erasing your QuickBooks Online data, including how to cancel your subscription, purge company data, and troubleshooting any related issues.
Cancel Subscription
If you no longer require the services of QuickBooks Online and wish to delete your company data, you also need to cancel your subscription. To do this, follow the steps below:
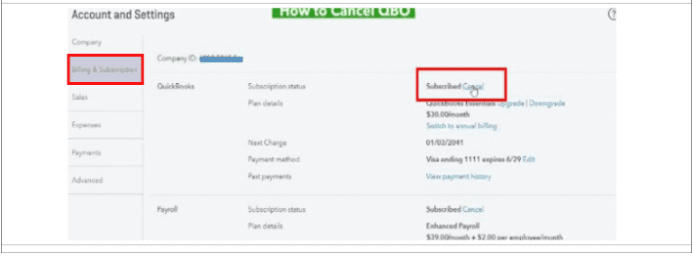
- Sign in to QuickBooks Online as a primary admin.
- Go to Settings ⚙, then select Account and Settings.
- Click on the Billing & Subscription tab, then select Cancel subscription.
- Follow the prompts to confirm the cancellation.
Purge Company Data
Once you have canceled your subscription, the next step is to purge your company data. This is a critical process, ensure to back up any necessary data before proceeding. Here’s how to purge your company data:
- Go to the following web address: https://app.qbo.intuit.com/app/purgecompany.
- Confirm your intent to delete the company data by entering “Yes” and select “OK”.
- Follow the on-screen instructions to complete the process.
Troubleshooting
If you encounter any issues while attempting to erase your QuickBooks Online data, you can troubleshoot the problem by following these steps:
- Sign in to QuickBooks Online and access the support center.
- Detail the issue you are facing and seek assistance from the QuickBooks support team.
- Follow any additional steps or recommendations provided to resolve the problem.
By following these steps, you can successfully erase your QuickBooks Online data and start afresh with a clean slate. Remember to always proceed with caution and ensure that you have a secure backup of any important information before initiating the deletion process.
Purge Company Quickbooks Online
Ready to start over with your QuickBooks Online company? The ability to purge your company data is essential for maintaining accurate records and ensuring a fresh start when needed. In this guide, we’ll walk you through the process of purging your company in QuickBooks Online, ensuring you can confidently initiate this crucial action.
Dashboard
Upon accessing QuickBooks Online, navigate to the dashboard to initiate the process of purging your company data. The dashboard serves as the central hub for accessing the functionalities required for managing your company’s financial records efficiently.
How To Purge Company
- Navigate to the web address: https://app.qbo.intuit.com/app/purgecompany
- Enter “Yes” to confirm your intent to delete the company data.
- Select “OK” to proceed.
Final Thoughts
Purging company data in QuickBooks Online is an essential process for maintaining accurate financial records and facilitating a fresh start when necessary. By following the outlined steps, you can confidently erase your company data and commence a new phase in your financial management journey.
How To Delete An Accounting Firm In Quickbooks Online
How to Delete an Accounting Firm in QuickBooks Online
Sign In To Quickbooks Online
As the primary admin, sign in to QuickBooks Online.
Go To Settings
Click on the settings icon (⚙) in the top right corner of the dashboard.
Select Manage Users
In the settings menu, choose “Manage Users” option.
- Find the Accountants or Accounting firms tab.
- Locate the accountant you wish to remove.
- From the Action column, click on “Delete”.
- Confirm your action by selecting “Delete”.
For a permanent deletion, follow these steps:
- Access your account via a web browser.
- Click on the Gear icon.
- Select Intuit Account.
- Scroll down to the Data privacy section.
- Choose to make a delete request.
This will guide you on how to successfully close out an accounting firm on QuickBooks Online.
How To Permanently Delete Quickbooks Online
To permanently delete a company in QuickBooks Online, sign in to your account and go to the Intuit Account section. Scroll down to the Data privacy section and click on “Make a delete request. ” Follow the prompts to select the account you want to delete and confirm your request.
Deleting a company file in QuickBooks Online is easy and straightforward. If you no longer need a company file and want to start fresh, here’s how to permanently delete it. By following these simple steps, you can rid your QuickBooks Online account of unnecessary data and ensure a clean slate for your financial records.
Sign In To Quickbooks With A Web Browser
First, sign in to your QuickBooks Online account using a web browser. Open your preferred browser and enter the web address quickbooks.intuit.com in the address bar. Then, click on the “Sign In” button and enter your login credentials to access your account.
Click Intuit Account
Once you are signed in, locate the gear icon ( ) in the upper right corner of the page. Click on the gear icon to access the account settings menu. From the dropdown menu, select “Intuit Account” to proceed to the next step.
Request Delete
Scroll down to the “Data privacy” section in the Intuit Account page. Look for the “Delete” area and click on the “Continue” button. This will bring up a prompt asking you to confirm your delete request. Select the specific account you want to delete and click on the “Continue” button again.
Finally, to complete the process, follow the on-screen instructions to confirm the deletion of your company data. Once you have reviewed all the necessary details, click on the “Make a delete request” button to initiate the permanent deletion of your QuickBooks Online company.
Deleting your QuickBooks Online company is a critical decision, so make sure you have a backup of any relevant information before proceeding. Once the deletion process is complete, all data associated with the deleted company will be permanently removed from your QuickBooks Online account.
Remember, this process is irreversible and should only be done if you are absolutely certain that you no longer need the company data. If you have any doubts, it’s always advisable to consult with a professional or seek guidance from QuickBooks support.
By following these steps, you can easily delete your QuickBooks Online company and start anew with a fresh slate. Ensure to have a clear understanding of the implications and backup your data to avoid any potential loss. Keep your financial records organized and streamlined by regularly deleting unnecessary files and data in QuickBooks Online.
Credit: www.conectier.com

Credit: quickbooks.intuit.com
Frequently Asked Questions For Quickbooks Online Delete Company
Can I Delete A Company In Quickbooks And Start Over?
Yes, you can delete a company in QuickBooks and start over. Simply visit https://app. qbo. intuit. com/app/purgecompany, confirm yes to delete, and start fresh.
How Do I Delete An Accounting Firm In Quickbooks Online?
To delete an accounting firm in QuickBooks Online, sign in as a primary admin, go to Settings ⚙, then Manage users. Select the Accountants tab, find the firm, and click Delete. Confirm the deletion to remove the firm. Alternatively, submit a delete request in the Data privacy section.
How Do I Permanently Delete Quickbooks Online?
To permanently delete QuickBooks Online, sign in, click the Gear icon, select Intuit Account, and scroll to Data privacy. Then hit Continue, make a delete request, choose the account, and press Continue.
How Do I Close A Company In Quickbooks?
To close a company in QuickBooks, sign in, go to Settings, select Manage users, and delete the company from the Action column.
Conclusion
If you’re ready to start fresh, deleting your QuickBooks company is a simple process. Follow the steps outlined above to erase your data and begin anew with QuickBooks Online. Don’t hesitate to take control of your financial records for a clean slate.