To import a QBO file into Quickbooks Desktop, first, open the QBO file with Notepad, then set the Bank INTU.BID, Bank ID, and Account ID. Finally, review the transactions and click the ‘Transaction List’ to match the transactions to Vendor Records.
Alternatively, you can switch from QuickBooks Online to QuickBooks Desktop by going to the Gear Icon, selecting Export data under Tools, and choosing the Reports or Lists you want to export. Then, download the company data and follow the prompts to complete the process.
You can also import journal entries for QuickBooks Desktop by going to the File menu, selecting Utilities, then Import, and choosing General Journal Entries. Locate and select the QBJ file you saved, and review the entries in the Add General Journal Entries window. When it comes to managing finance and accounting tasks effectively, Quickbooks Desktop is a reliable and popular software. Whether you are dealing with QBO files, exporting data from QuickBooks Online, or importing entries into QuickBooks Desktop, it is essential to understand the steps involved in each process. This article provides a concise guide on how to import a QBO file into Quickbooks Desktop, switch from QuickBooks Online to QuickBooks Desktop, and import journal entries. Following these steps will enable users to seamlessly transfer data and ensure accurate financial management.
Overview Of Importing Qbo File Into Quickbooks Desktop
Welcome to our guide on importing QBO files into Quickbooks Desktop! In this post, we will provide you with the necessary steps and video tutorials for a seamless integration of QBO files into your Quickbooks Desktop software.
Introduction
Importing QBO files into Quickbooks Desktop can be a straightforward process when you follow the correct procedures. It allows you to streamline your financial data and transactions more efficiently, reducing manual data entry and potential errors.
Below are the precise steps to import a QBO file into your Quickbooks Desktop:
- Backup your Quickbooks company data file.
- Create a local backup to ensure data safety.
- Download or create the QBO file that needs to be imported.
- If the bank or credit card account is connected to online services, disconnect it.
- Select the bank account where the QBO file needs to be imported.
For a more comprehensive understanding of each step, refer to the video tutorials listed below. These tutorials provide visual guidance to facilitate the import process.
Video Tutorials
Below are recommended video tutorials that offer detailed guidance on importing QBO files into Quickbooks Desktop:
- ProperSoft Inc.: “How to import a QBO file into Quickbooks Desktop for Windows”
- The QuickBooks Dude: “Importing Web Connect QBO Files”
- Hector Garcia CPA: “Convert from QuickBooks Online to QuickBooks Desktop”
By following the steps and utilizing the video tutorials, you can efficiently import QBO files into Quickbooks Desktop, enhancing your financial management capabilities and saving time.
Credit: quickbookstoolhub.com
Steps For Importing Qbo File
To import a QBO file into Quickbooks Desktop, begin by backing up your company data file and ensuring bank accounts are disconnected from online services. Open the QBO file with Notepad, set financial institution details, review transactions, and match them to vendor records for success.
Importing a QBO file into QuickBooks Desktop is an efficient way to transfer financial data and streamline your bookkeeping process. To ensure a smooth import, follow these simple steps:
Backup Quickbooks Data
The first and most crucial step before importing a QBO file is to backup your QuickBooks data to avoid any potential data loss or corruption. Follow these steps to create a backup:
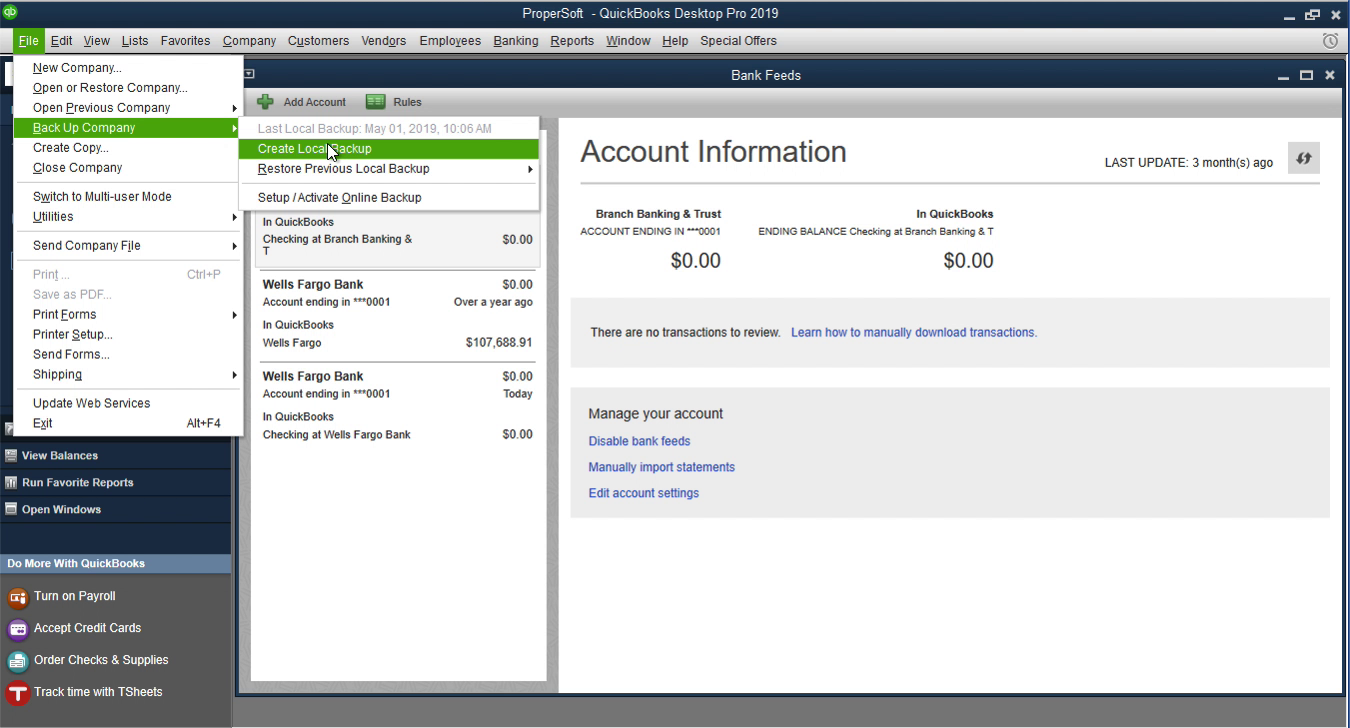
- Open QuickBooks Desktop.
- Go to the “File” menu and select “Back Up Company” and then “Create Local Backup”.
- Choose a location to save the backup file and click “Next”.
- Verify the backup options and click “Save” to start the backup process.
- Once the backup is complete, you can proceed with the QBO file import.
Opening And Setting Up Qbo File
Now that you have your QuickBooks data backed up, follow these steps to open and set up the QBO file:
- Locate the downloaded QBO file on your computer.
- Right-click on the file and choose “Open with” followed by selecting “Notepad” from the options.
- In the Notepad file, locate the line containing the “Bank INTU.BID” and enter the appropriate bank identification number.
- Next, find the line with “Bank ID” and enter the bank identifier for the financial institution associated with the QBO file.
- Similarly, locate the line with “Account ID” and enter the account identifier corresponding to the account you want to import the transactions into.
- Check that expenses are represented as negative numbers and payments to the account are positive.
- Save the changes made in the Notepad file.
Transaction Review And Management
Once you have successfully set up the QBO file, it’s time to review and manage the imported transactions. Follow these steps:
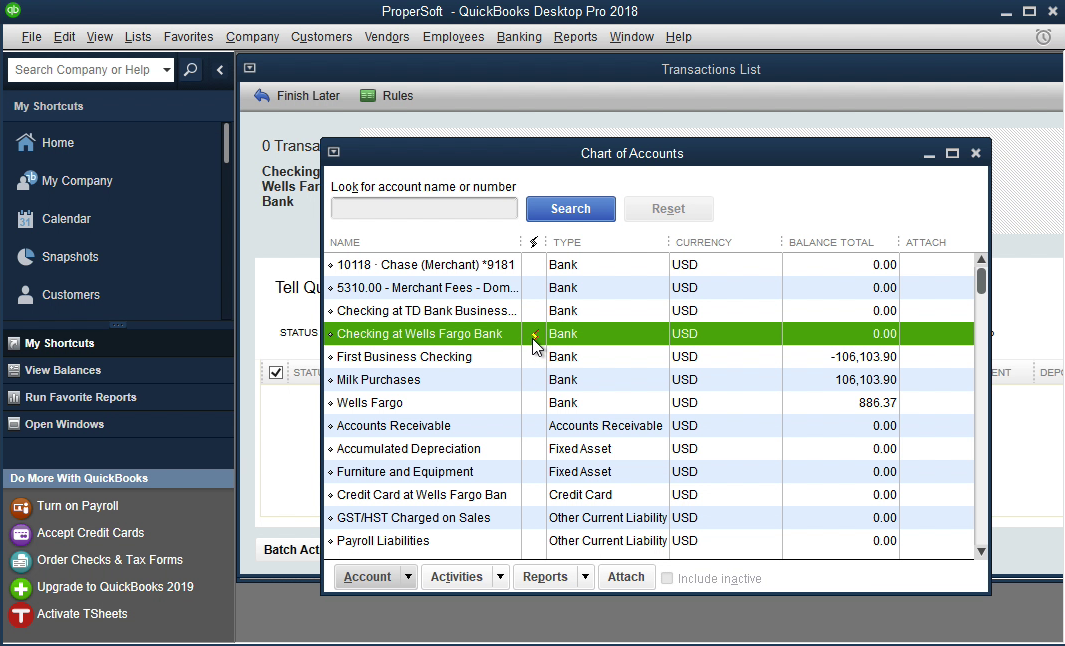
- In QuickBooks Desktop, click on the “Transaction List” option to view all the imported transactions.
- Review the transactions, ensuring the accuracy of the payee’s information and the account associated with each transaction.
- For batch actions such as adding or approving multiple transactions at once, use the “Batch Actions” feature.
- To match the transactions with vendor records, navigate to the “Vendor Center” settings and select the appropriate options.
By following these steps, you can efficiently import a QBO file into QuickBooks Desktop, saving time and ensuring accurate financial data. Remember to always back up your QuickBooks data before proceeding with any import or data manipulation.
Importing Web Connect Qbo Files
To import QBO files into Quickbooks Desktop, start by downloading or creating the QBO file. Open it with Notepad and set the bank INTU. BID, ID, and Account ID. Check that expenses are negative and payments are positive, then select the bank account and review the transactions.
Importing the Web Connect QBO files can be done by following these straightforward steps.
Understanding Qbo Files
Before we delve into the process of importing Web Connect QBO files into Quickbooks Desktop, let’s take a moment to understand what QBO files are. QBO files, short for Quickbooks Online files, are a type of file format used to import financial data into Quickbooks Desktop. These files contain transaction information that can be easily imported and synced with your Quickbooks Desktop software.
Import Process
Now that we have a basic understanding of QBO files, let’s discuss the process of importing these files into Quickbooks Desktop. Here is a step-by-step guide to help you import Web Connect QBO files:
- First, make sure you have the QBO file that you want to import. If you don’t have one, you can download it from your bank or financial institution’s online banking portal.
- To begin the import process, open Quickbooks Desktop and navigate to the Bank Feed Center.
- Within the Bank Feed Center, locate the option to import the QBO file. This is typically found under the “File” or “Import” menu.
- Click on the import option and browse for the QBO file on your computer. Select the file and click “Open” to initiate the import.
- Quickbooks Desktop will now analyze the QBO file and display a preview of the transactions that will be imported. Take a moment to review this preview and ensure that everything looks correct.
- If you are satisfied with the preview, click on the “Import” button to complete the import process. Quickbooks Desktop will now import the transactions from the QBO file into your company file.
- Once the import is complete, you can review and categorize the imported transactions in the Bank Feed Center. This will help ensure that your financial records are accurate and up-to-date.
Bank Feed Center
The Bank Feed Center is a powerful tool within Quickbooks Desktop that allows you to manage and reconcile your bank and credit card transactions. It provides a centralized location where you can view, categorize, and approve incoming transactions from your financial institution.
When importing Web Connect QBO files into Quickbooks Desktop, the Bank Feed Center plays a crucial role in the import process. It provides a user-friendly interface where you can review the imported transactions, make any necessary updates, and ensure that your financial records are accurately reflected in Quickbooks Desktop.
By utilizing the Bank Feed Center, you can streamline the import process and save valuable time when importing QBO files into Quickbooks Desktop. It also allows for easy reconciliation of your financial transactions, giving you a clear and organized view of your company’s financial health.
Credit: www.propersoft.net
Converting From Quickbooks Online To Quickbooks Desktop
When transitioning from QuickBooks Online to QuickBooks Desktop, it’s essential to make sure that all necessary data and reports are successfully transferred. This process involves exporting reports, installing and using specific tools, and understanding differences in inventory management. Here, we will walk you through the steps involved in this conversion process.
Exporting Reports
To begin with, the conversion involves exporting reports from QuickBooks Online. These reports are crucial for maintaining financial records and ensuring the continuity of business operations. You need to carefully select the relevant reports and export them to ensure all financial data is accurately transferred from QuickBooks Online to QuickBooks Desktop.
Tool Installation And Usage
After exporting reports, the next step involves the installation and usage of specific tools designed to facilitate the transition process. These tools play a crucial role in ensuring that the data remains intact and seamlessly integrates into QuickBooks Desktop. It is essential to follow the installation instructions carefully and utilize the tools effectively to guarantee a smooth transition.
Differences In Inventory Management
Another crucial aspect to consider when converting from QuickBooks Online to QuickBooks Desktop is understanding the differences in inventory management between the two platforms. It is important to be aware of these disparities to effectively manage inventory data after the transition. This understanding will help in maintaining accurate records and avoiding any discrepancies related to inventory management.
Transferring Data From Quickbooks Online To Desktop
Learn how to import a QBO file into QuickBooks Desktop easily by following these steps. First, log in to your QuickBooks Online account and go to the Gear Icon. Choose “Export Data” and select the data you want to export.
Then, click on “Learn more” under the “Moving to QuickBooks Desktop? ” Section and download the company data. Finally, follow the prompts to complete the importing process.
Exporting Data
To migrate data from QuickBooks Online to QuickBooks Desktop, follow these essential steps:
- Log in to the QuickBooks Online account of your client.
- Access the Gear Icon and select Export Data.
- Provide a reason for exporting the data and proceed by clicking Continue.
- For Moving to QuickBooks Desktop, choose Learn more.
- Select Learn more under Download company data.
Conversion Process
Converting data involves a streamlined process to ensure data integrity:
- Export reports from QuickBooks Online for reference.
- Install the necessary conversion tool for the transfer.
- Enter your details and acquire the QBXML file.
- Save the file to a secure location for later retrieval.
- Run the reports to confirm data accuracy post conversion.
Steps For The Transition
Follow these steps meticulously to execute a successful data transition:
- Access the Gear Icon in QuickBooks Online.
- Export the data by selecting Export Data.
- State the reason for the export and proceed by clicking Continue.
- For transferring to QuickBooks Desktop, choose the appropriate option.
- Download the company data securely.
Credit: www.propersoft.net
Frequently Asked Questions On Import Qbo File Into Quickbooks Desktop
How To Transfer File From Quickbooks Online To Quickbooks Desktop?
To transfer a file from QuickBooks Online to QuickBooks Desktop, follow these steps: 1. Log in to your QuickBooks Online account. 2. Click on the Gear Icon. 3. Choose Export Data. 4. Enter the reason for exporting the data and click Continue.
5. Select Learn more under Moving to QuickBooks Desktop? 6. Choose Learn more under Download company data. 7. Follow the instructions to download the data. 8. Import the downloaded data into QuickBooks Desktop using the Import function.
How Do I Import Data From Quickbooks Online To My Desktop?
To import data from QuickBooks Online to your desktop: 1. Log in to QuickBooks Online. 2. Go to the Gear Icon and select Export Data. 3. Enter the reason for exporting and click Continue. 4. Choose Learn more under Moving to QuickBooks Desktop.
5. Follow the instructions to download company data.
How Do I Import Entries Into Quickbooks Desktop?
To import entries into QuickBooks Desktop, go to File > Utilities > Import. Select General Journal Entries, then choose the saved QBJ file with the entries. Review and import the journal entries provided by your accountant.
How Do I Import A Coa File Into Quickbooks Desktop?
To import a COA file into QuickBooks Desktop, go to File menu, select Utilities then Import. Choose Chart of Accounts, select the file, and click Import.
Conclusion
Importing a QBO file into QuickBooks Desktop offers a seamless way to manage your financial data. By following the detailed steps and video tutorials, you can efficiently handle your bank transactions and maintain accurate records. Ensure to verify the accuracy of the imported data to ensure smooth operations.
With these tips, you can easily streamline your financial processes with QuickBooks Desktop.