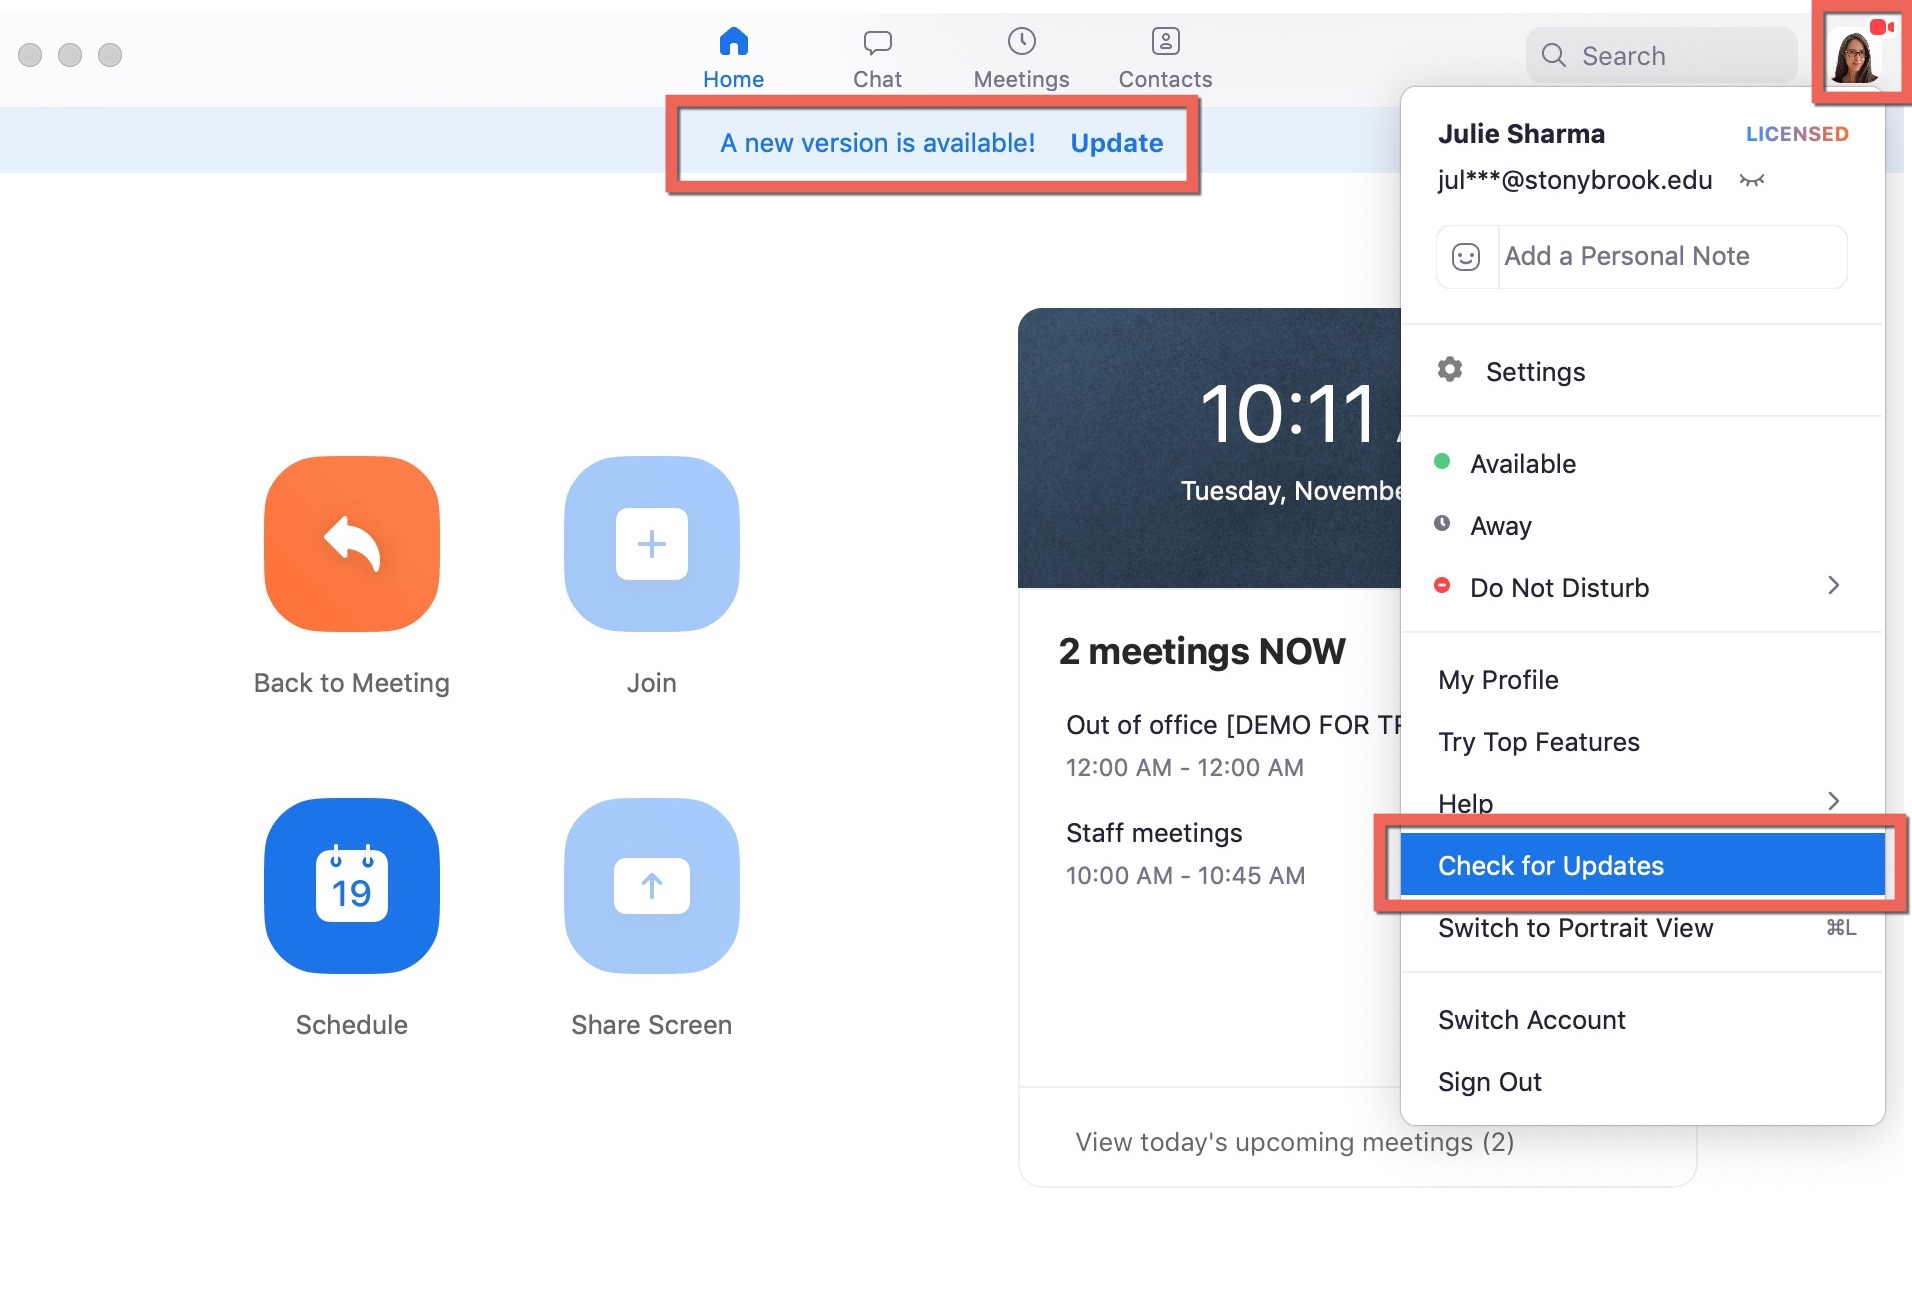
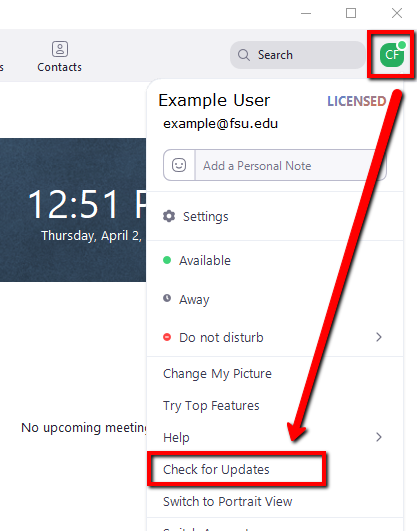
To update Zoom, select your profile icon in the Zoom app and select “Check for Updates.” If there is a newer version available, it will automatically download.
In today’s digital age, staying up-to-date with the latest software versions is essential for optimal performance and security. This includes popular video conferencing platform Zoom. Updating Zoom is a simple process that can be done within the app itself. By following a few easy steps, users can ensure they have the most recent version of Zoom installed on their device.
We will guide you through the process of updating Zoom, so you can continue to enjoy seamless video meetings and conferences without any glitches or security vulnerabilities. Let’s get started and keep your Zoom app up to date.
Credit: it.stonybrook.edu
Importance Of Updating Zoom
Zoom, being a powerful tool for virtual meetings, has rapidly evolved with various updates and advancements. Keeping the Zoom application updated is crucial to ensure user security, stability, and access to the latest features.
Benefits Of Keeping Zoom Updated
When it comes to the advantages of updating Zoom, there are several compelling reasons to prioritize the latest version:
- Enhanced Security: Updating Zoom guarantees protection against potential vulnerabilities and cyber threats, thereby safeguarding sensitive information.
- Improved Performance: Each update often includes optimizations and bug fixes that contribute to a smoother and more reliable user experience.
- Feature Access: Staying updated ensures access to the latest functionalities, ensuring that users can leverage the full capabilities of the platform.
- Compatibility: Keeping Zoom up to date ensures compatibility with various devices and operating systems, facilitating seamless communication and collaboration.
- Compliance: Regular updates help in adhering to industry regulations and standards, particularly vital for businesses and organizations.
How To Check For Updates In Zoom App
Checking for updates in the Zoom app is essential to ensure you have the latest features, improvements, and bug fixes. Fortunately, the process is quick and straightforward. Here’s how you can do it:
Accessing Profile Icon
To begin, open the Zoom app on your device. Once the app is launched, look for the profile icon located on the top-right corner of the screen. It’s represented by a small silhouette of a person.
Selecting ‘check For Updates’
Click on the profile icon, and a drop-down menu will appear. From the options available in the drop-down menu, select ‘Check for Updates.’
If there is a newer version available, the Zoom app will automatically start the download process. You can sit back and let it do its job.
If, however, you are already on the latest version, a notification will appear, informing you that no updates are available at the moment. In that case, you can continue using your Zoom app knowing that you’re up to date.
Updating your Zoom app regularly is crucial to take advantage of the latest enhancements and security patches. By keeping your Zoom app up to date, you ensure a seamless and secure video conferencing experience.
If you encounter any difficulties during the update process, make sure to check your internet connection and try again. In some cases, restarting your device may also help resolve any update-related issues.
Now that you know how to check for updates in Zoom app, you can stay ahead with the latest features and enjoy a seamless video conferencing experience.
Enabling Automatic Updates In Zoom
To enable automatic updates in Zoom, go to Settings, click on General, and select “Automatically keep my Zoom up to date. ” This ensures you are always on the latest version without manual checks. Keep your Zoom client current effortlessly with this feature.
Turning On Auto Updates In Settings
To ensure that your Zoom app stays up to date with the latest features and security patches, you can enable automatic updates in the settings. By turning on this feature, you won’t have to manually check for updates and can focus on your Zoom meetings without any interruptions. To turn on auto updates in Zoom, follow these simple steps: 1. Open the Zoom app on your device. 2. Click on your profile icon in the top-right corner of the screen.3. In the menu that appears, select “Settings” from the options. This will take you to the Zoom settings page.
4. Under the “General” tab, scroll down and look for the “Auto-update” section. 5. Next to the “Automatically keep my Zoom up to date”, check the checkbox to enable the setting.

By following these steps, you have successfully turned on auto updates in Zoom. Now, whenever a new version of Zoom is released, you will be prompted to update the app. This ensures that you can enjoy the latest features and enhanced security measures that Zoom has to offer. Remember, if you are in the middle of a meeting, the update prompt will appear immediately after the meeting ends. So you don’t have to worry about interruptions during your important Zoom sessions. Updating Zoom regularly is crucial to ensure a smooth and secure video conferencing experience. By enabling auto updates in Zoom settings, you can stay up to date effortlessly, without the hassle of manually checking for updates.

Prompt For Updates
In addition to enabling auto updates in settings, you also have the option to manually prompt for updates in Zoom. This feature can be useful if you want to ensure that you have the latest version of Zoom installed, without waiting for the auto update prompt. To prompt for updates in Zoom, follow these steps: 1. Open the Zoom app on your device. 2. Click on your profile icon in the top-right corner of the screen. 3. From the dropdown menu, select “Check for Updates”.4. If a newer version of Zoom is available, it will start downloading automatically. Follow the on-screen prompts to complete the installation process. Prompting for updates manually is a convenient way to stay updated on the latest features and security enhancements that Zoom provides. This ensures that you can take full advantage of the functionalities offered by Zoom and have a reliable and secure virtual meeting experience. Remember, whether you choose to enable auto updates or prompt for updates manually, it is important to regularly update your Zoom app. By keeping up with the latest releases, you can enjoy the best performance and the most up-to-date security measures that Zoom has to offer.

Credit: support.canvas.fsu.edu
Checking The Current Version Of Zoom Client
To ensure that you are using the most up-to-date version of Zoom and have access to the latest features and security fixes, it’s essential to check the current version of the Zoom client on your device. This can be done easily within the Zoom app.
Viewing Client Options
When you open the Zoom app on your device, you can access the client options by clicking on your profile icon located on the top-right corner of the screen. This will open a dropdown menu with various choices for customizing and managing your Zoom account.
Locating Zoom Version Number
Within the client options, you can find the Zoom version number by selecting the ‘Help’ option, and then choosing ‘About Zoom.’ This will display the currently installed version of the Zoom desktop client, allowing you to verify if it is the latest version available.
Updating Zoom Client
When updating your Zoom client, follow these simple steps to ensure you have the latest version for a seamless video conferencing experience.
Using Profile Drop-down Menu
Open the profile drop-down menu located at the top-right corner next to the Search bar.
Following On-screen Prompts For Installation
If an update is available, Check for Updates and proceed by following all on-screen prompts to start the installation.

Credit: cusps.zendesk.com
Frequently Asked Questions Of How To Update Zoom
How Do I Update My Zoom To The Latest Version?
To update Zoom, click on your profile icon, then select ‘Check for Updates’ within the Zoom app. If a newer version is available, it will download automatically. You can also turn on automatic updates in the settings for future updates.
To check the current version, click on your profile picture, then select ‘Help’ and ‘About Zoom’.
Does Zoom Update Automatically?
Yes, Zoom updates automatically. Simply turn on auto updates in Settings to ensure that your Zoom app stays up to date.
How Do I Check The Version Of Zoom?
To check the version of Zoom, open the Zoom app and click on your profile icon. Then, click on Help and select About Zoom. You will see the currently installed version of the Zoom desktop client.
How Do I Update My Zoom Client Without Signing In?
To update Zoom client without signing in, go to your profile icon, select “Check for Updates,” and download the newer version.
Conclusion
Staying updated with the latest version of Zoom is crucial for ensuring a seamless and secure video conferencing experience. By following the simple steps outlined, users can easily check for and install any available updates. Keeping the Zoom app up to date not only enhances its functionality but also helps in addressing any potential security vulnerabilities.