Are you tired of your plain, light-colored wooden furniture? Do you long for a rich, dark finish that exudes elegance and sophistication? If so, you’re in luck! In this guide, we will delve into the art of staining wood darker, transforming your furniture and decor into stunning pieces that will be the envy of all. Whether you’re a seasoned DIY enthusiast or a beginner looking to embark on your first staining project, this comprehensive tutorial will provide you with the essential knowledge and techniques needed to achieve a deep, lustrous finish that will stand the test of time.
Staining wood darker is not only a great way to revive tired pieces of furniture, but it also allows you to express your personal style and enhance the overall aesthetic appeal of your living space. From classic mahogany to contemporary ebony, the possibilities are endless when it comes to selecting the perfect shade to complement your decor. However, achieving a flawless, professional-looking result requires more than just slapping on a coat of stain. In this guide, we will explore the step-by-step process of preparing your wood, selecting the right stain, applying it evenly, and finishing with a protective topcoat. So, roll up your sleeves, grab your brushes, and let’s dive into the fascinating world of wood staining to create a darker, more alluring finish that will leave everyone in awe.
How to stain wood darker: Follow these steps to achieve a darker wood stain:
- Prepare the wood surface by sanding it.
- Clean the wood to remove any dust or debris.
- Apply a wood conditioner to ensure an even stain absorption.
- Choose a darker wood stain color and test it on a small area.
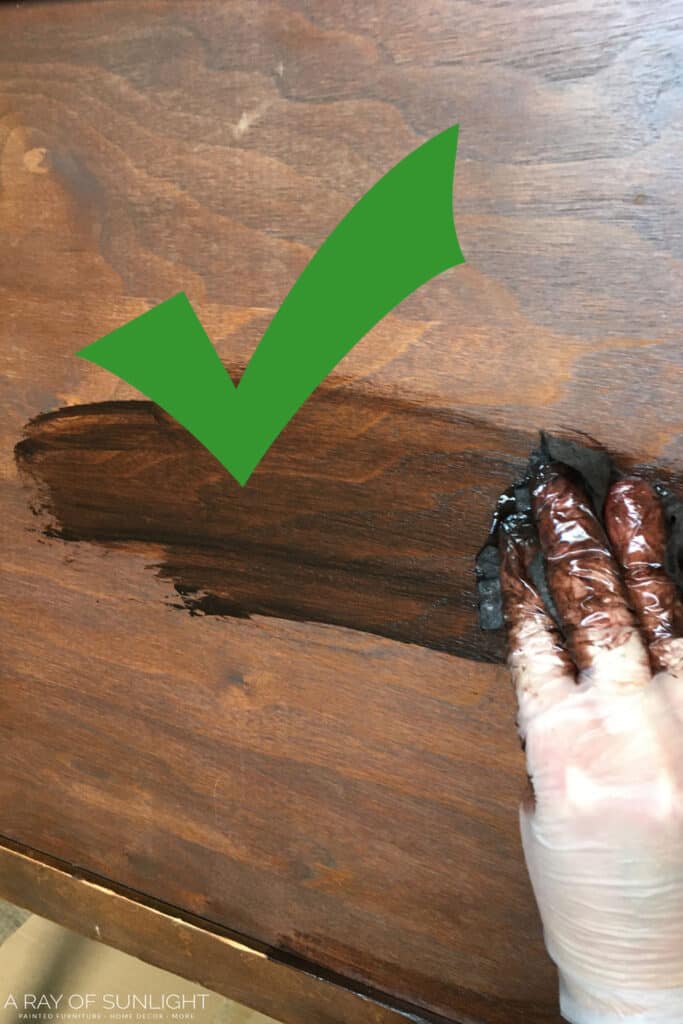
- Apply the stain with a brush or cloth, following the wood grain.
- Allow the stain to penetrate for the recommended time.
- Wipe off excess stain with a clean cloth.
- Apply additional coats if a darker shade is desired.
- Finish with a protective top coat once the stain is dry.
How to Stain Wood Darker
Staining wood is a great way to enhance its natural beauty and add depth to your woodworking projects. If you’re looking to achieve a darker shade, follow these step-by-step instructions to ensure a professional and long-lasting finish.
1. Prepare the Wood Surface
Before you begin staining, it’s crucial to prepare the wood surface properly. Start by sanding the wood with progressively finer grit sandpaper to remove any roughness or imperfections. This will also help the stain penetrate more evenly. Once sanded, use a tack cloth or a soft brush to remove any dust or debris.
Next, apply a wood conditioner to the surface. This will help prevent blotching and ensure an even color absorption. Follow the manufacturer’s instructions for application and drying time. Once the wood is conditioned, it’s ready for staining.
2. Choose the Right Stain
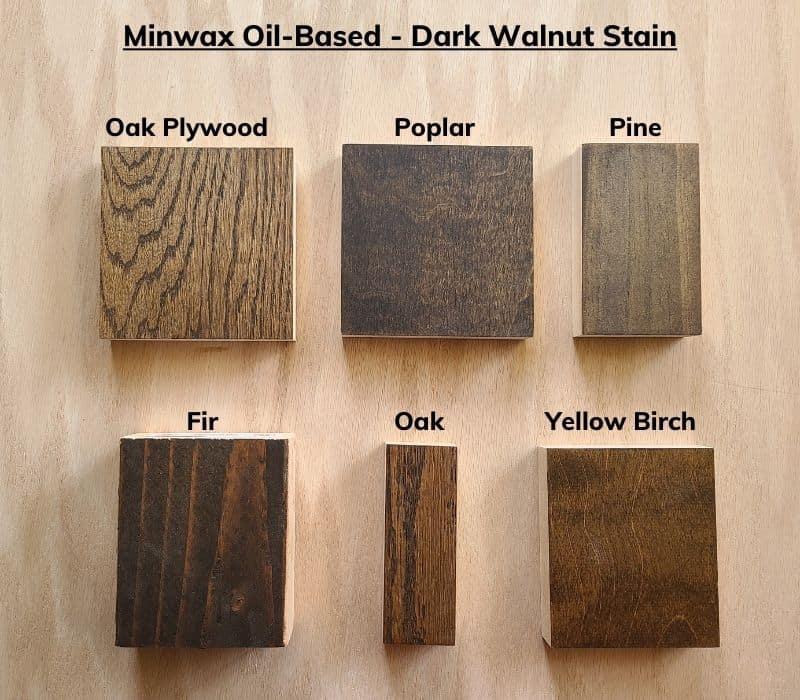
Choosing the right stain is essential for achieving the desired darker shade. There are various types of wood stains available, including oil-based, water-based, and gel stains. Consider the type of wood you’re working with and the final look you want to achieve.
Test the stain on a small inconspicuous area or a scrap piece of wood to see how it will darken the wood. Adjust the number of coats or the application time to achieve the desired darkness. Remember to stir the stain thoroughly before applying to ensure an even color throughout.
3. Apply the Stain
Using a clean brush or a lint-free cloth, apply the stain in the direction of the wood grain. Start with a thin, even coat and let it penetrate the wood for the recommended time. Wipe off any excess stain with a clean cloth or brush after the specified time. Allow the first coat to dry completely before applying additional coats for a darker shade.
For a more intense color, apply multiple thin coats, rather than one thick coat. This will prevent the stain from pooling or creating uneven patches. Be sure to follow the manufacturer’s instructions for drying time between coats.
4. Seal the Stained Wood
Once you’ve achieved the desired darkness, it’s essential to protect and seal the stained wood. Apply a clear protective finish, such as polyurethane or varnish, to enhance the color and provide durability. Use a clean brush or a cloth to apply the finish in thin, even coats, following the manufacturer’s instructions. Allow each coat to dry completely before applying the next.
Sand lightly between coats with a fine grit sandpaper to ensure a smooth finish. Apply as many coats as necessary to achieve the desired level of protection and sheen. Once the final coat is dry, your stained wood will be darker and ready to use in your woodworking project.
5. Maintain and Enjoy
Proper maintenance is crucial to preserve the beauty and longevity of your stained wood. Avoid exposing it to excessive moisture or direct sunlight, as these can cause fading or damage. Regularly clean the surface with a mild wood cleaner and a soft cloth to remove dust and dirt.
If the finish starts to show signs of wear over time, lightly sand the surface and apply a fresh coat of protective finish. This will restore the color and protect the wood for years to come. With proper care, your stained wood will continue to impress with its rich and darker tone.
Frequently Asked Questions
Here are some frequently asked questions about how to stain wood darker:
Question 1: What is the best type of stain to use for darkening wood?
When it comes to darkening wood, the best type of stain to use is an oil-based stain. Oil-based stains penetrate deep into the wood fibers, providing a rich and long-lasting color. They also enhance the natural beauty of the wood by highlighting its grain patterns. It is recommended to choose a stain color that is darker than the desired final shade, as the stain will appear lighter once applied to the wood.
Before applying the stain, ensure that the wood is clean, dry, and free from any previous finishes. Use a brush or a lint-free cloth to apply the stain evenly, following the wood grain. Allow the stain to penetrate the wood for the recommended amount of time, usually specified on the product label. Finally, wipe off any excess stain with a clean cloth and let the wood dry completely.
Question 2: Can I stain wood darker without sanding?
While sanding is typically recommended before staining wood, it is possible to darken the wood without sanding, depending on the condition of the surface. If the wood is already smooth and free from any previous finishes or coatings, you can proceed with staining without sanding. However, keep in mind that sanding helps to remove any existing layers and allows the stain to penetrate more evenly.
If you decide to skip sanding, thoroughly clean the wood surface to remove any dirt or debris. Apply the stain following the manufacturer’s instructions, making sure to work it into the wood grain. Keep in mind that the final result may vary, and without sanding, the stain may not penetrate as deeply or evenly as desired.
Question 3: How many coats of stain should I apply to achieve a darker color?
The number of coats of stain you should apply to achieve a darker color depends on the desired shade and the type of wood you are working with. In most cases, applying multiple thin coats of stain will result in a deeper and richer color. It is recommended to start with one coat and assess the color before deciding if additional coats are necessary.
When applying multiple coats, allow each coat to fully dry before applying the next. This ensures that the stain has enough time to penetrate and develop its color. It is important to follow the manufacturer’s recommendations for drying times between coats, as they can vary depending on the specific stain product.
Question 4: Can I mix different stain colors to achieve a darker shade?
Yes, you can mix different stain colors to achieve a darker shade. This technique allows you to customize the color to your liking and create unique tones. To mix stains, start by testing small amounts of each color on a piece of scrap wood until you achieve the desired shade.
Once you have determined the ratio of each stain color, mix them together thoroughly. It is recommended to mix enough stain to complete the entire project to ensure consistency in color. Apply the mixed stain using a brush or cloth, following the same application techniques as with a single-color stain.
Question 5: How can I ensure an even and consistent stain color on wood?
To ensure an even and consistent stain color on wood, it is important to prepare the surface properly before applying the stain. Start by sanding the wood to remove any imperfections, such as scratches or uneven areas. This helps to create a smooth and uniform surface for the stain to adhere to.
Additionally, always test the stain on a small, inconspicuous area of the wood before applying it to the entire surface. This allows you to see how the stain will interact with the wood and adjust the application technique if needed. When applying the stain, work in small sections at a time and follow the wood grain to achieve an even distribution. Wipe off any excess stain to prevent uneven drying and blotchy results.
Additionally, staining wood darker not only adds visual appeal but also provides protection against wear and tear. The stain penetrates the wood, creating a barrier that helps to prevent moisture damage, warping, and fading caused by sunlight exposure. By investing time and effort into mastering this skill, you can ensure that your wooden furniture and surfaces maintain their beauty and integrity for a long time.
In conclusion, whether you are a DIY enthusiast or a professional woodworker, learning how to stain wood darker is a worthwhile endeavor that can elevate your craftsmanship to new heights. So go ahead, gather your tools, and embark on this rewarding journey of transforming ordinary wood into extraordinary pieces that will stand the test of time.