Creating a screened-in porch is an excellent way to enhance your outdoor living experience. Not only does it provide a comfortable space to relax, but it also protects you from pests and harsh weather, making it an ideal choice for a covered porch. This DIY guide will walk you through the entire process of how to screen in a Porch, from understanding the benefits to choosing the right materials and ensuring compliance with local codes, so you’re ready to start. Whether you’re a seasoned DIY enthusiast or a beginner, this guide will equip you with all the knowledge you need to transform your existing porch into a beautiful screened-in oasis.
What Are the Benefits of Screening a Porch?

Why Choose a Screened-In Porch Over an Open Porch?
Screening in a porch offers numerous advantages over an open porch. One of the primary benefits is protection from insects. A screened-in porch allows you to enjoy the outdoors without the annoyance of mosquitoes, flies, and other pests. Moreover, a screened-in space can extend your living area, providing an additional room that’s usable throughout the year, perfect for a porch or patio. Additionally, a screened porch helps shield your furniture from UV rays and rain, reducing wear and tear and prolonging the life of your outdoor decor.
How Does a Screen Porch Enhance Outdoor Living?
A screened porch enhances outdoor living by creating a comfortable environment that merges the indoors with the outdoors, especially when built on a concrete slab. This versatile space can be designed to fit your lifestyle—whether you want a cozy nook for reading, a dining area for family meals, or a screen room for entertaining guests, all while considering the cost to enclose a porch. The ability to control airflow while keeping out bugs allows homeowners to enjoy fresh air without compromising comfort. Furthermore, a screened-in porch can serve as a peaceful retreat for relaxation, meditation, or yoga, making it an invaluable addition to your home and a perfect space for a screen room.
What Features Can You Add to a Screened-In Porch?
When designing your screened-in porch or patio, there are many features you can incorporate to enhance its functionality and aesthetic appeal, including the addition of a railing. Consider adding a screen door for easy access, allowing you to seamlessly transition between your home and the outdoors. You can also install ceiling fans to improve air circulation on warmer days or radiant heaters for cooler evenings. Additionally, customizing your space with comfortable furniture, decorative lighting, and potted plants can create an inviting atmosphere. For pet owners, a pet-resistant screen is an excellent feature that provides durability while keeping your furry friends safe.
What Types of Screen Material Should You Use for Your Screen Porch?
Also Read :25 Creative Porch Railing Ideas to Enhance Your Outdoor Space
What is the Best Screen Material for Durability?
Choosing the right screen material is crucial for the longevity and durability of your screened porch, which can affect the cost to enclose a porch. Fiberglass screens are among the most popular options due to their resistance to rust and corrosion. They are lightweight, flexible, and available in various mesh sizes to suit different needs. Another durable option is aluminum screen material, which offers added strength and longevity but may be more prone to denting. Homeowners should weigh the pros and cons of each type to determine which screen material will best fit their lifestyle and environmental conditions.
How Do Fiberglass Screens Compare to Other Materials?
Fiberglass screens have several advantages over other materials, such as metal screens, making them a popular choice for many screened in porch designs. They are less likely to sag and can be easily installed using a screen tight system, which keeps the porch screen taut and in place, providing a finished look. Fiberglass is also available in different colors, allowing for better integration with your home’s design and the overall look of your porch or patio. While metal screens may offer greater strength, they can be more challenging to install and may require additional support due to their rigidity. Ultimately, the choice between fiberglass and metal screens will depend on your preferences and specific requirements for your screened in porch, including the average cost to enclose a porch.
What Are the Pros and Cons of Different Types of Screen Material?
Each type of screen material comes with its unique set of pros and cons, which can affect the average cost of your project. Fiberglass screens are lightweight, easy to handle, and resistant to fading; however, they can tear more easily than metal options. Aluminum screens, on the other hand, are robust and resistant to corrosion but may require more effort during installation to hold the screen securely. Pet-resistant screens are designed to withstand scratching and tearing from pets, making them an excellent choice for animal lovers. Understanding these differences will help you make an informed decision when selecting the right screen material for your porch from scratch project.
How Do You DIY a Screened-In Porch?

What Are the Step-by-Step Instructions for Screening a Porch?
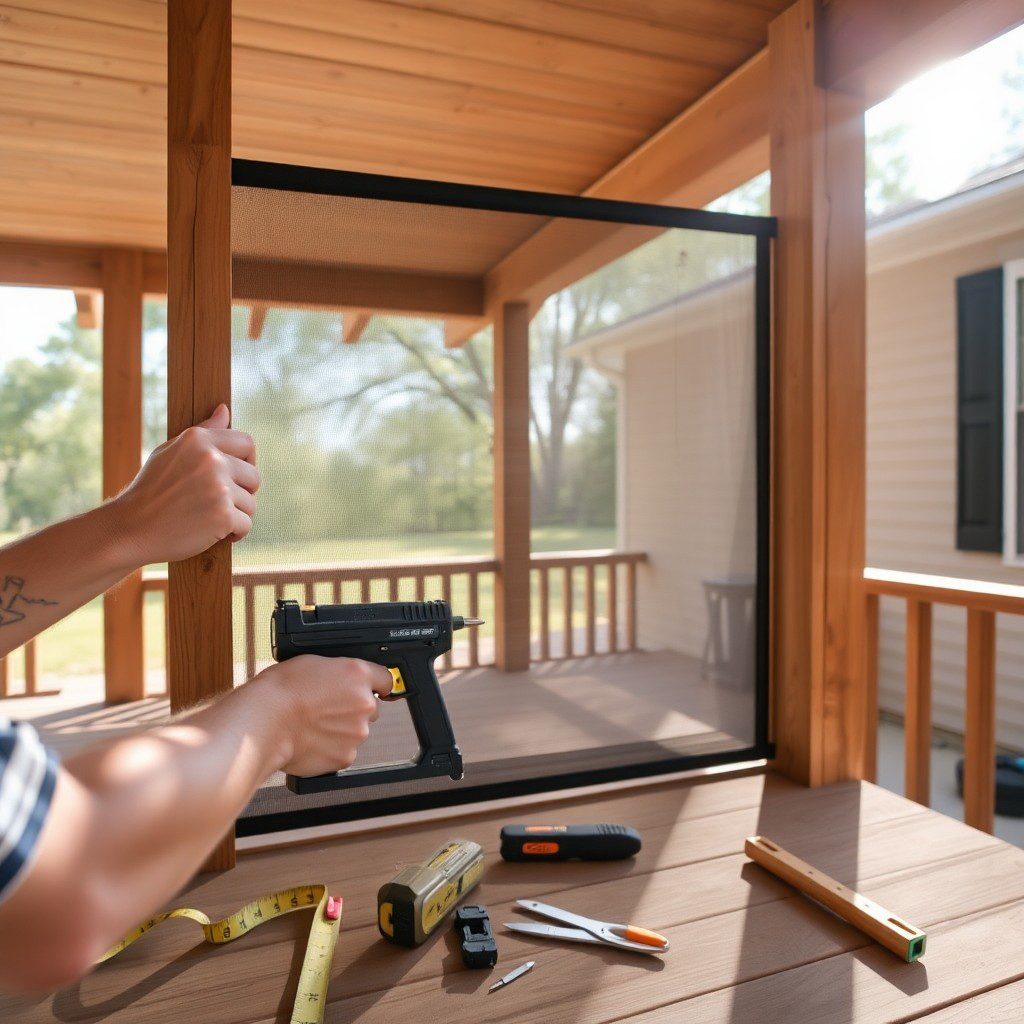
Screening in a porch is a rewarding DIY project that can be accomplished with careful planning and execution. Begin by measuring the dimensions of your existing porch to determine the amount of screen material needed. Next, gather materials such as pressure-treated lumber for the frame, screen panels, screen spline, and a base strip. Begin the construction by building a wooden frame that fits the height of the porch, ensuring it is secure and level. Once the frame is in place, cut the screen fabric to size, allowing for an overlap to ensure a snug fit for your porch screen, ideally on an 8-foot frame. Use a utility knife to trim any excess material and ensure a clean edge. Attach the screen fabric to the frame using the screen spline and base strip, keeping the screen tight to prevent sagging.
What Tools and Equipment Will You Need for Your DIY Project?
Equipping yourself with the right tools is essential for successfully screening in your porch. You will need a rubber mallet to secure the screen spline in place, a utility knife for cutting the screen material, and a measuring tape for accurate measurements. Additionally, a level will help ensure your wood frame is properly aligned, and a power drill may be needed for attaching any screws or brackets during the installation of the screen, especially at the top and bottom. Having these tools on hand will streamline the process and help you achieve a professional finish.
How Can You Ensure a Professional Finish When Screening a Porch?
To achieve a polished look while screening a porch, attention to detail is key, especially when installing the railing. Start by ensuring that the frame is level and square before attaching the screen material for your screened in porch, making sure to trim the excess screen as necessary. Use the screen tight system to keep the screen taut, which will prevent sagging and enhance durability. When cutting the screen fabric, measure twice and cut once to avoid mistakes. Lastly, take your time with the installation process, ensuring each panel is securely fastened and free from wrinkles for a finished look. By following these steps, you can achieve a beautiful and functional screened-in porch that rivals professionally done installations.
What Codes and Regulations Should You Consider Before Screening a Porch?
How Do Local Building Codes Affect Your Screened-In Porch?
Before starting your DIY project, it is crucial to understand how local building codes may impact your screened porch. Building codes regulate various aspects, including structural integrity, safety, zoning requirements, and the installation of porch screens. Check with your local building department to learn about any codes that may apply to your screened in porch project, especially if you are considering the least expensive options. Some areas may require specific materials or construction techniques, particularly if your screened-in porch is attached to your home or exceeds certain height limits.
What Permits Might You Need for Your DIY Project?
Depending on your location and the scope of your project, you may need to obtain permits before learning how to screen in your porch from scratch. Common permits include building permits, which ensure compliance with local codes, and zoning permits, which may restrict alterations based on property lines or neighborhood regulations for your screened in porch. It is advisable to contact your local authorities to understand what permits are necessary for your specific screened porch project, as failing to acquire the proper permits can result in fines or required removal of the structure.
How Can You Avoid Code Violations When Screening a Porch?
To avoid code violations when screening in a porch, it is essential to familiarize yourself with local regulations and follow best practices throughout the construction process. Ensure that your design adheres to height restrictions and does not obstruct any existing structures or pathways. Additionally, using approved materials and construction methods will help you stay compliant with building codes and achieve the best finished look. Lastly, consider consulting a professional or referring to local guidelines to ensure your project meets all necessary requirements.
When Should You Consider Hiring a Pro for Your Screen Porch Project?
What Are the Signs That You Should Hire a Professional?
While many homeowners can successfully DIY a screened-in porch, certain circumstances may warrant hiring a professional for a more complex screen room setup, which can often be found in tutorials on the world on YouTube. If your existing porch has structural issues, such as rotting wood or improper alignment, it may be best to consult a contractor to address these problems before screening. Additionally, if your project exceeds your comfort level or requires specialized skills, such as electrical work for lighting, hiring a pro can save you time and ensure quality workmanship for installing screens. Lastly, if you’re short on time and want to enjoy your new screened porch sooner rather than later, a professional can expedite the process.
How Do You Choose the Right Contractor for Your Screened-In Porch?
Selecting the right contractor for your screened-in porch project is crucial for achieving satisfactory results. Begin by researching local contractors with experience in screening porches and reading reviews from previous clients. Request quotes from multiple contractors to compare prices and services offered. During the selection process, ask about their specific experience with similar projects, and inquire about any warranties or guarantees they provide for your screened in porch. A reputable contractor will not only complete the project efficiently but also ensure that it meets local codes and regulations.
What Costs Are Involved When Hiring a Pro vs. DIY?
The costs associated with hiring a professional for your screened-in porch project can vary significantly based on location, project complexity, and contractor rates. On average, hiring a pro may significantly increase your overall porch costs compared to a DIY approach. However, consider the potential costs of mistakes and delays that can arise from a DIY project. By weighing the costs of materials, tools, and potential labor, you can determine whether to proceed with a DIY project or enlist the help of a professional to ensure a high-quality result.
Q: What are the first steps to screen in a porch?
A: Begin by measuring the height and width of your porch or patio. You’ll need to determine the right materials, such as lumber, to construct the frame for the screen panels tightly. Make sure to have tools and materials ready before you start.
Q: Do I need a permit to screen in a porch?
A: Whether you require a permit to screen in a porch depends on local building codes. It’s advisable to check with your local municipality to ensure compliance with regulations.
Q: What type of screen material should I choose for my porch screen?
A: There are various options for screen materials. Options like pet-resistant screen are ideal for households with pets, while traditional fiberglass screens are a common choice for porches. Select a screen that suits the features you want for your screened-in porch.
Q: How do I construct the frame for my screen panels?
A: To construct the frame, use two-by-twos cut to length. You will need to measure the height and width of the porch and then cut the lumber accordingly. Ensure you secure the frame with four metal braces for added stability.
Q: What is the best way to attach the screen around the frame?
A: To attach the screen around the frame, start by stapling the screen panels tightly to the frame. Be careful not to over-tighten the fasteners, as this can damage the screen. Make sure to also attach the base strip securely to hold the screen in place.
Q: Can I use Douglas fir or poplar for my screen frame?
A: Yes, Douglas fir or poplar are both excellent choices for constructing the frame of your screened-in porch. These woods are durable and can withstand the elements, making them suitable for outdoor applications.
Q: What tools do I need to screen in a porch?
A: Essential tools for screening in a porch include an electric miter saw to cut lumber, a staple gun for attaching the screen, and a measuring tape to ensure precise dimensions. Having the right tools and materials will make the process much easier.
Q: How do I measure for my screen panels?
A: To measure for your screen panels, measure the height and width of each section of the porch or patio where you will install the screens. Each panel will need to be cut to fit these measurements, ensuring a snug fit.
Q: How much does it typically cost to screen in a porch?
A: The cost to screen in a porch can vary greatly depending on the size of the area and the materials used. In general, screening in a porch can be two to three times more expensive than traditional methods, so plan your budget accordingly.