How to Replace a Thermocouple on a Gas Fireplace: Easy Step-by-Step Guide

To replace a thermocouple on a gas fireplace, follow these steps: Turn off the gas supply, locate the thermocouple, disconnect it from the gas valve, remove the thermocouple from the pilot assembly, install a new thermocouple, and reconnect it to the gas valve. By doing this, you can easily replace the thermocouple and ensure the proper functioning of the gas fireplace.
Gas fireplaces provide warmth and ambiance to a home, and the thermocouple plays a crucial role in their safe operation. A thermocouple is a safety device that detects the presence of a pilot flame and prevents gas leaks by shutting off the gas supply if the flame goes out.
Over time, thermocouples can wear out and may need to be replaced. In this guide, we will walk you through the step-by-step process of replacing a thermocouple on a gas fireplace, ensuring the continued functionality of your fireplace and the safety of your home.
/replacing-water-heater-thermocouple-flame-sensor-1824918-13-6e53620037d74c19b8e0fab0d57f9896.jpg)
Credit: www.thespruce.com
Understanding A Thermocouple
A thermocouple is a small but crucial component found in gas fireplaces. It plays a vital role in ensuring the safety and efficient functioning of the appliance. Understanding how a thermocouple works and why it is important is essential when it comes to maintaining and troubleshooting a gas fireplace.
What Is A Thermocouple?
A thermocouple is a sensor made from two different types of metal wires that are joined together at one end. This joined end is known as the hot junction, while the opposite ends are called the cold junction. When a temperature difference occurs between the hot and cold junctions, it creates an electrical voltage known as the thermoelectric effect. This voltage is used to power the gas valve by creating a small electric current.
Why Is The Thermocouple Important?
The thermocouple plays a critical safety role in a gas fireplace. Its main function is to detect the presence of a pilot flame. If the pilot flame goes out, the thermocouple senses the absence of heat and subsequently shuts off the gas supply to prevent the release of unburned gas. This safety feature ensures that gas does not continue to flow into the fireplace, reducing the risk of gas leaks and potential fire hazards.
| Benefits of a Thermocouple |
|---|
| – Safeguards against gas leaks |
| – Prevents unburned gas from accumulating |
| – Provides an additional layer of protection |
| – Easy to identify and replace if faulty |
In addition to its safety function, the thermocouple also helps maintain the gas supply to the pilot light. As long as the pilot flame remains lit, the thermocouple generates a continuous electrical current, keeping the gas valve open. If the pilot flame fails, the electrical current stops, causing the gas valve to close automatically.
It is important to regularly inspect and maintain the thermocouple to ensure its proper functioning. Over time, the thermocouple may become dirty or worn, affecting its performance. If you notice any issues with your gas fireplace, such as difficulty in lighting the pilot flame or frequent pilot flame outages, it is likely that the thermocouple needs replacement.
In conclusion, understanding the role of a thermocouple is crucial in maintaining the safety and functionality of a gas fireplace. By regularly inspecting and replacing a faulty thermocouple, homeowners can ensure their gas fireplace operates smoothly and provides warmth and comfort during the colder months.
Signs Of A Faulty Thermocouple
A faulty thermocouple in your gas fireplace can cause issues with the pilot light and prevent your fireplace from functioning properly. It’s important to be aware of the signs that indicate your thermocouple may need replacing. By being proactive and addressing these issues, you can ensure that your gas fireplace continues to provide warmth and ambiance in your home. In this section, we will discuss two common signs of a faulty thermocouple: weak pilot flame and frequent pilot light outages.
Weak Pilot Flame
A weak pilot flame is often an indication of a faulty thermocouple. The pilot flame should be strong and steady, with a blue color. If you notice that the flame is flickering or appears yellow, this could be a sign that the thermocouple is not heating properly. A weak pilot flame can result in difficulty in igniting the main burner or cause the fireplace to turn off unexpectedly.
Some additional signs to look out for:
- The pilot flame is too small to envelop the thermocouple properly.
- The pilot flame frequently goes out on its own.
- The pilot flame struggles to stay lit when the gas valve is turned on.
If you notice any of these signs, it’s recommended to replace the thermocouple to ensure the efficient and safe operation of your gas fireplace.
Frequent Pilot Light Outages
Another common sign of a faulty thermocouple is frequent pilot light outages. If you find yourself needing to relight the pilot light frequently, it may indicate that the thermocouple is not producing enough voltage to keep the gas valve open. A properly functioning thermocouple should generate enough voltage to hold the gas valve open, allowing the pilot light to remain lit consistently.
Here are a few possible reasons why you might experience frequent pilot light outages:
- The thermocouple is not positioned correctly in the pilot flame.
- There is dirt, dust, or debris blocking the pilot assembly orifice.
By addressing these issues and replacing the faulty thermocouple, you can ensure a reliable and continuous operation of your gas fireplace.
Tools And Materials Needed
To replace a thermocouple on a gas fireplace, you will need tools and materials such as a screwdriver, a wrench, a new thermocouple, and perhaps a flashlight for visibility in tight spaces. These items will help you complete the task efficiently and ensure a safe operation of your fireplace.
List Of Required Tools
List Of Required Materials
Tools and Materials Needed: To replace a thermocouple on a gas fireplace, there are a few essential tools and materials that you will need. These items will help you successfully complete the task and ensure the proper functioning of your fireplace. Here is a list of the required tools and materials:List Of Required Tools
Below are the tools you will need to replace a thermocouple on a gas fireplace:| No. | Tool |
|---|---|
| 1. | Screwdriver |
| 2. | Adjustable wrench |
| 3. | Pliers |
| 4. | Wire brush |
| 5. | Hex key (Allen wrench) |
List Of Required Materials
Here are the materials you will need for the thermocouple replacement:- New thermocouple
- Thread sealant
:max_bytes(150000):strip_icc()/replacing-water-heater-thermocouple-flame-sensor-1824918-hero-7ee1bb61d2a84355b3884424297996b4.jpg)
Credit: www.thespruce.com
Step-by-step Guide To Replacing A Thermocouple
Learn how to easily replace a thermocouple on a gas fireplace with this step-by-step guide. This comprehensive tutorial will walk you through the process, ensuring a hassle-free and successful replacement.
Is your gas fireplace not producing a flame, or is the pilot light constantly going out? If so, the problem could be a faulty thermocouple. The thermocouple is a safety device that detects whether the pilot light is lit and allows gas to flow to the burner. Over time, it can wear out and need replacement. In this step-by-step guide, we will walk you through the process of replacing the thermocouple on your gas fireplace to get it up and running again.
Step 1: Turn Off The Gas Supply
The first step in replacing a thermocouple is to ensure your safety by turning off the gas supply. Locate the shut-off valve typically located near the fireplace or on the main gas line. Turn the valve to the off position using a wrench or pliers. This step will prevent any gas from flowing while you work on the thermocouple.
Step 2: Remove The Old Thermocouple
With the gas supply turned off, it’s time to remove the old thermocouple. Locate the thermocouple near the pilot light assembly. Depending on your fireplace model, it may be held in place with a retaining nut, screws, or clips. Use the appropriate tools to loosen and remove these attachments, taking care not to damage the surrounding components. Once the attachments are removed, gently pull out the old thermocouple from its housing.
Step 3: Install The New Thermocouple
Now it’s time to install the new thermocouple. Begin by aligning the new thermocouple with the pilot light assembly, ensuring it is fully inserted into the housing. Use the retaining nut, screws, or clips to secure the thermocouple in place, making sure it is tightly fastened. Double-check that the new thermocouple is in the correct position and properly installed.
Step 4: Test The New Thermocouple
With the new thermocouple installed, it’s important to test its functionality before proceeding. Turn on the gas supply again and ignite the pilot light using the manufacturer’s instructions for your specific fireplace model. Hold the pilot light button for a minute or two to allow the thermocouple to heat up. If the pilot light stays lit, this indicates that the new thermocouple is working correctly. However, if the pilot light continues to go out, further inspection and troubleshooting may be required.
Step 5: Turn On The Gas Supply
Assuming the new thermocouple is functioning properly, it’s time to turn the gas supply back on. Carefully locate the shut-off valve and turn it to the on position using a wrench or pliers. This will allow gas to flow to the burner and should ignite the main flames of the fireplace. Ensure there are no gas leaks and that the flame is burning steadily. If everything looks and sounds good, congratulations! You have successfully replaced the thermocouple on your gas fireplace.
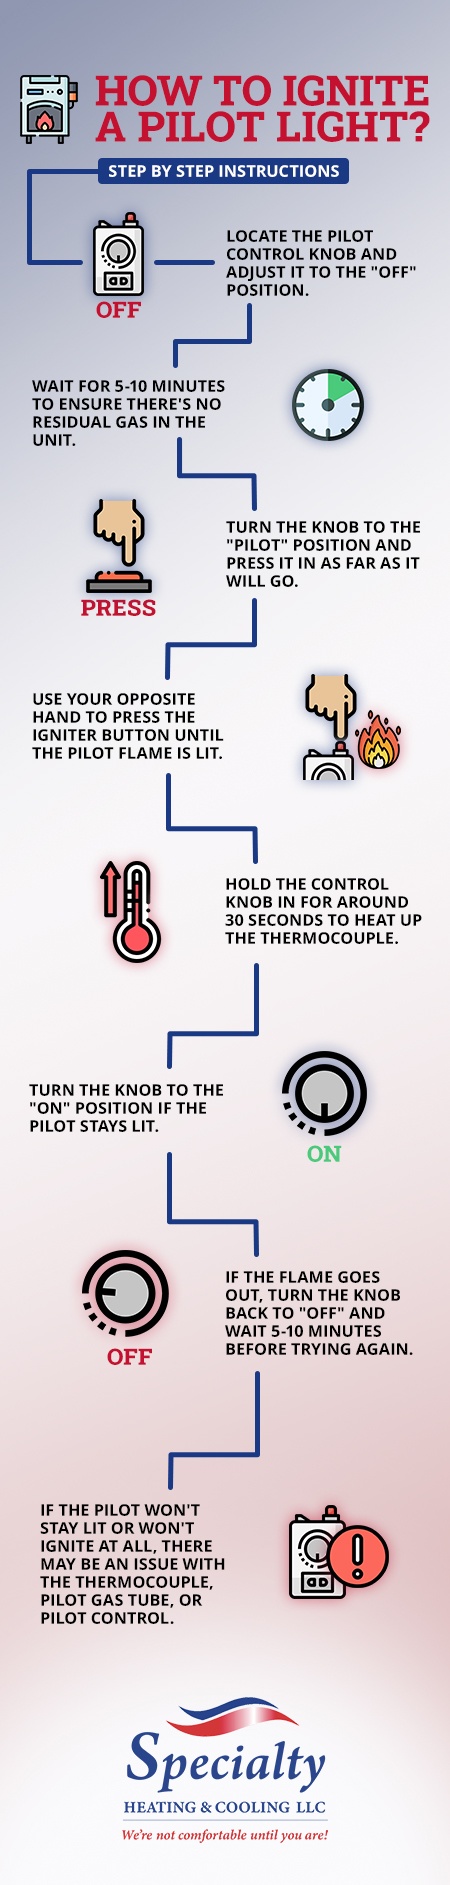
Credit: specialtyheating.com
Frequently Asked Questions For How To Replace A Thermocouple On A Gas Fireplace
How Do I Know If My Thermocouple Is Bad?
If the pilot light on your gas fireplace keeps going out or the burner won’t stay lit, it is likely that your thermocouple is bad. A failing thermocouple can’t sense the flame, causing the gas valve to shut off. This is a safety feature to prevent gas leaks.
How Do I Replace A Thermocouple On A Gas Fireplace?
To replace a thermocouple on a gas fireplace, start by turning off the gas supply and allowing the fireplace to cool down. Remove the access panel to locate the thermocouple, disconnect it from the gas valve or pilot assembly, and then install the new thermocouple by reversing the process.
Be sure to follow the manufacturer’s instructions for your specific fireplace model.
Can I Replace A Thermocouple Myself?
Yes, you can replace a thermocouple on a gas fireplace yourself. However, it’s important to exercise caution and follow the proper steps. If you are unsure or uncomfortable with the process, it’s always best to consult a professional. Safety should be the top priority when working with gas appliances.
Conclusion
Replacing a thermocouple on a gas fireplace may seem daunting, but with the right guidance, it can be a manageable task. By following the steps outlined you can ensure the safety and functionality of your fireplace. Remember to always consult the manufacturer’s instructions and exercise caution when working with gas appliances.
With a little bit of patience and the right tools, you’ll have your gas fireplace back up and running in no time. Enjoy the warmth and comfort it provides!