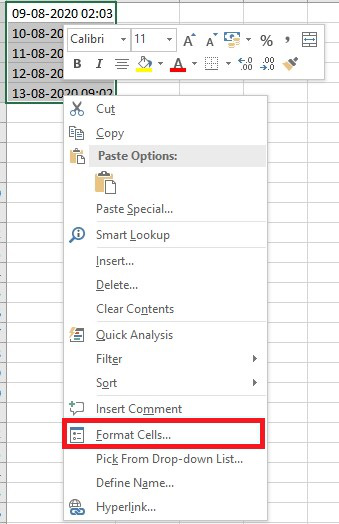
To remove time from a date in Excel, simply format the cell as a date. When working in Excel, you can easily remove the time from a date by selecting the cells you want to format, clicking on the “Number” tab in the “Format Cells” box, choosing “Date” in the Category list, and then selecting the desired date format under Type.
This will allow you to display the date only without the time component, helping you organize and present your data more effectively. By following these steps, you can manipulate the format of your date values, making them more suitable for your specific needs within your Excel spreadsheets.
Methods For Removing Time From Date
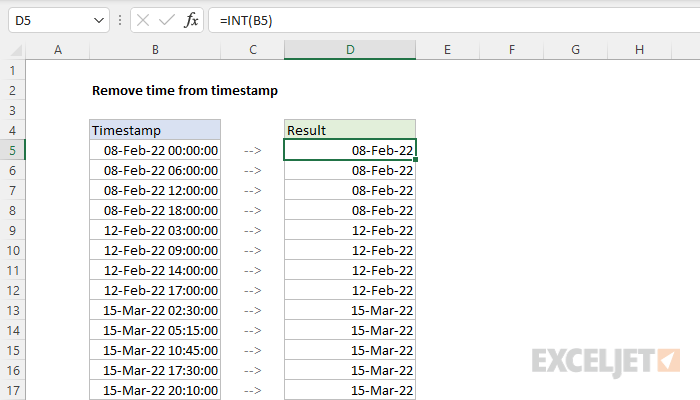
To remove time from a date in Excel, you can follow these steps: Select the cells, go to Format Cells, click on the Number tab, choose Date under Category, and select a date format. Another method is to use the INT function to extract the date value from a combined date-time cell.
This simplifies data analysis and presentation.
Methods for Removing Time from Date Changing Date Format To remove time from a date in Excel, you can change the date format. This method allows you to display the date without the time component. Follow these steps: 1. Select the cells containing the dates you want to format. 2. Right-click on the selected cells and choose the “Format Cells” option. 3. In the “Format Cells” dialog box, go to the “Number” tab. 4. In the “Category” list, click on “Date”. 5. Under “Type”, choose a date format that excludes the time component. 6. Click “OK” to apply the changes. Using Text to Columns Another way to remove time from a date in Excel is by using the Text to Columns feature. This method allows you to separate the date and time into different columns. Here’s how: 1. Select the cells containing the combined date and time values. 2. Go to the “Data” tab in the Ribbon. 3. Click on “Text to Columns” in the “Data Tools” group. 4. In the “Convert Text to Columns Wizard”, select “Delimited” and click “Next”. 5. Choose the delimiter that separates the date and time values (e.g., space or comma). 6. Click “Next” and choose the appropriate column data format for each part (date and time). 7. Click “Finish” to separate the date and time into different columns. Using INT Function If a cell contains a combined date and time, you can use the INT function to extract just the date value. Excel stores dates as numbers, with a decimal portion representing the time. Follow these steps: 1. Select the cell(s) with the combined date and time values. 2. Enter the following formula in a different cell: =INT(cell reference) Replace “cell reference” with the actual cell reference of the combined date and time value. 3. Press Enter to get the date value without the time component. By using these methods, you can easily remove time from dates in Excel. Whether you prefer changing the date format, using the Text to Columns feature, or the INT function, these techniques will help you manipulate your data accurately.Credit: www.geeksforgeeks.org
Converting Timestamp To Date
When working with timestamps in Excel, you may encounter situations where you need to convert a timestamp to a date format. Converting a timestamp to a date is a common task, and Excel provides several methods for achieving this.
Selecting And Formatting Timestamps
To convert timestamps to dates in Excel, you must first select the cells containing the timestamps and then apply the appropriate date formatting. The following steps will guide you through the process:
- Select the cells containing the timestamps that you want to convert.
- Right-click on the selected cells and choose the “Format Cells” option.
- In the Format Cells dialog box, navigate to the “Number” tab.
- Under the “Category” list, click on “Date.”
- Choose the desired date format from the “Type” list or enter a custom format code.
By following these steps, you can effectively convert timestamps to dates in Excel while maintaining the accuracy of your data.
Advanced Techniques
When it comes to Excel, there are advanced techniques to remove time from dates, offering more efficient solutions. Below, we will explore two advanced methods – ‘Find and Replace’ and Excel Formulas to Remove Time – to streamline the process.
Removing Time Through ‘find And Replace’
If you want to remove time from dates in a large dataset, the ‘Find and Replace’ feature can be a time-saving option:
- Select the date column
- Press
Ctrl + Hto open the ‘Find and Replace’ dialog - In the ‘Find what’ field, enter the time format you want to remove (e.g., 12:00:00 AM)
- Leave the ‘Replace with’ field blank
- Click ‘Replace All’
- Voila! The time from all the dates is removed!
Excel Formulas To Remove Time
For more intricate tasks, Excel formulas can be handy to eliminate the time component:
- Use the RIGHT Function: =RIGHT(A1,LEN(A1)-FIND(” “,A1))
- Utilize Text Functions: =TEXT(A1,”mm/dd/yyyy”)
- Employ the DATE Function: =DATE(YEAR(A1),MONTH(A1),DAY(A1))
By applying these advanced techniques, you can efficiently remove time from dates in Excel, simplifying your data processing tasks.
Credit: trumpexcel.com
Additional Resources
To remove time from date in Excel, you can easily format cells and select a date format. Alternatively, you can use formulas like splitting date and time data or converting timestamps to dates for a cleaner presentation. Efficiently managing date values is crucial for accurate Excel data analysis.
Video Tutorials For Date Formatting In Excel
If you prefer more visual guidance, video tutorials can be a great resource for learning how to remove time from dates in Excel. These tutorials provide step-by-step instructions and demonstrations to help you understand the process better.
- Video Tutorial 1: How to Remove Time from Date in Excel
- Video Tutorial 2: Excel Date Formatting Made Easy
In these video tutorials, you will learn various methods and techniques to remove time from dates, including using format cells, date value formulas, and other useful tips. Take advantage of these resources to gain a better understanding of date formatting in Excel.
External Guides And Tools For Date Modification
Aside from video tutorials, there are also external guides and tools available to assist you in modifying dates in Excel. These resources provide detailed explanations, examples, and additional tips to help you navigate date formatting challenges.
| Guide/Tool Name | Description | Link |
|---|---|---|
| How to Separate Date and Time in Excel Guide | This comprehensive guide walks you through the steps to separate date and time data using Excel’s Text to Columns feature. | Guide Link |
| Excel Date and Time Conversion Tool | This tool allows you to easily convert timestamps to dates in Excel by selecting the desired cells and applying the appropriate date format. | Tool Link |
These external guides and tools can enhance your date formatting skills in Excel and provide practical solutions for removing time from dates.
Credit: exceljet.net
Frequently Asked Questions For How To Remove Time From Date In Excel
How Do I Change Date And Time To Date Only In Excel?
To change date and time to date only in Excel, follow these steps: 1. Select the cells you want to format. 2. In the Format Cells box, click the Number tab. 3. In the Category list, click Date. 4. Under Type, pick a date format.
How Do I Separate Date And Time In Excel?
To separate date and time in Excel, follow these steps: 1. Select the cells with date and time data 2. Click on the Data tab 3. Choose Text to Columns 4. Select Delimited and click Next.
How Do You Reduce Date And Time To Just Date In Excel?
To reduce date and time to just date in Excel, follow these steps: 1. Select the cells with combined date and time. 2. Use the INT function to extract only the date value. 3. Format the cells by selecting the ‘Number’ tab, choosing ‘Date’ under Category, and picking a date format.
How Do I Convert Timestamp To Date In Excel?
To convert a timestamp to a date in Excel, follow these steps: 1. Select the cell(s) with the timestamp. 2. On the Number tab, choose either Date or Custom in the Category list. 3. Select a predefined date format from the Type list or enter your own format code.
4. Press Enter to convert the timestamp to a date. (Source: Ablebits)
Conclusion
To remove time from a date in Excel, you can use various methods such as formatting cells, using formulas, or separating date and time. By following these steps, you can easily extract only the date value. Select the cells you want to format, go to the Format Cells option, choose the Date category, and select a date format.
Alternatively, you can use the INT function to extract the date value. With these techniques, you can manipulate your date data in Excel efficiently.


