To remove a shower curtain rod, start by unscrewing the brackets at each end of the rod. Then, gently pull the rod away from the wall or ceiling.
Make sure to keep the screws and brackets in a safe place for future use. Are you looking to update your bathroom decor or replace your shower curtain? Removing the shower curtain rod is the first step in the process.
Whether you’re planning to install a new rod or replace it with a different style, removing the existing rod can be done easily and quickly. We’ll guide you through the steps to remove a shower curtain rod without any hassle. By following these simple instructions, you’ll have your old curtain rod removed in no time, allowing you to make the desired changes to your bathroom. So, let’s get started on removing that shower curtain rod!
Tools Required For Removing A Shower Curtain Rod
Removing a shower curtain rod requires a few essential tools such as a screwdriver, pliers, and a ladder. These tools will make the process easier and efficient, allowing you to remove the rod without any hassle.
:
To successfully remove a shower curtain rod, you’ll need a few basic tools on hand. These tools will make the process easier and more efficient. Here are the essential tools you’ll need:
- Screwdriver: A screwdriver will come in handy for removing any screws or fasteners that are holding the shower curtain rod in place. It’s important to have a screwdriver with both flathead and Phillips head options to accommodate different types of screws.
- Adjustable wrench: An adjustable wrench is essential for loosening and tightening nuts and bolts. It will allow you to easily adjust the tension on the curtain rod and remove any connecting brackets.
- Pliers: Pliers are useful for gripping and pulling out any stubborn screws or nails that may be holding the curtain rod in place. They provide a firm grip and give you more control during the removal process.
- Scraper or putty knife: A scraper or putty knife is helpful for removing any adhesive or caulking that may have been used to secure the curtain rod. Gently scrape along the edges of the rod to loosen and remove any residue left behind.
Having these tools readily available will ensure that you have everything you need to successfully remove a shower curtain rod. They will make the process smoother and prevent any unnecessary damage to your bathroom walls or fixtures.
Preparation Before Removing The Shower Curtain Rod
Before removing the shower curtain rod, it is important to prepare for the task. This involves gathering the necessary tools, clearing the area, and ensuring safety precautions are in place.
Clear the area around the shower:
- Remove any objects or bathroom accessories that may obstruct your way or cause accidents.
- Ensure there is enough space for you to work comfortably and safely.
Protect the shower curtain and bathroom floor/walls:
- Lay down a towel or drop cloth to protect your shower curtain or liner from potential damage or dirt.
- Cover the bathroom floor and nearby walls with a protective layer to prevent any accidental scratches or marks.
Turn off the water supply:
- Locate the water shut-off valves for the shower.
- Turn the valves clockwise until the water supply is completely shut off.
- This step is crucial to avoid any leaks or water damage during the removal process.
Preparing adequately before removing the shower curtain rod will make the entire process smoother and more efficient. By clearing the area, protecting the shower curtain and bathroom surfaces, and turning off the water supply, you can minimize any potential mishaps and ensure a hassle-free removal experience.
Remember, a little preparation goes a long way in achieving successful results without unnecessary complications.
Steps To Remove A Shower Curtain Rod
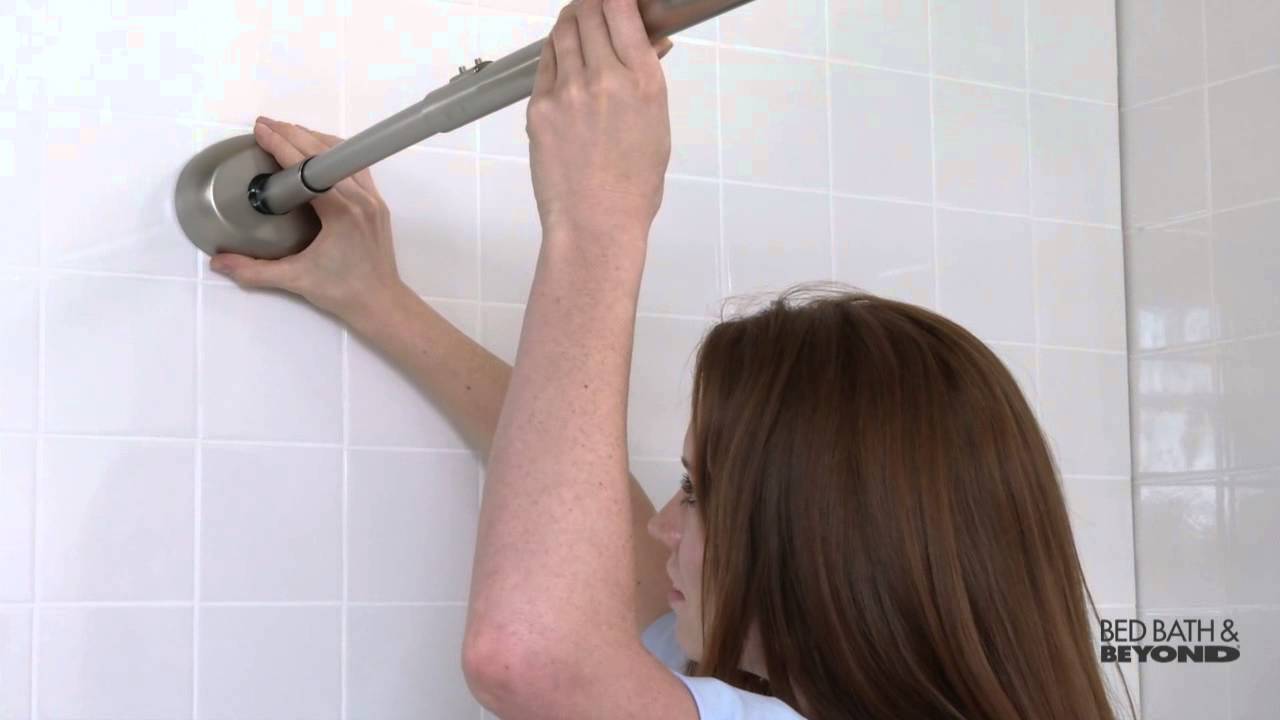
Removing a shower curtain rod is a simple task. Start by loosening the screws or brackets holding it in place. Then, carefully slide the rod out of the brackets and detach any hooks or rings.
Loosening the mounting brackets:
- Start by locating the mounting brackets on either side of the shower rod.
- Rotate the outer part of the mounting brackets counterclockwise to loosen them.
- If the brackets are secured with screws, use a screwdriver to unscrew them.
- Gently pull the brackets away from the wall, ensuring they are completely detached.
Removing the finials or end caps:
- Look for finials or end caps at the ends of the shower curtain rod.
- Hold the finials firmly and twist them counterclockwise to loosen and remove them.
- If the finials are secured with screws, use a screwdriver to remove them.
- Once the finials are removed, set them aside in a safe place.
Detaching the rod from the brackets:
- After removing the finials, take hold of the shower curtain rod.
- Carefully slide the rod out of the brackets towards yourself.
- If the rod is stuck, wiggle it gently while pulling to release it from the brackets.
- Once the rod is free, set it aside, making sure it doesn’t fall or get damaged.
Removing the brackets from the wall:
- Inspect the wall and locate any screws or fasteners that secure the brackets.
- Use a screwdriver to unscrew and remove the screws, taking care not to damage the wall.
- If the brackets are adhesive-mounted, gently pry them off the wall using a putty knife.
- Clean any adhesive residue using rubbing alcohol or an adhesive remover.
Congratulations! You have successfully removed the shower curtain rod and brackets from your bathroom. Remember to store all the parts in a secure location in case you need to reinstall them or replace them in the future.
Credit: m.youtube.com
Common Challenges When Removing A Shower Curtain Rod
Removing a shower curtain rod can present common challenges, such as stuck screws, rusted fittings, or difficulty accessing hidden hardware. Follow these helpful steps to successfully remove your shower curtain rod without any fuss or frustration.
Removing a shower curtain rod may seem like a simple task, but sometimes you can encounter common challenges during the process. Here are some issues you might face and how to overcome them:
Rusty Or Stuck Hardware:
- Rusty or stuck hardware can make it difficult to remove a shower curtain rod. Here’s what you can do:
- Apply a penetrating oil, such as WD-40, to the screws and joints. This will help loosen any rust and make it easier to unscrew.
- Use pliers or a wrench to grip and rotate the hardware if it’s difficult to turn by hand.
- If all else fails, you may need to cut through the rusted parts using a hacksaw. Be careful and protect your hands with gloves.
Damaged Or Stripped Screw Heads:
- When the screw heads are damaged or stripped, removing the shower curtain rod can become a real challenge. Consider the following solutions:
- Use a screwdriver with a larger or different type of head that can grip the damaged screws better.
- If the screw heads are completely stripped, you may need to create a new groove with a rotary tool before attempting to unscrew them.
- As a last resort, you can try using a screw extractor tool to remove the damaged screws. This tool grips onto the stripped heads, allowing you to turn them out.
Difficult Access To The Mounting Brackets:
- Sometimes, limited access to the mounting brackets can make it frustrating to remove a shower curtain rod. Try these tips:
- Use a flashlight to examine the area and identify any obstacles that may be blocking access.
- If there are obstacles, such as tiles, that prevent you from reaching the screws, you might need to remove them temporarily. Be sure to exercise caution and use the right tools for tile removal.
- In some cases, you may need to recruit a helper to hold up the rod while you unscrew the mounting brackets from behind or underneath the wall.
- If it’s difficult to reach the screws, consider using an extension tool or a flexible screwdriver that can navigate tight spaces.
Remember, patience and the right tools are key to overcoming these common challenges when removing a shower curtain rod. With a little persistence, you’ll be able to successfully replace the rod or make any necessary repairs.
Safety Precautions While Removing A Shower Curtain Rod
When removing a shower curtain rod, it is important to take safety precautions. Follow these guidelines to ensure a safe and successful removal process. Keep yourself protected by taking necessary precautions every step of the way.
When it comes to removing a shower curtain rod, safety should be your top priority. Here are some important precautions to keep in mind before getting started:
Wear Safety Gloves:
- Protect your hands by wearing safety gloves before attempting to remove the shower curtain rod.
- Gloves will provide a good grip and prevent injuries that may occur due to sharp edges or slippery surfaces.
- Additionally, gloves can also protect your hands from any potential allergens or irritating substances that may be present.
Use Proper Lifting Techniques:
- Before removing the curtain rod, ensure that you know the weight and dimensions of the rod.
- Lift with your legs, not your back, to avoid strain or injury.
- Keep your back straight, bend your knees, and use your leg muscles to lift the rod smoothly and efficiently.
- If the rod is heavy, consider asking for assistance to avoid unnecessary strain.
Avoid Using Excessive Force:
- It’s important to remove the shower curtain rod carefully without using excessive force.
- If the rod seems stuck, don’t pull or yank on it forcefully as it may damage the surrounding walls or the rod itself.
- Instead, try twisting or rotating the rod gently to loosen it before attempting to remove it.
- If necessary, use a lubricant like WD-40 to ease the removal process.
Remember, proper safety precautions are essential to minimize the risk of accidents and injuries while removing a shower curtain rod. By following these guidelines, you can safely and effectively complete the task without any hassle.
Alternatives To Removing A Shower Curtain Rod
Save time and effort by exploring alternative methods for removing a shower curtain rod without the need for traditional removal techniques. These innovative solutions provide convenience and flexibility for those seeking an easy way to take down their shower curtain rod.
Are you tired of the hassle of removing your shower curtain rod every time you need to clean or replace your shower curtain? Well, fret not! There are some great alternatives that can save you time and effort. Let’s explore these options:
Converting To A Tension Rod:
- Replace your traditional shower curtain rod with a tension rod. These rods are easy to install and require no drilling or permanent fixtures. Simply extend the rod to fit snugly between the walls of your shower enclosure.
- Tension rods are versatile and can be adjusted according to the width of your shower space. This feature allows you to hang various types of shower curtains without any hassle.
- With a tension rod, you can easily remove and change your shower curtain whenever you want. Cleaning your shower area or replacing the curtain becomes a breeze.
Use A Curved Shower Rod:
- Another alternative to removing your shower curtain rod is to upgrade to a curved shower rod. These rods provide extra space inside the shower, making it feel more open and spacious.
- Curved shower rods also prevent the curtain from sticking to your body while showering, creating a more comfortable and enjoyable experience.
- Installing a curved shower rod requires some basic tools and can be done in a few simple steps. Once installed, you can easily slide the shower curtain on and off the curved rod whenever needed.
Install A Permanent Shower Rod:
- If you’re not keen on removing your shower curtain rod at all, you can opt for a permanent installation. This involves securing the rod to the wall using brackets or screws.
- A permanent shower rod provides stability and durability, ensuring that it stays in place without any wobbling or movement.
- With a permanent shower rod, you don’t have to worry about removing it for cleaning or curtain replacement. Simply take off the curtain rings and slide the curtain off for maintenance.
Now that you know these alternatives, you can choose the option that suits you best. Whether you convert to a tension rod, use a curved shower rod, or install a permanent shower rod, removing your shower curtain rod will no longer be a headache.
Enjoy a hassle-free shower experience with these convenient alternatives.
Tips For Reinstalling A Shower Curtain Rod
Looking to reinstall your shower curtain rod? Follow these easy tips to remove and replace your rod quickly and efficiently. Ensure a secure installation for a hassle-free shower experience.
After removing your shower curtain rod for cleaning or renovation purposes, it’s essential to reinstall it correctly to ensure proper functionality. Here are some useful tips to guide you through the process:
Clean And Prepare The Mounting Surface
Before reinstalling the shower curtain rod, it’s crucial to clean and prepare the mounting surface properly. This will help ensure a secure and long-lasting installation. Here’s what you need to do:
- Remove any dust, dirt, or debris from the mounting surface using a damp cloth.
- Use a mild detergent or cleaning solution to remove any stubborn stains or residue.
- Allow the surface to dry completely before proceeding with the installation.
Measure And Mark The Correct Height And Width
Accurate measurements are crucial when reinstalling a shower curtain rod. Follow these steps to ensure you get the correct height and width:
- Measure the desired height for the shower curtain rod using a tape measure. This will depend on your personal preference and the length of your shower curtain.
- Mark the desired height using a pencil or marker on both sides of the shower wall.
- Measure the width of the shower area to determine the appropriate length for the curtain rod.
- Mark the width measurement on both sides of the wall, making sure they are level with each other.
Use The Right Tools And Hardware
Using the proper tools and hardware is essential to ensure a sturdy and secure installation of the shower curtain rod. Here’s what you’ll need:
- Screwdriver: Depending on the type of mounting hardware, you may need a Phillips or flathead screwdriver.
- Drill: If your shower wall requires drilling for mounting brackets, make sure you have a drill and appropriate drill bits.
- Mounting Hardware: Check the packaging of your curtain rod for the necessary mounting brackets, screws, and anchors.
- Level: Use a level to ensure the curtain rod is installed straight and level.
Remember to follow the manufacturer’s instructions for your specific shower curtain rod and consult any additional resources if needed.
With these tips, you’ll be well-equipped to reinstall your shower curtain rod confidently. Just remember to clean and prepare the mounting surface, measure and mark the correct height and width, and use the right tools and hardware. Happy reinstalling!
Frequently Asked Questions Of How To Remove Shower Curtain Rod
How Do You Remove A Curtain Rod?
To remove a curtain rod, start by locating the mounting brackets on either end. Use a screwdriver to loosen and remove the screws holding the brackets in place. Once the brackets are off, gently pull the rod out of the curtain rings or hooks.
If the rod is stuck, wiggle it back and forth to loosen it before pulling it out. If the curtain rod is a tension rod, simply twist and compress it to release it from the wall. Remember to store the rod and brackets in a safe place for future use.
How Do You Get A Shower Curtain Rod To Stay Up On Tile?
To get a shower curtain rod to stay up on tile, follow these steps: 1. Measure the length of your shower area and purchase a curtain rod that fits. 2. Use a drill and a masonry bit to make small holes in the tile where you want to install the rod.
3. Insert wall anchors into the holes, ensuring they are flush with the tile surface. 4. Attach the rod brackets to the anchors using screws and a screwdriver. 5. Slide the curtain onto the rod and hang it on the brackets.
By properly installing the rod with wall anchors, you can ensure that it stays securely attached to the tile. Remember to choose a rod that is designed for tile installation to avoid any issues down the line.
How Do You Twist A Shower Curtain Rod?
To twist a shower curtain rod, follow these steps: 1. Start by loosening any existing tension on the rod. 2. Hold one end of the rod firmly and rotate it in a clockwise or counterclockwise direction. 3. Continue twisting until the desired length is achieved.
4. Once in place, secure the rod by tightening it to create tension against the walls or shower enclosure. Remember to adjust the length accordingly to ensure a snug fit. By following these steps, you can easily twist and install a shower curtain rod in your bathroom.
How Do I Stop My Shower Curtain From Catching The Rod?
To prevent your shower curtain from catching on the rod, follow these steps: 1. Ensure that the curtain rings or hooks are large enough to move freely along the rod. 2. Use a fabric softener or dryer sheet to reduce static electricity, which can cause the curtain to stick to the rod.
3. Consider using a double-curtain setup with an inner liner and an outer decorative curtain. The liner will be less likely to catch on the rod. 4. Regularly clean the curtain rod and the rings or hooks to remove any buildup of soap scum or debris that may cause friction.
5. Apply a small amount of silicone lubricant or talcum powder on the rod to reduce friction and make it easier for the curtain to slide. 6. If the curtain still catches, replace the rod with a smooth, rounded one to minimize friction.
Remember, by following these steps, you can avoid the hassle of a stubborn shower curtain catching on the rod.
Conclusion
To sum it up, removing a shower curtain rod is a simple task that can be done with just a few basic tools. By following the steps outlined in this blog post, you can easily remove your shower curtain rod without any hassle.
Start by gathering the necessary tools, such as a screwdriver and pliers. Then, remove the curtain rings and set them aside. Use the screwdriver to loosen the screws holding the rod in place, and carefully take it down. Remember to be gentle to avoid any damage to your walls.
Once the rod is removed, you can clean it and store it for future use or replace it with a new one. With these easy steps, you can successfully remove your shower curtain rod and make any necessary updates or changes to your bathroom décor.
Happy renovating!