To remove reflections in Photoshop, follow these steps: First, save the selection of the area with reflections. Next, merge the layers and feather the edges.
Use a soft brush to blend the reflection area, and then utilize the Spot Healing Brush tool. Finally, apply the layer mask for a seamless result.
Understanding Reflections In Photoshop
To remove reflections in Photoshop, start by making a clean selection around the reflection using the lasso or pen tool. Then, use the clone stamp tool to erase the reflection by copying a nearby area. Next, adjust the brightness, contrast, and color to blend the area seamlessly.
Introduction To Reflections
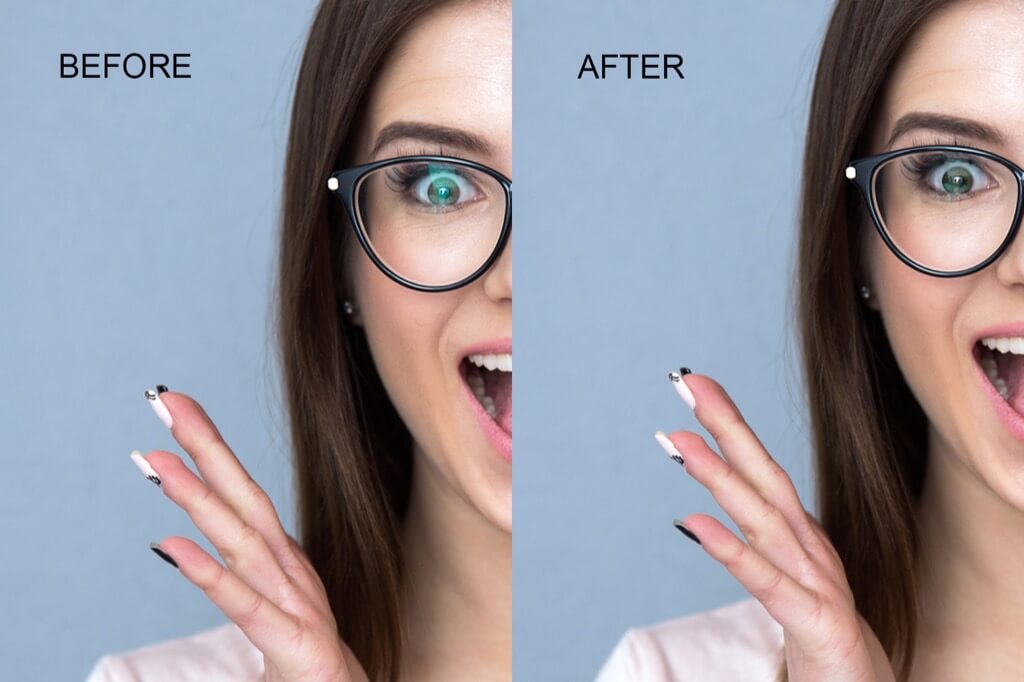
Reflections in Photoshop can be tricky to deal with but understanding the basics can help you achieve desired results. Whether it’s removing unwanted reflections from glasses or eliminating glare in photos, mastering this skill opens up a world of creative possibilities.
Common Challenges With Reflections
When working with reflections in Photoshop, you may encounter challenges like uneven lighting, distorted reflections, or difficulty in selecting and isolating the reflection areas. Knowing how to navigate these obstacles is crucial for achieving professional-looking results.

Credit: photoshopcafe.com
Techniques For Removing Reflections
When it comes to photo editing, removing reflections can be a tricky task. However, with the right techniques in Photoshop, you can easily eliminate unwanted reflections and enhance the overall quality of your images. In this article, we will explore three effective methods for removing reflections: using selection tools, applying layer masks, and utilizing cloning and healing tools.
Using Selection Tools
The first technique involves the use of selection tools in Photoshop. These tools help you isolate the areas affected by reflections, allowing you to make targeted adjustments. Here’s how you can use selection tools to remove reflections:
- Select the appropriate selection tool from the toolbar, such as the lasso or marquee tool.
- Carefully outline the area affected by the reflection.
- Once the selection is made, go to the “Edit” menu and choose “Fill”.
- Adjust the fill settings to match the surrounding area and click “OK” to apply the changes.
Applying Layer Masks
The second technique involves the use of layer masks. Layer masks allow you to selectively hide or reveal parts of an image, making them perfect for removing reflections. Here’s how you can apply layer masks to remove reflections:
- Open your image in Photoshop and duplicate the background layer.
- Select the duplicate layer and click on the layer mask icon at the bottom of the Layers panel.
- Using a brush tool, paint over the areas affected by the reflection to hide them.
- Adjust the brush settings, such as opacity and hardness, to achieve a seamless blend.
Using Cloning And Healing Tools
The third technique involves the use of cloning and healing tools. These tools are perfect for removing small, detailed reflections. Here’s how you can use cloning and healing tools to remove reflections:
- Select the cloning or healing brush tool from the toolbar.
- Alt-click on an area near the reflection that you want to replicate.
- Carefully paint over the reflection using the cloned or healed area.
- Adjust the brush settings, such as brush size and opacity, for precise control.
By utilizing these techniques in Photoshop, you can easily remove reflections from your photographs and achieve stunning results. Take your time, experiment with different tools and settings, and soon you’ll be able to master the art of reflection removal in Photoshop.
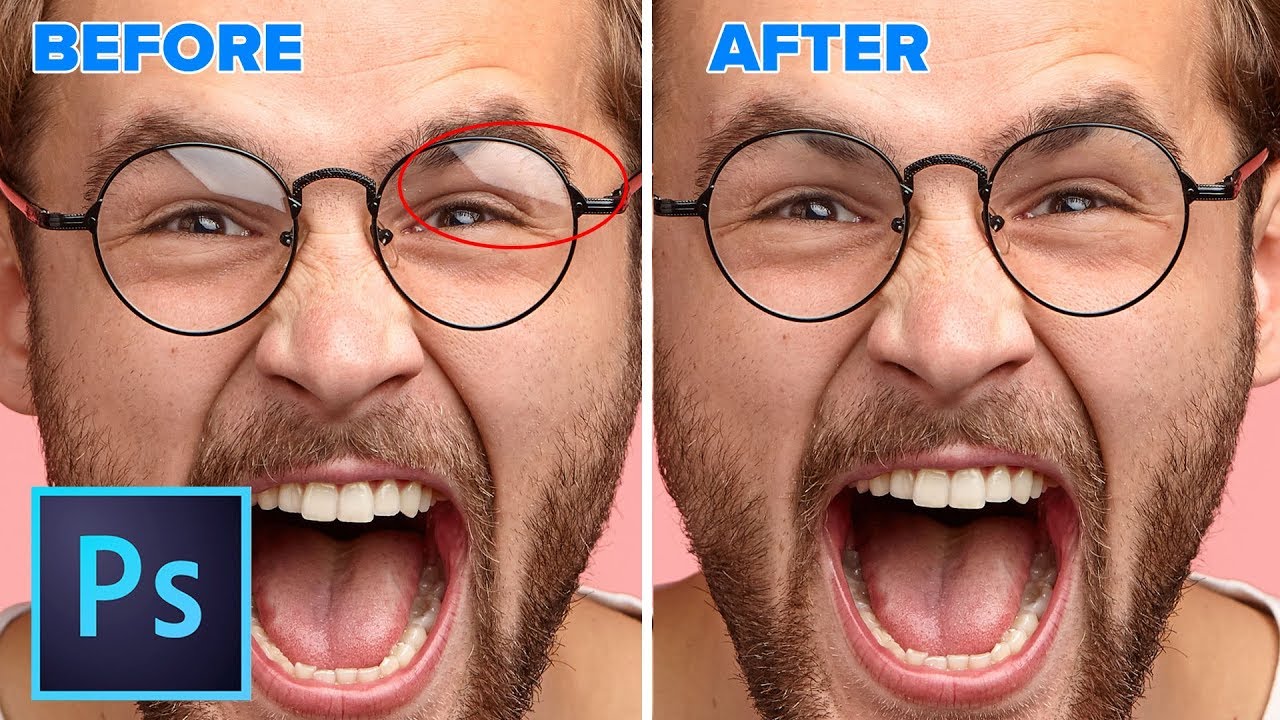
Advanced Methods For Reflection Removal
Learn advanced methods for effectively removing reflections in Photoshop. Enhance your skills with techniques such as feathering edges, using a soft brush for blending, and utilizing the spot healing brush tool. Master the art of reflection removal effortlessly with these professional-grade strategies.
Utilizing Generative Fill
Removing reflections from photos can be a challenging task, but with advanced Photoshop techniques, it becomes significantly easier and more efficient. One such method is utilizing the Generative Fill feature in Photoshop. Generative Fill is an amazing tool that allows you to remove reflections from photos effortlessly. It works by analyzing the surrounding areas of the reflection and using that information to fill in the reflected areas with a seamless pattern or texture. To use Generative Fill for reflection removal, follow these simple steps:- Open your image in Photoshop and duplicate the layer to work non-destructively.
- Select the area containing the reflection using your preferred selection tool (such as the Lasso tool or the Quick Selection tool).
- Go to the Edit menu and choose Fill.
- In the Fill dialog box, select ‘Content-Aware’ from the Use dropdown menu.
- Check the box next to ‘Color Adaptation’ to ensure a smooth transition between the filled area and the surrounding pixels.
- Click Ok, and Photoshop will analyze the surrounding pixels and remove the reflection, replacing it with a generated pattern that seamlessly blends with the rest of the image.
- Finally, make any necessary adjustments like color correction or blending modes to achieve the desired result.
Blurring Backgrounds For Enhanced Results
In some cases, simply removing the reflection might not be enough to achieve the desired result. To further enhance the overall appearance of the image, you can consider blurring the background. Blurring the background helps to draw more attention to the subject while creating a pleasing depth effect. By reducing the level of detail in the background, the viewer’s focus will be directed towards the main subject, allowing it to stand out more prominently. To blur the background in Photoshop, you can follow these steps:- Select the background layer or create a duplicate layer to work non-destructively.
- Go to the Filter menu and choose Gaussian Blur.
- In the Gaussian Blur dialog box, adjust the Radius value to control the amount of blur. Lower values will result in a subtle blur, while higher values will create a more pronounced effect.
- Preview the changes in real-time and adjust the blur until you achieve the desired effect.
- Once you are satisfied with the blur, click Ok to apply it.
Credit: www.lightroompresets.com
Additional Tools And Resources
When it comes to removing reflections in Photoshop, having access to the right tools and resources can streamline the process and enhance the quality of your edits. Below, we explore some essential tools and techniques that can help you achieve seamless reflection removal in your photos.
Photo Editing Software For Reflection Removal
Utilizing advanced photo editing software can significantly simplify the task of removing reflections from images. Programs like Adobe Photoshop offer a wide range of tools and features specifically designed for this purpose.
- Adobe Photoshop: Known for its robust editing capabilities, Adobe Photoshop provides various tools like the Clone Stamp, Healing Brush, and Content-Aware Fill that can effectively eliminate unwanted reflections.
- Other photo editing software such as GIMP and Affinity Photo also offer powerful tools for reflection removal, catering to different user preferences and skill levels.
Utilizing Blend Modes In Photoshop
When it comes to refining the removal of reflections in Photoshop, understanding and leveraging blend modes can make a significant difference in achieving realistic and seamless results.
- Overlay Blend Mode: This blend mode is handy for enhancing contrast and details in areas where reflections need to be removed, giving the image a more natural look.
- Soft Light Blend Mode: By using the Soft Light blend mode, you can subtly blend the edited portions with the original image, ensuring a seamless transition between the two.
- Multiply Blend Mode: The Multiply blend mode is ideal for darkening and blending reflections with the background, creating a more cohesive and visually appealing result.
Expert Tips And Best Practices
When it comes to removing reflections in Photoshop, expert tips and best practices can greatly enhance the outcome. By utilizing advanced techniques and tools, you can effectively eliminate unwanted reflections, resulting in a polished and professional image. Below are key tips and methods to help you achieve impeccable results in your photo editing endeavors.
Color Blending Modes For Reflections
One effective method for addressing reflections in Photoshop is by leveraging color blending modes. By understanding and utilizing blending modes such as Overlay, Soft Light, and Color Dodge, you can seamlessly blend the reflection with the surrounding colors to achieve a natural and seamless appearance. Experiment with different blending modes to identify the most suitable option for your specific image.
Utilizing Clone Stamp Tool Effectively
Another powerful tool for removing reflections is the Clone Stamp Tool. This versatile tool allows you to effectively clone and replace areas affected by reflections. Ensure that you carefully adjust the brush size, hardness, and opacity to precisely clone adjacent areas, seamlessly removing the unwanted reflections.
When working with the Clone Stamp Tool, it’s essential to pay attention to details and maintain a consistent pattern to ensure a natural and flawless result. By employing the Clone Stamp Tool strategically and attentively, you can achieve a reflection-free image that exudes professionalism.
Credit: m.youtube.com
Frequently Asked Questions Of How To Remove Reflections In Photoshop
How Do I Remove A Reflection From An Image?
To remove reflections from an image in Photoshop, follow these steps: 1. Select the area with the reflection. 2. Create a new layer and apply the Clone Stamp tool to clone nearby pixels. 3. Use the Healing Brush tool to blend the cloned pixels with the rest of the image.
4. Adjust the opacity and blending mode of the new layer to refine the effect. 5 Save your edited image.
How Do I Get Rid Of Unwanted Reflections?
To remove unwanted reflections in Photoshop, follow these steps: 1. Save the selection. 2. Merge layers and feather edges. 3. Use a soft brush to blend. 4. Use the spot healing brush tool. 5. Apply the layer mask. Additional tutorials and tools are available for more specific cases.
How Do I Remove Shine In Photoshop?
To remove shine in Photoshop, use the Spot Healing Brush Tool and adjust the layer mask for a flawless finish.
Is There A Reflection Tool In Photoshop?
Yes, Photoshop has a reflection tool. The tool helps to create realistic reflections in images.
Conclusion
Achieve flawless results in Photoshop by mastering reflection removal techniques. Enhance your editing skills with our step-by-step guide. Elevate your photos to professional quality with ease. Say goodbye to unwanted reflections and hello to stunning visuals. Start your editing journey today!