Have you ever wondered how to turn your favorite photos into unique and eye-catching pieces of art? Printing pictures on wood is a fascinating and innovative technique that allows you to do just that. Combining the warmth and natural beauty of wood with the vibrancy and detail of your photographs, this process creates stunning and personalized décor that is sure to impress. In this guide, we will explore the step-by-step process of printing pictures on wood, from selecting the right materials to achieving the perfect finish. So, whether you are a photography enthusiast eager to showcase your work or simply looking to add a personal touch to your home, get ready to embark on a creative journey that will transform your memories into timeless masterpieces.
Printing pictures on wood is a captivating blend of artistry and craftsmanship, providing a unique way to display your cherished photographs. The rich texture and grain of the wood give a rustic and organic feel to the images, adding depth and character to your artwork. But how exactly does one go about this intriguing process? With the right tools and techniques at your disposal, you can create stunning wooden prints that will be the envy of all who see them. From preparing the wood surface to transferring the image and sealing it for longevity, each step is crucial in achieving the desired result. So, grab your camera, gather your favorite photos, and let’s delve into the world of printing pictures on wood, where creativity knows no bounds.
- Choose a suitable piece of wood and sand it down to create a smooth surface.
- Apply a layer of gel medium onto the wood and place your printed picture face down onto the gel medium.
- Smooth out any air bubbles and let it dry for a few hours.
- Once dry, wet the paper with water and gently rub it off, revealing your picture on the wood.
- Apply a protective coat of varnish or sealant to preserve the image.
How to Print Pictures on Wood
Printing pictures on wood is a creative way to display your favorite images with a unique and rustic touch. In this step-by-step guide, we will walk you through the process of printing pictures on wood using a few simple materials and techniques. Follow these instructions to achieve stunning results and create personalized wooden photo prints.
Step 1: Gather the Materials
Before you begin, make sure you have all the necessary materials. You will need:
- A piece of wood (preferably smooth and sanded)
- An inkjet printer
- Printer paper
- Mod Podge or a similar transfer medium
- A foam brush
- A brayer or a flat object for smoothing
- A spray sealant (optional)
Once you have gathered these materials, you are ready to move on to the next step.
Step 2: Prepare the Wood Surface
Before printing on the wood, it is important to prepare the surface to ensure optimal image transfer. Start by sanding the wood to create a smooth and even texture. Remove any dust or debris using a clean cloth or brush.
Next, apply a thin and even layer of Mod Podge or the transfer medium of your choice to the wood surface. This will act as a bonding agent between the wood and the printed image, ensuring a successful transfer.
Step 3: Print the Image
Now, it’s time to print your image. Open the image on your computer and make any necessary adjustments or resizing using image editing software. Ensure that the image is compatible with your printer size.
Load the printer with the appropriate printer paper and set the print quality to the highest resolution for optimal results. Print the image onto the paper.
Step 4: Transfer the Image
Once the image is printed, carefully place it face down onto the prepared wood surface. Use a brayer or a flat object to smooth out any air bubbles or wrinkles. Apply even pressure to ensure proper adhesion between the paper and the wood.
Allow the image to dry completely. This may take a few hours or overnight, depending on the transfer medium used. Follow the manufacturer’s instructions for drying times.
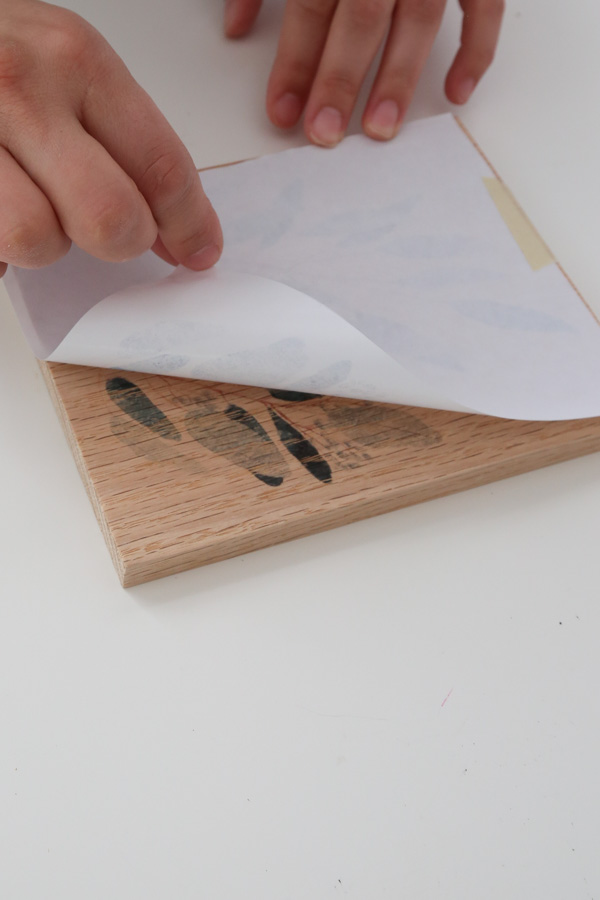
Step 5: Remove the Paper
After the image has dried, it’s time to remove the paper and reveal the transferred image on the wood. Moisten a clean cloth or sponge and gently rub the paper in circular motions. As you rub, the paper will start to peel off, leaving the transferred image behind.
Continue rubbing until all the paper has been removed. Be careful not to rub too hard, as this may damage the transferred image. Take your time and be patient during this step for the best results.
Step 6: Seal the Image (Optional)
If you want to protect the transferred image and enhance its longevity, you can apply a spray sealant. Choose a sealant suitable for wood surfaces and follow the instructions on the can.
Apply a thin and even coat of sealant over the transferred image, making sure to cover the entire surface. Allow the sealant to dry completely before handling or displaying your wooden photo print.
Step 7: Display and Enjoy
Once the sealant has dried, your wooden photo print is ready to be displayed and admired. You can hang it on the wall, place it on a shelf, or give it as a thoughtful and personalized gift.
Remember to keep your wooden photo print away from direct sunlight and excessive moisture to prevent any damage or fading over time.
Step 8: Experiment and Have Fun
Now that you know how to print pictures on wood, feel free to experiment with different types of wood, transfer mediums, and printing techniques. Let your creativity shine and explore the endless possibilities of this unique art form.
Remember, practice makes perfect, so don’t be discouraged if your first attempts don’t turn out exactly as expected. With time and experience, you will master the art of printing pictures on wood and create beautiful and personalized wooden photo prints.
Step 9: Share Your Creations
Once you have successfully printed pictures on wood, share your creations with others. Spread the joy of this artistic technique and inspire others to try it themselves. You can showcase your wooden photo prints on social media, in galleries, or even organize your own exhibition.
Remember to credit the original source of the image when sharing your wooden photo prints to respect copyright laws and give proper recognition to the artists.
Step 10: Keep Learning and Improving
Lastly, keep learning and improving your skills in printing pictures on wood. Stay updated with new techniques, materials, and trends in the field. Join online communities, attend workshops, or enroll in courses to expand your knowledge and connect with fellow artists.
By continuously learning and improving, you will be able to push the boundaries of your creativity and achieve even more impressive results in printing pictures on wood.
Frequently Asked Questions
Here are some commonly asked questions about how to print pictures on wood:
Question 1: What materials do I need to print pictures on wood?
To print pictures on wood, you will need the following materials:
– A piece of wood with a smooth surface
– An inkjet printer
– Transfer paper specifically designed for wood
– Clear acrylic sealer
– A foam brush or roller
Question 2: How do I prepare the wood surface for printing?
Before printing on wood, it’s important to prepare the surface properly. Here’s what you need to do:
1. Sand the wood surface to make it smooth and even.
2. Clean the surface thoroughly to remove any dust or debris.
3. Apply a thin layer of clear acrylic sealer and let it dry completely.
Following these steps will ensure better adhesion and a more vibrant print.
Question 3: How do I print the picture on the wood?
To print a picture on wood, follow these steps:
1. Select the image you want to print and edit it if necessary.
2. Mirror the image horizontally using photo editing software.
3. Load the transfer paper into your inkjet printer according to the manufacturer’s instructions.
4. Print the mirrored image onto the transfer paper.
5. Place the transfer paper face down onto the prepared wood surface.
6. Apply pressure evenly to transfer the image onto the wood.
7. Carefully remove the transfer paper and let the print dry completely.
Question 4: How can I protect the printed picture on wood?
To protect the printed picture on wood and make it more durable, you can use the following steps:
1. Apply a thin layer of clear acrylic sealer over the printed image.
2. Use a foam brush or roller to ensure even application.
3. Let the sealer dry completely, following the manufacturer’s instructions.
This will help prevent fading, protect the wood from moisture, and enhance the overall appearance of the print.
Question 5: How long does it take for the print to dry on wood?
The drying time for the print on wood can vary depending on factors like humidity and the type of ink used. Generally, it takes about 24 to 48 hours for the print to fully dry. It’s important to avoid touching or handling the print until it’s completely dry to prevent smudging or damaging the image.
Allowing sufficient drying time will ensure a long-lasting and high-quality print on wood.
As you embark on your wood printing journey, remember to experiment and have fun with different techniques and materials. Don’t be afraid to push the boundaries of your creativity and let your imagination run wild. With practice and patience, you’ll soon master the art of printing pictures on wood and unlock a whole new world of artistic possibilities. So gather your supplies, unleash your creativity, and get ready to bring your favorite memories to life on this beautiful, natural canvas. Happy printing!