“Zip it up – Create a Crown Fit for a King!”
Introduction
Zip tie crowns are a fun and easy way to make a unique and stylish headpiece. With just a few simple materials, you can create a beautiful crown that is perfect for a special occasion or just for fun. This guide will walk you through the steps of making a zip tie crown, from gathering the materials to the final touches. With a little bit of creativity and patience, you can make a beautiful crown that will be sure to turn heads.
Step-by-Step Guide to Making a Zip Tie Crown
Are you looking for a fun and creative way to make a crown? Look no further! With just a few simple materials, you can make a unique and stylish zip tie crown. Here is a step-by-step guide to help you get started.
Step 1: Gather Your Materials. You will need a package of zip ties, scissors, and a ruler.
Step 2: Measure and Cut the Zip Ties. Measure and cut the zip ties into four equal lengths. Each length should be about 4 inches long.
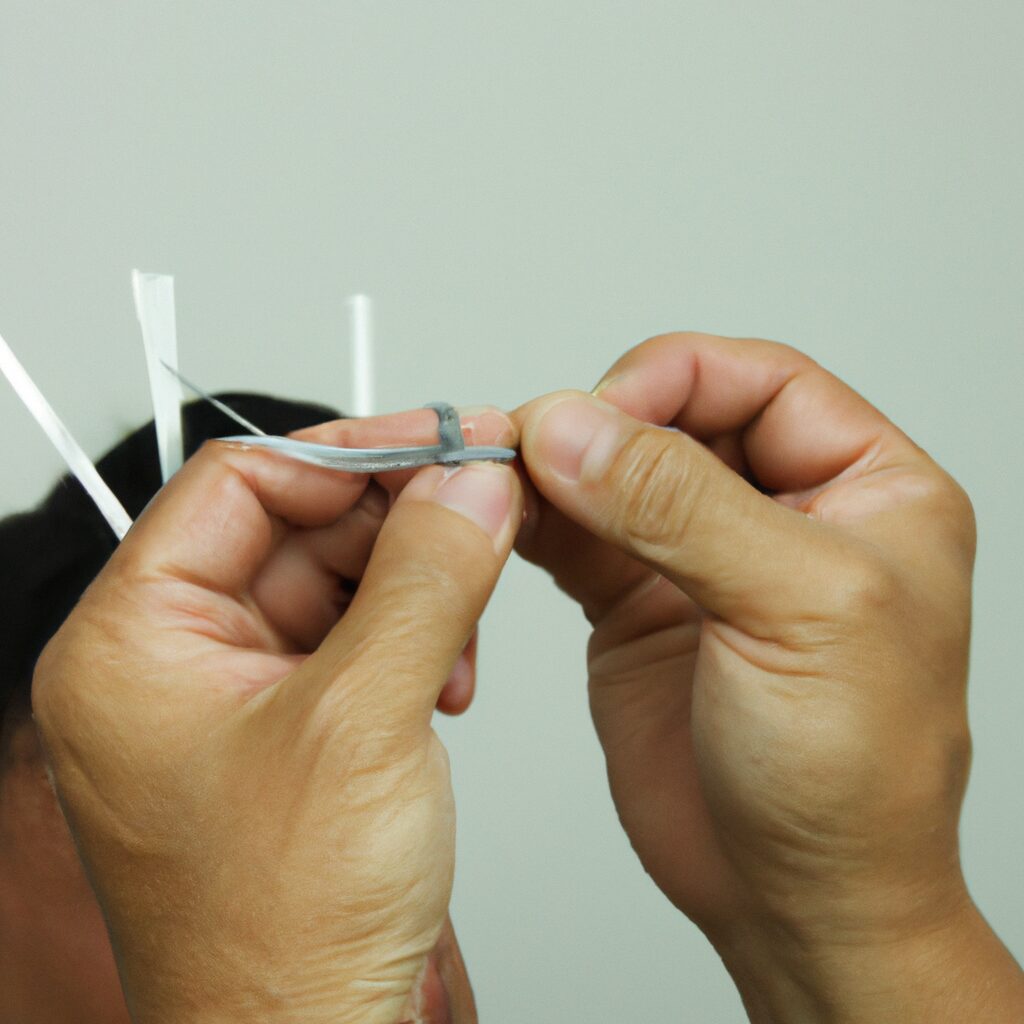
Step 3: Create the Base. Take two of the zip ties and connect them together at the ends to form a loop. This will be the base of your crown.
Step 4: Add the Zip Ties. Take the remaining two zip ties and attach them to the base. Make sure to leave a small gap between the two zip ties.
Step 5: Secure the Zip Ties. Take the two zip ties and twist them together to secure them in place.
Step 6: Trim the Zip Ties. Trim the ends of the zip ties to create a smooth and even edge.
Step 7: Wear Your Crown. You’re done! Now you can proudly wear your zip tie crown and show it off to your friends.
Making a zip tie crown is a fun and creative way to make a unique accessory. With just a few simple materials and a few easy steps, you can make a stylish and one-of-a-kind crown. So what are you waiting for? Get started and make your own zip tie crown today!
How to Create a Unique Zip Tie Crown for Any Occasion
Are you looking for a unique way to make a statement at your next special occasion? Look no further than the zip tie crown! This easy-to-make accessory is sure to turn heads and make you the center of attention. Here’s how to create your own zip tie crown for any occasion.
First, you’ll need to gather your supplies. You’ll need a package of zip ties, scissors, and a ruler. You can also use a variety of decorative items such as beads, ribbons, and feathers to add a personal touch to your crown.
Next, measure the circumference of your head with the ruler. Cut the zip ties to the length of your head measurement. You’ll need to cut at least 10 zip ties for a full crown.
Once you’ve cut the zip ties, it’s time to assemble your crown. Start by connecting two zip ties together at one end. Then, loop the other end of the zip tie around the first one to form a circle. Continue this process until you have a full circle of zip ties.
Now it’s time to decorate your crown. You can use beads, ribbons, and feathers to add a personal touch. You can also use hot glue to attach the decorations to the zip ties.
Once you’ve finished decorating your crown, it’s time to put it on. Simply slip the crown over your head and adjust the zip ties to fit comfortably.
You’re now ready to make a statement at your next special occasion with your unique zip tie crown! With a few simple supplies and a bit of creativity, you can create a one-of-a-kind accessory that will be sure to turn heads.
Crafting a Zip Tie Crown: Tips and Tricks for Beginners
Are you looking for a fun and creative way to make a crown? Crafting a zip tie crown is a great way to make a unique and stylish headpiece. Whether you’re looking to make a crown for a costume or just for fun, this guide will provide you with tips and tricks to help you get started.
First, you’ll need to gather your supplies. You’ll need zip ties, scissors, and a ruler. You can find zip ties at most hardware stores. You’ll also need a piece of cardboard or foam board to use as a base for your crown.
Once you have your supplies, you’ll need to measure and cut your zip ties. Measure the circumference of your head and add an extra inch or two for a comfortable fit. Cut the zip ties to the desired length.
Next, you’ll need to assemble your crown. Start by looping the zip ties together to form a circle. Make sure the ends of the zip ties are facing the same direction. Once you have the circle formed, you can start to weave the zip ties together. Start by weaving the zip ties in and out of each other. You can also add extra zip ties to make the crown more secure.
Once you’ve finished weaving the zip ties together, you’ll need to attach the crown to the base. Use a hot glue gun to attach the crown to the cardboard or foam board. Make sure to press down firmly to ensure a secure bond.
Finally, you’ll need to decorate your crown. You can use paint, glitter, or other craft supplies to make your crown unique.
Crafting a zip tie crown is a fun and creative way to make a unique headpiece. With these tips and tricks, you’ll be able to make a stylish and comfortable crown in no time.
Get Creative with Zip Tie Crowns: Ideas for Colorful and Fun Designs
Zip tie crowns are a fun and creative way to add a unique touch to any outfit or event. Whether you’re looking for a fun craft project to do with your kids or a way to add a bit of sparkle to your next party, zip tie crowns are a great way to get creative. With a few simple supplies and a bit of imagination, you can create colorful and fun designs that will be sure to turn heads.
To get started, you’ll need a few supplies. You’ll need zip ties in a variety of colors, scissors, and a ruler. You’ll also need a piece of cardboard or foam board to use as a base for your crown. Once you have your supplies, you can start designing your crown.
One of the most popular designs for zip tie crowns is a rainbow pattern. To create this look, start by cutting your zip ties into different lengths. You can use the ruler to measure the lengths and make sure they’re all even. Then, start arranging the zip ties in a rainbow pattern on the cardboard or foam board. Once you’ve arranged the zip ties, use the scissors to cut off the excess.
Another fun design is a chevron pattern. To create this look, start by cutting your zip ties into different lengths. Then, arrange the zip ties in a chevron pattern on the cardboard or foam board. Once you’ve arranged the zip ties, use the scissors to cut off the excess.
You can also create a more intricate design by using multiple colors of zip ties. To create this look, start by cutting your zip ties into different lengths. Then, arrange the zip ties in a pattern on the cardboard or foam board. Once you’ve arranged the zip ties, use the scissors to cut off the excess.
No matter what design you choose, zip tie crowns are a great way to get creative and add a unique touch to any outfit or event. With a few simple supplies and a bit of imagination, you can create colorful and fun designs that will be sure to turn heads. So get creative and have fun with your zip tie crowns!
DIY Zip Tie Crowns: A Fun and Easy Way to Accessorize Your Outfit
Are you looking for a fun and easy way to accessorize your outfit? Look no further than DIY zip tie crowns! Zip tie crowns are a unique and creative way to add a touch of flair to any outfit. With just a few simple supplies, you can create a one-of-a-kind crown that will make you stand out from the crowd.
To make your own zip tie crown, you will need a few supplies. First, you will need a package of zip ties. You can find these at any hardware store or online. You will also need a pair of scissors and a ruler. Once you have all of your supplies, you are ready to get started.
Begin by measuring the circumference of your head. Cut the zip ties to the length of your head measurement. Next, you will need to create the shape of your crown. To do this, you will need to connect the zip ties together. Start by connecting the first two zip ties together. Then, connect the next two zip ties together. Continue this process until all of the zip ties are connected.
Once your crown is complete, you can customize it with any decorations you like. You can add beads, feathers, or any other embellishments to make your crown unique. You can also paint the zip ties to match your outfit.
DIY zip tie crowns are a fun and easy way to accessorize your outfit. With just a few simple supplies, you can create a one-of-a-kind crown that will make you stand out from the crowd. So, grab your supplies and get creative!
Q&A
1. What materials do I need to make a zip tie crown?
You will need zip ties, scissors, and a ruler.
2. How do I measure the zip ties for the crown?
Measure the circumference of your head with a ruler and then cut the zip ties to that length.
3. How do I attach the zip ties together?
Connect the zip ties together by looping one end of the zip tie through the other end and then pulling it tight.
4. How do I make the crown more comfortable to wear?
You can add padding to the inside of the crown by using foam or fabric.
5. How do I make the crown more decorative?
You can add beads, feathers, or other decorations to the zip ties to make the crown more decorative.
Conclusion
Making a zip tie crown is a fun and easy way to add a unique and creative touch to any outfit. With just a few simple supplies and a few minutes of your time, you can create a beautiful and unique crown that will be sure to turn heads. Whether you choose to make a simple crown or a more elaborate one, you can be sure that your zip tie crown will be a conversation starter.