How to Install Blink Doorbell Wired: A Quick and Easy Guide
To install the Blink Doorbell Wired, simply follow the provided installation guide for step-by-step instructions. Now let’s delve into a well-rounded introduction to this topic.
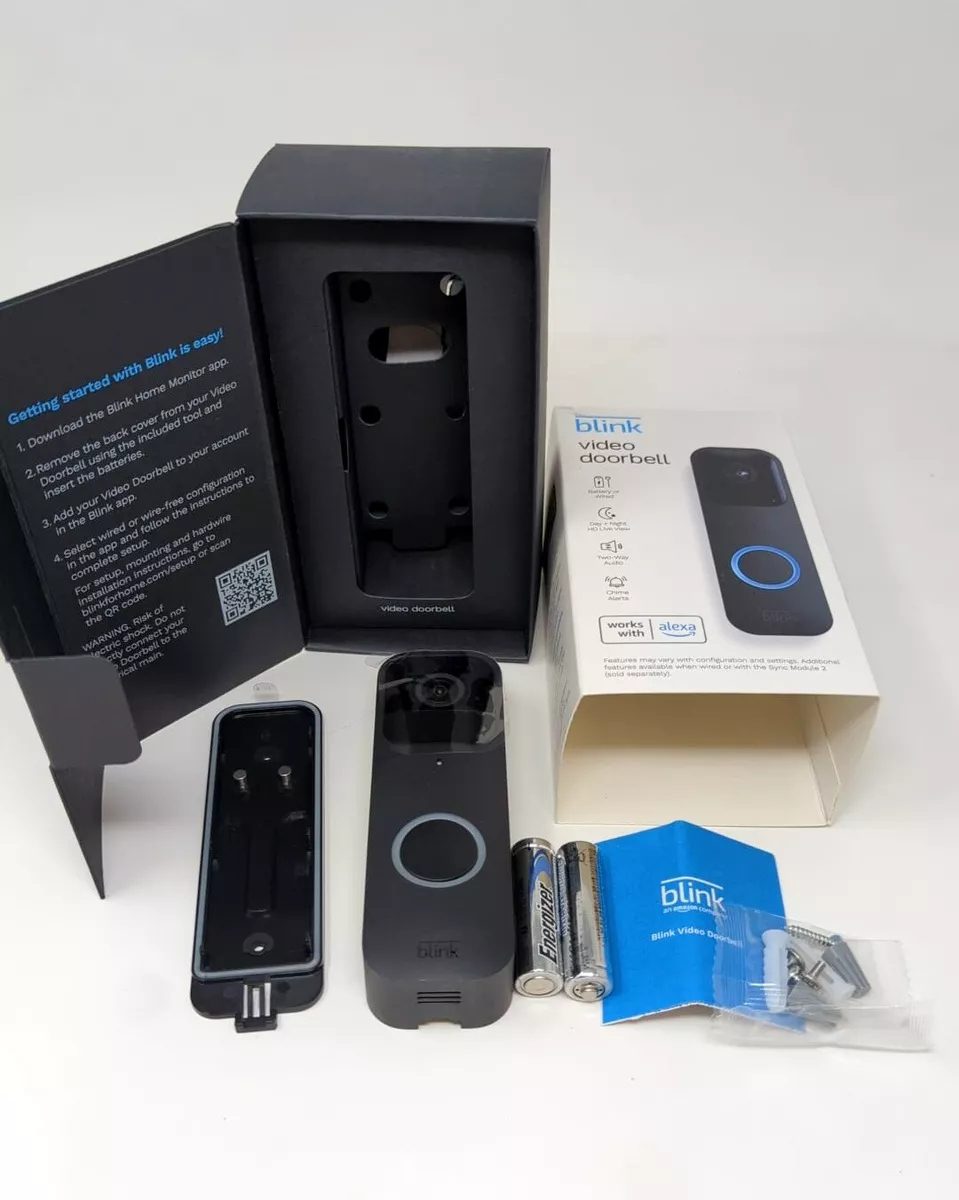
The Blink Doorbell Wired has become a popular choice for homeowners looking to enhance their home security. This advanced doorbell offers features such as motion detection, two-way audio, and live video streaming, all accessible through a smartphone app. With its easy installation process, the Blink Doorbell Wired can be seamlessly integrated into your home in no time.
Whether you’re a DIY enthusiast or a homeowner with little technical knowledge, setting up the Blink Doorbell Wired is a breeze. We will guide you through the simple steps to install the Blink Doorbell Wired, ensuring your home is equipped with the latest in doorbell technology to keep you safe and secure.

Credit: www.amazon.com
Preparation
Before you start installing your Blink Doorbell Wired, it’s essential to make sure you’re adequately prepared. This involves checking the compatibility of your doorbell system and gathering all the necessary tools. By completing these initial steps, you’ll ensure a smooth and hassle-free installation process.
Check The Compatibility
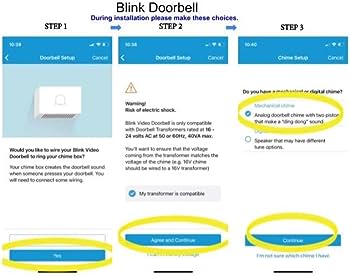
To begin, it’s crucial to check if your current doorbell system is compatible with the Blink Doorbell Wired. This will ensure that the installation process goes smoothly without any compatibility issues. Follow the steps below to check the compatibility:
- Locate your existing doorbell chime, which is typically installed near your front door.
- Open the cover of the doorbell chime to access the wiring.
- Check if the existing wiring consists of two low-voltage wires. These wires are usually labeled as “TRANS” and “FRONT.”
- Ensure that the voltage of your existing wiring is within the Blink Doorbell Wired’s required voltage range. Refer to the user manual or the manufacturer’s website for specific voltage specifications.
Checking the compatibility of your existing doorbell system will save you time and effort by avoiding any complications during installation.
Gather The Necessary Tools
Now that you’ve confirmed the compatibility of your doorbell system, it’s time to gather the necessary tools for the installation. Having these tools ready will allow you to work efficiently and complete the process smoothly. Here are the tools you’ll need:
| Tool | Description |
|---|---|
| Screwdriver | A Phillips head screwdriver to remove and install screws. |
| Wire stripper | A tool to strip the insulation from the existing wiring. |
| Wire nuts | Used for securely connecting the wires together. |
| Drill | If necessary, a drill to create holes for mounting the doorbell. |
| Level | A level to ensure that the doorbell is installed straight and aligned correctly. |
| Tape measure | To measure the distance and position of the doorbell. |
Having these tools readily available will ensure that you can proceed with the installation smoothly and minimize any unnecessary delays or interruptions.
Installation Steps
In this section, we’ll walk you through the installation process of the Blink Doorbell Wired. Follow these simple steps to ensure a successful installation.
Turn Off Power
Before you begin installing your Blink Doorbell Wired, it’s crucial to turn off the power supply to your existing doorbell. This step ensures your safety and prevents any electrical mishaps during the installation process.
Remove Existing Doorbell
Once the power is turned off, you can proceed to remove your existing doorbell. Locate the screws holding the doorbell in place, typically found at the top and bottom. Using a screwdriver, carefully remove these screws to detach the doorbell from the wall. With the screws removed, gently pull the doorbell away from the wall, exposing the wiring behind it.
Connect The Wires
With your existing doorbell removed, it’s time to connect the wires to your new Blink Doorbell Wired. Take a moment to carefully examine the wiring, making note of the color-coded wires. You should see two wires: one red and one white.
Proceed by:
- Carefully strip the ends of the red and white wires, ensuring that no bare wire is left exposed.
- Once stripped, take the corresponding red wire and white wire from your new Blink Doorbell Wired.
- Using wire connectors or a screwdriver (depending on the connector type provided), secure the red wire to the red wire from the doorbell and the white wire to the white wire respectively.
Mount The Blink Doorbell
Now that the wiring is properly connected, it’s time to mount your Blink Doorbell Wired on the wall. Ensure that you have a suitable location that provides a clear view of your front porch or entryway.
To mount the Blink Doorbell Wired:
- Hold the doorbell against the wall where you want it to be mounted.
- Using a pencil or marker, mark the screw holes on the wall through the holes in your doorbell.
- Once marked, set the doorbell aside and drill pilot holes at the marked spots. Ensure these holes match the size of the included screws.
- Align the doorbell with the pilot holes and secure it to the wall using the provided screws.
With the Blink Doorbell Wired securely mounted, you can now proceed with the rest of the setup process, such as connecting it to your Wi-Fi network and configuring the settings through the Blink Home Monitor app.
Connecting To The Home Wi-fi
Learn how to easily connect your Blink Doorbell Wired to your home Wi-Fi network with these simple steps for hassle-free installation. Enjoy the convenience of monitoring your home from anywhere with a stable and secure wireless connection.
Connecting your Blink Doorbell Wired to your home Wi-Fi network is a crucial step in ensuring seamless functionality and uninterrupted monitoring. In this section, we will guide you through the process of connecting your doorbell to your Wi-Fi network, ensuring you can conveniently access the live feed, receive notifications, and manage settings through the Blink app.Download The Blink App
To begin the setup process, you will need to download the Blink app on your smartphone or tablet. The Blink app is available for both iOS and Android devices and can be easily found and installed from the respective app stores. Make sure to download the latest version of the app to ensure compatibility and access to all the features and updates.Create A Blink Account
Once you have the app downloaded, you will need to create a Blink account. Open the app and follow the intuitive registration process to set up your account. Provide the required information, such as your email address and a strong password. Remember to keep your login credentials secure, as they will grant you access to your Blink devices and protected data.Add The Doorbell To The App
After creating your Blink account, it’s time to add your Blink Doorbell Wired to the app. Ensure your doorbell is correctly installed and powered up. Open the Blink app and tap on the “+” icon to start adding a new device. Select “Doorbell” from the device options and follow the on-screen instructions to initiate the pairing process between your doorbell and the app. Make sure to keep your phone close to the doorbell during this step for a smooth connection.Connect To Wi-fi Network
Now that your doorbell is successfully added to the app, it’s time to connect it to your home Wi-Fi network. In the app, navigate to the settings menu and select your doorbell from the device list. Look for the Wi-Fi network settings and tap on it. A screen will appear prompting you to enter your Wi-Fi network name (SSID) and password. Ensure that the details entered are correct and verify the information once again before proceeding. Once the correct credentials are entered, wait for the doorbell to establish a connection with your Wi-Fi network. This process may take a moment, so be patient. Congratulations! You have successfully connected your Blink Doorbell Wired to your home Wi-Fi network. From now on, you can enjoy the full range of features provided by the Blink app, including real-time video feed, notifications, and settings customization. Feel free to explore the app and make any necessary adjustments to suit your preferences. Enjoy the added security and convenience that your Blink Doorbell Wired brings to your home.
Credit: www.ebay.com
Customizing Doorbell Settings
After successfully installing your Blink Doorbell Wired, you can now customize its settings to suit your preferences. By adjusting motion detection, setting up notifications, and configuring camera settings, you can ensure that your doorbell operates exactly the way you want it to. In this blog post, we will guide you through each step, allowing you to make the most out of your Blink Doorbell Wired.
Adjust Motion Detection
With Blink Doorbell Wired, you can fine-tune the motion detection feature to focus on the areas that matter the most to you. To adjust motion detection settings, follow these simple steps:
- Open the Blink app on your smartphone or tablet.
- Select the Blink Doorbell Wired device from your device list.
- Navigate to the “Settings” tab.
- Choose “Motion Detection” from the options.
- Use the sensitivity slider to set your preferred level of motion detection.
Make sure to test the motion detection settings by walking in front of your doorbell to verify the desired sensitivity level. By customizing the motion detection feature, you can minimize false notifications and receive alerts only when it truly matters.
Set Up Notifications
Stay informed about who’s at your door by setting up notifications on your Blink Doorbell Wired. Follow these steps to enable notifications:
- Access the Blink app on your smartphone or tablet.
- Select the Blink Doorbell Wired device from your device list.
- Go to the “Settings” tab.
- Choose “Notifications” from the options.
- Toggle the notification switch to the “On” position.
- You can further customize the notification settings, such as sound and vibration, based on your preference.
By enabling notifications, you’ll receive real-time alerts whenever someone rings the doorbell or triggers the motion detection feature. This way, you’ll never miss an important visitor or package delivery.
Configure Camera Settings
Blink Doorbell Wired allows you to configure various camera settings for optimal performance. Follow the steps below to customize camera settings:
- Launch the Blink app on your smartphone or tablet.
- Select the Blink Doorbell Wired device from your device list.
- Navigate to the “Settings” tab.
- Choose “Camera Settings” from the available options.
- Here, you can adjust settings such as video quality, night vision, and field of view to suit your preferences.
By configuring camera settings, you can ensure crisp and clear video recordings, even in low-light conditions. Don’t forget to save your changes to activate the new settings.
Troubleshooting
Install Blink Doorbell Wired without any hassle by following these simple troubleshooting steps. Ensure a smooth installation process and enjoy the convenience and security of your new doorbell.
Doorbell Not Connecting To Wi-fi
If you’re facing trouble with your Blink Doorbell Wired not connecting to Wi-Fi, don’t worry – we’ve got you covered! Here are a few potential solutions to help you resolve this issue quickly.
- Check your Wi-Fi signal strength: Ensure that your Blink Doorbell Wired is within range of your Wi-Fi router and that the signal is strong enough to establish a connection.
- Reset your router and doorbell: Sometimes, a simple reset can fix connectivity issues. Turn off your router and unplug your Blink Doorbell Wired. Wait for about 30 seconds, then plug in both devices and give them a few minutes to reconnect.
- Double-check your Wi-Fi credentials: Make sure you’ve entered the correct Wi-Fi network name (SSID) and password during the setup process. Any typos or mismatched credentials can prevent a successful connection.
- Move your router closer: If your Blink Doorbell Wired is located far from your router or obstructed by walls, consider moving your router closer or installing a Wi-Fi range extender to strengthen the signal.
- Update firmware: Ensure that both your Blink Doorbell Wired and your router are running the latest firmware versions. Outdated firmware can sometimes cause connectivity issues.
Low Battery Warning
Seeing a low battery warning on your Blink Doorbell Wired? Don’t fret – these simple steps will help you overcome this challenge and keep your doorbell functioning smoothly.
- Recharge or replace the battery pack: When the battery gets low, remove the battery pack from your doorbell and plug it into the provided charging cable. Alternatively, replace the battery pack with a fully charged one if you have an additional pack.
- Check power-saving settings: In the Blink app, navigate to the device settings and ensure that the power-saving mode is not activated. This mode can limit the functionality and drain the battery faster.
- Optimize motion detection settings: Customize the motion detection range and sensitivity settings in the app to reduce unnecessary alerts and conserve battery life. Adjusting these settings ensures the doorbell only captures relevant events.
- Consider a hardwired installation: If you’re consistently experiencing battery drain despite these steps, you may want to consider a hardwired installation. This provides a constant power source to your Blink Doorbell Wired, eliminating the need for recharging.
Video Quality Issues
If you’re encountering video quality issues with your Blink Doorbell Wired, follow these strategies to enhance your viewing experience and ensure crystal-clear video footage.
- Check your internet connection: A stable and high-speed internet connection is crucial for optimal video quality. Make sure your Wi-Fi connection is strong and consider upgrading your internet plan if necessary.
- Adjust the camera position: Evaluate the placement of your doorbell to ensure it captures the desired field of view. Minor adjustments in angles or location can significantly improve video quality.
- Clean the camera lens: Over time, dust and debris can accumulate on the camera lens, affecting video clarity. Gently clean the lens using a microfiber cloth to remove any obstructions.
- Optimize lighting conditions: Insufficient or excessive lighting can impact video quality. Ensure that the area around your doorbell is well-lit, and if necessary, consider installing additional lighting to improve visibility.
- Review internet speed and bandwidth: Check your internet speed and bandwidth capacity. Multiple devices or activities consuming a significant portion of your bandwidth may result in reduced video quality.
Credit: www.ebay.com
Frequently Asked Questions Of How To Install Blink Doorbell Wired
How Do I Install The Blink Doorbell Wired?
To install the Blink Doorbell Wired, start by powering off your existing doorbell and removing it from the wall. Next, attach the mounting plate to the wall using the provided screws. Connect the wires from your home’s electrical system to the terminals on the back of the doorbell.
Finally, attach the doorbell to the mounting plate and power it on.
What Tools Do I Need To Install The Blink Doorbell Wired?
To install the Blink Doorbell Wired, you will need a Phillips screwdriver, a voltage tester to ensure the power is off, wire strippers to prepare the wires, and a drill if you need to create holes for mounting. Additionally, make sure you have a stable internet connection during the installation process.
Does The Blink Doorbell Wired Require A Wired Connection?
Yes, the Blink Doorbell Wired requires a wired connection for both power and internet connectivity. It needs to be hardwired to your home’s electrical system to ensure a reliable power source. Furthermore, a wired connection provides a consistent internet connection for seamless functionality and access to the Blink app.
Can I Install The Blink Doorbell Wired Myself?
Yes, you can install the Blink Doorbell Wired yourself. The installation process is straightforward and comes with a step-by-step guide. However, if you are not comfortable working with electrical wiring, it is recommended to hire a professional electrician to ensure a safe and proper installation.
Conclusion
Installing the Blink Doorbell Wired is a simple and straightforward process that anyone can do. By following the step-by-step instructions provided, you can easily set up and connect your doorbell to your home’s Wi-Fi network. With its sleek design and convenient features, the Blink Doorbell Wired is a reliable choice for enhancing your home security.
Don’t wait any longer, take the first step towards a safer and more secure home today.