How to Install a Garden Window
A garden window is a great way to add light and space to any room in your home. Here are some tips on how to install a garden window:
1. Choose the right location for your garden window.
It should be placed in an area where it will get plenty of sunlight so that your plants can thrive.
2. Measure the area where you want to install the garden window, and then order the window accordingly.
3. Once the window arrives, carefully remove it from the packaging and set it in place.
Make sure that it is level and square before attaching it to the opening.
4. Use screws or nails to secure the garden window in place. Be careful not to over-tighten them, as this could damage the glass.
- Decide on the location of the garden window
- Cut out a hole in the wall where the garden window will be placed using a saw
- Install a header above the hole to support the weight of the garden window
- Affix sill supports to the bottom of the hole
- Place the garden window into the hole and secure it in place with screws
- Caulk around the perimeter of the window to create a weather-tight seal
Garden Window Home Depot
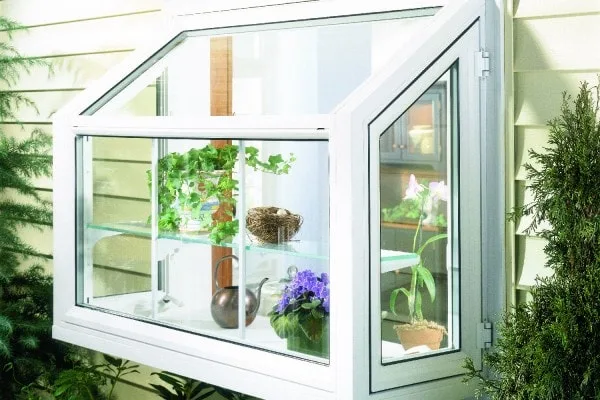
A garden window is a great way to add natural light and ventilation to your home. Garden windows project outward from the house and have shelves that are ideal for plants. At The Home Depot, we have a variety of garden windows in different styles and sizes to suit your needs.
Garden windows are a great way to brighten up any room in your home. They let in lots of natural light and can help you start or maintain a healthy indoor garden. Many people use their garden windows as herb gardens, growing fresh herbs that they can use in cooking.
Others use them as plant nurseries, starting seedlings that they will later transplant into their outdoor gardens. No matter how you use it, a garden window is a great addition to any home.
If you’re interested in adding a garden window to your home, stop by your local Home Depot store or visit our website today.
One of our expert associates would be happy to help you choose the perfect window for your home and provide guidance on installation.
Diy Garden Window
Garden windows are a great way to add natural light and ventilation to your home. They can also be used to grow plants and flowers indoors. Garden windows are usually installed in the kitchen, but can be added to any room that could benefit from extra light and fresh air.
If you’re thinking about adding a garden window to your home, there are a few things you should know. First, garden windows protrude from the exterior of your home, so make sure you have enough space on the outside of your house before beginning installation. Second, garden windows can be heavy, so it’s important to install them with sturdy support.
Finally, garden windows require regular maintenance to keep them functioning properly and looking their best.
If you’re up for the challenge of installing a garden window yourself, here’s what you’ll need:
-A level surface on which to work
-A tape measure
-A circular saw or jigsaw
-An electric drill
-Wood screws (1 inch long)
How to Remove a Garden Window
Removing a garden window is a relatively easy task that can be completed in a few hours. The first step is to remove the screws or nails that are holding the window in place. Once the screws or nails are removed, the window can be carefully lifted out of the opening.
The next step is to remove any trim or molding around the perimeter of the garden window. This trim will need to be replaced when the new window is installed. Once the trim is removed, it will be necessary to caulk around the perimeter of the opening to seal it from weather damage.
Finally, measure the opening for your new garden window and order one that fits snugly into place. Installation is simply a matter of reversing the process you used to remove the old window. Be sure to use fresh caulk around your new window and enjoy your bright, sunny view!
Milgard Garden Window Installation Instructions
If you’re looking to add a touch of greenery to your home, a Milgard garden window is the perfect way to do it. But before you can enjoy your new window, you’ll need to install it. Here are some tips to help you with the installation process:
1. Make sure that the area where you’ll be installing the window is level and free of debris. This will make it easier to install the window and ensure that it functions properly.
2. Once you’ve prepared the area, unpack your Milgard garden window and set it in place.
Be sure to check that the window is level before proceeding with the installation.
3. To secure the window in place, use shims around all four sides of the frame. You may need to adjust the shims until the window is level and flush with the opening.
4. Once the shims are in place, drill pilot holes through them and into the framing around the opening. Then, insert screws into those holes and tighten them down until they’re snug againstthe shims (but don’t over-tighten).
5. Finally, caulk around all four sides ofthe frameto create a weather-tight seal betweenthewindowandopeningin your home .
Allowthecaulktodrycompletelybefore addinganytrimorblinds toyournewwindow .
Affordable Garden Windows
Garden windows are a great way to add natural light and ventilation to your home. They are also a great way to show off your plants and flowers. But what if you don’t have a green thumb?
Or what if you’re on a budget? Here are some tips for finding affordable garden windows.
First, check out your local home improvement store.
Many stores sell garden windows at discounted prices. You may even be able to find one on clearance.
Next, try searching online.
There are many online retailers that sell garden windows at discount prices. Be sure to compare shipping costs before you make your purchase.
Finally, ask your friends and family if they know of any good deals on garden windows.
You may be surprised at how many people have purchased garden windows for their homes.
With a little bit of effort, you should be able to find some great deals on garden windows. So get out there and start shopping!

Credit: www.youtube.com
Are Garden Windows Hard to Install?
Garden windows are a great way to add natural light and extra space to your home. But are they hard to install?
The answer is: it depends.
Garden windows can be more complicated than other types of windows, simply because they jut out from the house. This means that you’ll need to take measurements and do some planning before you start installation.
But if you’re handy and have some basic carpentry skills, installing a garden window shouldn’t be too difficult.
The most important thing is to make sure that the window is level and square before attaching it to the house.
How Much Does It Cost to Put in a Garden Window?
Assuming you would like an answer for the U.S., the average cost to install a garden window is about $1,000-$2,000. This price range will depend on the size and style of window you choose as well as the complexity of your installation. If you need to do any significant structural work to accommodate your new window, that will obviously add to the overall cost.
Garden windows are a great addition to any home, bringing in natural light and giving you a little extra space for plants or other decorations. If you’re thinking about installing one in your home, be sure to get multiple quotes from contractors before making a final decision.
How to Build a Garden Window?
If you love spending time in your kitchen and want to add more light and space, then a garden window is the perfect solution. Garden windows protrude from the home and have shelves on all sides that are ideal for housing plants. Not only do they provide extra sunlight for your indoor plants, but they also offer a great view of the outdoors.
Best of all, garden windows are relatively easy to build yourself with some basic carpentry skills.
Here’s how to build a garden window:
1. Measure the rough opening in your wall where the garden window will go.
Be sure to account for the thickness of the walls when making your measurement.
2. Cut out a piece of plywood that will serve as the base for your window frame. This piece should be slightly larger than your rough opening measurement.
3. Assemble your window frame using lumber pieces cut to size and fasten them together with nails or screws. If you want, you can use corner brackets to reinforce the frame further.
4. Attach weather stripping around all four sides of the frame using screws or adhesive caulk (optional).
This will help seal out drafts once the window is installed in place
5- InstallShelf supports aroundthe perimeterof teh frame at whatever heightsyou desirefor holding plant potsor other decorations..
Space shelf supports every 6-12 inches apart depending on how heavy duty they are 6- Centertheframein tehroughopeningandsecureitin placeby nailingor screwinginto wall studsaroundthe perimeteroftehroughopening.. Make sureyour fastenersare longenoughto penetratethrough bothlayersof woodand intothe studbeyondat least1 inch.
.
What is the Difference between a Garden Window And a Bay Window?
Garden windows and bay windows are both types of projecting windows that extend beyond the exterior wall of a building. Garden windows typically have three or four panels, with the two outer panels being fixed in place and the inner panel or panels operable for ventilation. Bay windows usually have three panels, with the center panel fixed and the two side panels operable.
Both garden and bay windows let in more light than a standard window and can create a feeling of openness in a room.
One key difference between garden and bay windows is their purpose. Garden windows are designed to provide an indoor space for plants, while bay windows are primarily used for extra light and ventilation or to create a window seat.
Another difference is that garden windows typically project outward at a shallower angle than bay Windows, which project outward at a steeper angle. This means that garden windows take up less space on the exterior of a building than bay windows.
Whether you choose a garden window or bay window for your home depends on your needs and preferences.
If you want an indoor space for plants, go with a garden window. If you’re looking for extra light and ventilation or want to create a cozy window seat, opt for a bay window.
HOW TO INSTALL A GARDEN WINDOW
Conclusion
If you’re looking for a way to brighten up your kitchen and bring in some extra light, then you might want to consider installing a garden window. Garden windows are a type of bay window that protrudes from the house and has shelves on the sides for plants. They’re a great way to add some greenery to your home, even if you don’t have much outdoor space.
Installing a garden window is relatively simple, but there are a few things you’ll need to do before getting started. First, you’ll need to measure the opening where the window will go and order a custom-sized window accordingly. Next, you’ll need to remove the old window (if there is one) and prep the area for installation.
This usually involves adding some framing around the opening and attaching it to the house with screws or nails.
Once the area is prepared, it’s time to install the garden window. Most come with instructions, but essentially you’ll just be attaching it to the frame with brackets or screws.
Then, all that’s left to do is add your plants and enjoy your new view!