How to Install 3/8 Inset Self Closing Cabinet Hinges
Installing 3/8 Inset Self Closing Cabinet Hinges is a quick and easy process that anyone can do with just a few tools. The first step is to determine where the hinges will be installed and then mark the appropriate drill holes. Next, use a drill bit that is slightly smaller than the hinge screws to create pilot holes.
Once the pilot holes are drilled, insert the screws into the holes and tighten them until they are snug. The final step is to install the door onto the hinge and close it to ensure that it is properly aligned.
- Determine the correct size hinge for your cabinets
- 3/8 inch inset hinges are typically used for cabinets with thicker doors
- Place the hinge on the door, making sure that the knuckles are facing towards the inside of the cabinet
- Use a drill to create pilot holes for the screws, then insert the screws and tighten them until the hinge is secure
- Repeat these steps for each hinge you need to install
How to Install Inset Cabinet Hinges
If you’re looking to add a touch of class to your kitchen cabinets, then installing inset cabinet hinges is a great way to do it. Inset hinges are designed to sit inside the door frame, rather than on the outside like most other types of hinges. This gives your cabinets a sleek and elegant look that is sure to impress.
Installing inset cabinet hinges is not as difficult as it may seem. With a little patience and some careful measuring, anyone can do it. Here’s what you need to know:
1. Start by removing the old hinges from your cabinets. This will make it easier to install the new ones.
2. Use a drill to create pilot holes for the new screws.
Be careful not to make the holes too big or the screws will be loose and could fall out.
3. Place the new hinge in the doorframe and line up the pilot holes with the screw holes in the hinge.
4. Insert screws into the pilot holes and tighten them until they’re snug against the hinge.
Do not overtighten or you could strip out the hole or break off the head of the screw!
How to Install Inset Hinges for Face Frame Cabinets
Installing inset hinges for face frame cabinets is a relatively easy process, but there are a few things you need to know before you get started. Here’s what you need to know about installing inset hinges for face frame cabinets:
1. Inset hinges are installed by first drilling a hole in the cabinet door.
The size of the hole will depend on the size of the hinge.
2. Next, you’ll need to chisel out a mortise (a rectangular recess) in the doorframe to accommodate the hinge.
3. Once the mortise is cut, you can install the hinge by inserting it into the hole and attaching it to the doorframe with screws.
4. Finally, you’ll need to adjust the hinge so that it closes properly. This can be done by loosening or tightening the screws that hold the hinge in place.
How to Install Surface Mount Hinges
If you’re looking to install surface mount hinges, there are a few things you’ll need to keep in mind. First, you’ll need to determine the size of the hinge you need. This is typically based on the door width.
Once you have the correct size, you can begin installation.
To start, you’ll need to remove any existing door hardware. Next, position the hinge on the door so that the holes align with those on the frame.
If necessary, use a drill to create pilot holes for screws. Then, simply screw in the provided screws until tight. Be careful not to overtighten, as this could strip the hole or damage the door itself.
Once all hinges are installed, test them out by opening and closing the door a few times. Make sure they’re properly aligned and that there’s no resistance when moving them. With proper installation, your new surface mount hinges should provide years of reliable use!
Liberty Self Closing Inset Hinge Installation
If you’re looking for a simple, yet effective way to update your cabinet doors, then installing self-closing inset hinges is a great option. Liberty Self Closing Inset Hinges are easy to install and come in a variety of finishes to match your existing hardware. Plus, they’re adjustable so you can fine-tune the closing speed to suit your needs.
Here’s a quick guide on how to install them:
1. Start by removing the old hinges from your cabinet doors. If the holes are not perfectly aligned, you may need to use a chisel to enlarge them slightly.
2. Next, position the hinge plate on the back of the door and mark where the screws will go. Pre-drill pilot holes for the screws and then attach the hinge plate with screws.
3. Now it’s time to install the barrel portion of the hinge into the hinge plate.
Make sure that the hinge is positioned correctly before tightening the set screw with an Allen key or hex driver.
4. Once both hinges are installed, test them out by opening and closing the doors several times. Adjust as necessary until they operate smoothly and close securely every time.
Replacing Cabinet Hinges Problems
If your cabinet hinges are starting to show their age, it might be time to replace them. But before you start shopping for new hardware, it’s important to identify the type of hinge you have. Otherwise, you could end up with a replacement that doesn’t fit properly.
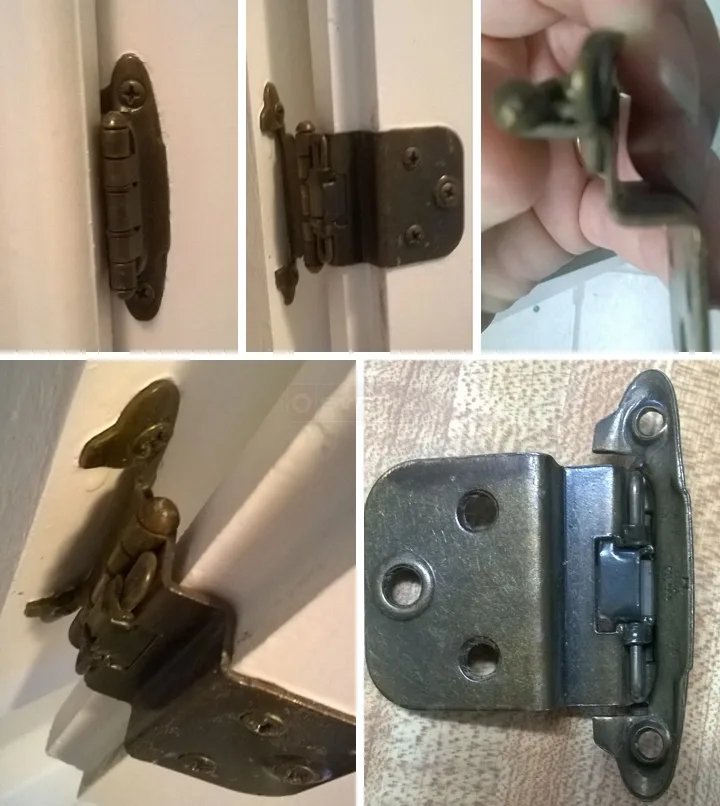
There are three main types of cabinet hinges: concealed, semi-concealed, and exposed. Concealed hinges are hidden from view when the door is closed, while semi-concealed and exposed hinges are visible. The most common type of hinge is the semi-concealed hinge, which has a small portion that is visible when the door is closed.
Once you’ve identified the type of hinge you have, it’s time to start shopping for replacements. If you’re not sure what size or style you need, take one of your old hinges with you to the store so that you can find an exact match. Keep in mind that some manufacturers offer different styles of hinges that will achieve the same look as your existing hardware.
Replacing cabinet hinges isn’t a difficult task, but it’s important to take your time and make sure everything lines up properly before drilling any new holes. With a little patience and attention to detail, though, you should be able to install your new hardware without any problems!
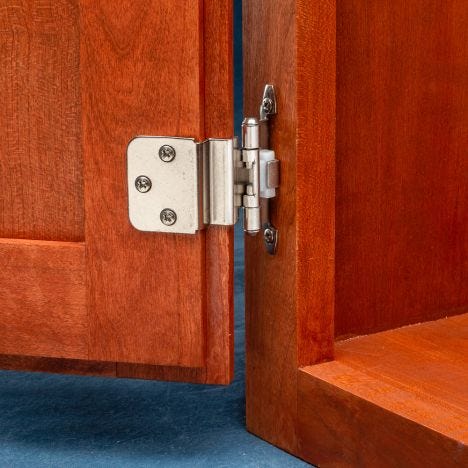
Credit: www.rockler.com
How to Install Liberty Self Closing Inset Hinge?
Installing a Liberty self closing inset hinge is a simple process that can be completed in just a few minutes. The first step is to remove the old hinges from the door. Next, use a drill to make pilot holes for the new hinges.
Once the pilot holes are drilled, insert the screws that come with the hinge into the holes. Be sure to tighten the screws until they are snug. Finally, test the door to make sure it closes properly and smoothly.
How Do You Install Self Closing Cabinet Hinges?
If you’re looking to add some convenience to your kitchen cabinets, then installing self-closing cabinet hinges is a great option. Not only will it make it easier to close your cabinets, but it can also help prevent them from slamming shut – which can be a real pain (literally).
Installing self-closing cabinet hinges is actually pretty straightforward, and can be done in just a few simple steps.
First, you’ll need to remove the existing door hinges from the cabinet doors (if there are any). Next, position the self-closing hinge on the door so that the screws line up with the pre-drilled holes. Once everything is lined up, simply screw in the hinge and tighten it down.
Repeat this process for all of the doors that you want to install self-closing hinges on. And that’s really all there is to it! In just a few minutes time, you can have your kitchen cabinets operating much more smoothly – and with far less effort on your part.
How Do You Adjust 3 8 Inset Hinges?
If you’re looking to adjust 3 8 inset hinges, there are a few things you’ll need to keep in mind. First, when adjusting an inset hinge, you’ll need to use a different technique than you would for a full-inset or overlay hinge. Inset hinges are designed to sit flush with the door, so you won’t be able to see the screws that hold them in place.
This means that you’ll need to use a special tool, like a screwdriver with a magnetic tip, to reach the screws.
Once you have your screwdriver (or other appropriate tool), simply insert it into the hole in the hinge and loosen or tighten the screws as needed. When adjusting an inset hinge, it’s important not to over-tighten the screws, as this can damage the hinge or cause it to become misaligned.
Just make sure that the door is level and even before tightening everything down completely.
With these tips in mind, adjusting 3 8 inset hinges should be a breeze!
What Does 3/8 Inch Inset Hinge Mean?
An inset hinge is a type of door hinge that is installed on the inside of a door. The most common size for an inset hinge is 3/8 inch, but they are also available in 1/4 inch and 5/8 inch sizes.
Inset hinges are used when you want the door to sit flush with the frame when it is closed.
This can give your doors a cleaner look, as there are no visible hinges. It can also make them more difficult to open if they are not properly installed.
If you are installing new doors in your home, or replacing old ones, you may want to consider using inset hinges.
Keep in mind that these types of hinges require more precise measuring and installation than other types of hinges.
Amerock AMBPR3428 3 Face Mount, Self Closing Cabinet Hinge Pair, 3 8 Inset Polished Brass Finish
Conclusion
If you’re looking to install 3/8 inset self closing cabinet hinges, here’s a quick and easy guide. All you’ll need is a drill, a screwdriver, and the hinges themselves. Start by drilling pilot holes into the door where the hinge will be mounted.
Next, use a screwdriver to attach the hinge to the door. Once both hinges are in place, simply close the door and test that it’s properly aligned and functioning. If everything looks good, you’re all set!