How to Fix Uneven Wood Cuts
If your cuts are consistently too deep or shallow, adjust the blade on your saw up or down. To do this, loosen the bevel-lock lever and bevel-tilt knob. Then, move the blade to the desired position and retighten both levers.
If your problem is with inconsistent angles, check the miter gauge on your saw to make sure it’s tight and that the pointer is lined up with 0 degrees. You may also need to adjust the fence if it’s not flush with the blade.
- Check the blade on your saw to make sure it is sharp and in good condition
- A dull or damaged blade will cause uneven cuts
- Make sure the wood you are cutting is straight and not warped or cupped
- Uneven wood will also lead to uneven cuts
- Cut slowly and evenly, letting the saw do the work instead of forcing it through the wood
- Pushing too hard can cause the blade to bind and produce an uneven cut
- If you find that your cuts are still not perfectly even, try using a different type of saw or a different blade on your current saw
- Some blades are better suited for certain types of cuts than others
How to Fix Wood Cut Too Short
If you’ve ever cut a piece of wood too short, you know it can be a frustrating experience. But don’t despair – there are ways to fix this problem! Here are a few tips on how to fix wood cut too short:
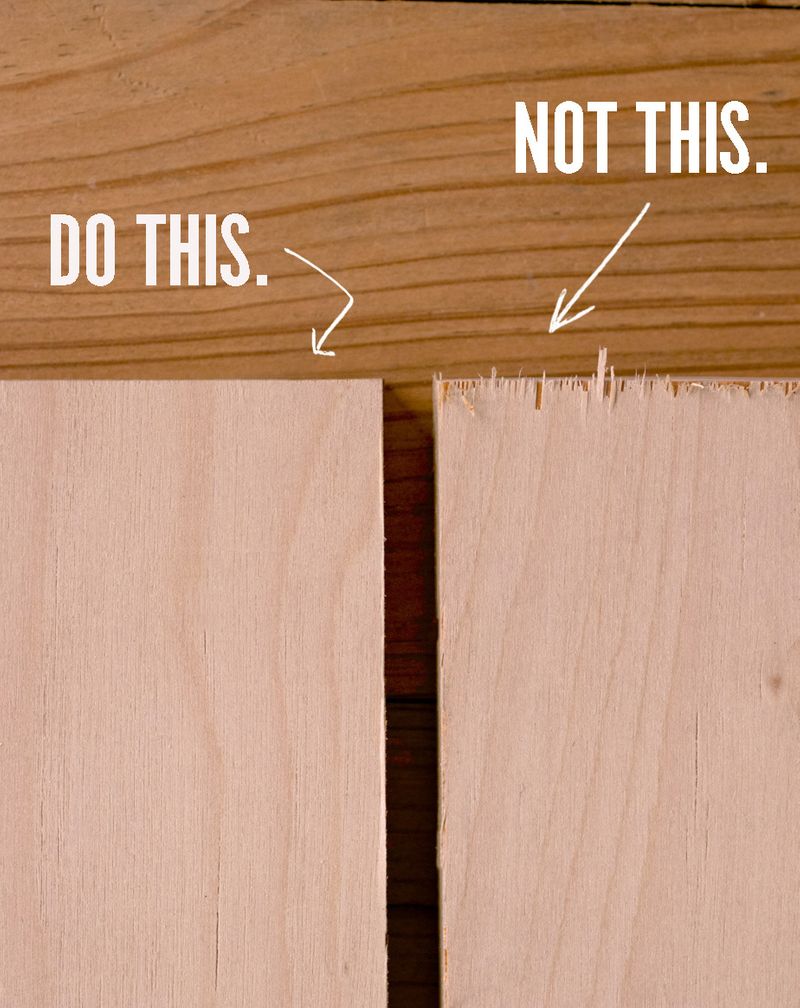
1. Use a saw blade with more teeth: This will help prevent the wood from splintering as you make your cuts.
2. Use a slower cutting speed: If you’re using a power saw, try reducing the speed at which you’re making your cuts. This will help minimize the amount of material that’s removed with each cut.
3. Use a smaller kerf: The kerf is the width of the blade’s cut. Using a saw with a smaller kerf will help reduce the amount of material that’s removed with each cut.
4. Make multiple passes: If possible, make several shallow cuts instead of one deep one.
This will help reduce the risk of splintering or breaking the wood.
5. Use clamps or another method to secure the workpiece: This will help prevent it from moving around as you make your cuts, and minimize the risk of accidently cutting it too short.
How to Straighten Jigsaw Cuts
One of the most useful woodworking tools is the jigsaw. It can be used to make a variety of cuts, including curved and straight cuts. When making straight cuts with a jigsaw, it’s important to use a few simple techniques to ensure that your cuts are as accurate as possible.
To start, clamp your workpiece down to your work surface. This will help to keep it from moving around while you’re cutting. Then, mark your cut line with a pencil or pen.
Be sure to use a sharpened pencil so that your line is visible and easy to follow.
Next, set up your jigsaw according to the manufacturer’s instructions. Make sure that the blade is properly installed and tighten the clamp so that the blade doesn’t come loose during use.
Once everything is ready, position the jigsaw on your marked line and begin cutting slowly and steadily along the line.
As you’re cutting, occasionally pause and check to make sure that you’re still following your marked line. If you find that you’ve veered off course, simply stop cutting and reposition the jigsaw so that it’s back on track.
Finally, when you reach the end of your cut line, turn off the power and carefully remove the workpiece from your clamps.
Timbermate Wood Filler
If you are in the market for a wood filler, you may have come across Timbermate. Timbermate is a water-based wood filler that is popular among professionals and DIYers alike. In this blog post, we will take a closer look at Timbermate and see what makes it so popular.
Timbermate is a water-based wood filler that comes in a variety of colors to match your project. It is easy to use and can be sanded, drilled, and painted once it is dry. Timbermate is also less likely to shrink or crack than other types of wood fillers.
When using Timbermate, you will want to make sure that the area you are filling is clean and free of debris. You will also want to make sure that the area is wet before applying the filler. This will help the filler to adhere better to the surface.
Once you have applied the filler, you will want to let it dry for at least 24 hours before sanding or painting.
Overall, Timbermate Wood Filler is a great option for those looking for an easy-to-use wood filler that dries quickly and resists shrinking and cracking.
How to Fix Uneven Wood Surfaces
If you have uneven wood surfaces in your home, there are a few ways that you can fix them. One way is to sand the surface down until it is level. Another way is to use a leveling compound, which you can apply with a putty knife or trowel.
Once the compound is dry, you can sand it smooth. If the surface is still not level, you may need to repeat the process.
How to Fix a Missing Chunk of Wood
If you have a missing chunk of wood, there are a few things you can do to fix it. The first thing you need to do is clean up the area around the missing chunk. This will help you assess the damage and figure out what kind of repair is needed.
If the missing chunk is small, you may be able to simply glue it back in place. If the damage is more extensive, you may need to use a piece of matching wood to fill the gap.
Once you’ve determined how to best fix the damage, it’s time to get started on the repairs.
If you’re using glue, apply it generously to both surfaces and then clamp them together until the glue dries. For larger gaps, start by attaching one end of your replacement piece with screws or nails. Then use wood filler or putty to fill any remaining space.
Once everything is dry, sand down any rough edges and paint or stain as desired.
With some patience and elbow grease, that damaged spot will soon be good as new!
Credit: www.woodfordtooling.com
How Do You Straighten a Crooked Cut in Wood?
It’s not uncommon to accidentally cut a piece of wood at an angle. Whether it’s because you were using a dull blade or you were rushing, a crooked cut can ruin the aesthetics of your project. Luckily, there are a few easy ways to fix this problem.
The first option is to use sandpaper to even out the edges of the piece of wood. You’ll want to start with coarse sandpaper and work your way up to finer grits until the edges are smooth. This method will take some time and patience, but it’s worth it for a professional looking finish.
If you’re in a hurry, you can also use a hand planer or electric sander to quickly remove any unevenness on the surface of the wood. Just be careful not to overdo it or you’ll end up with an uneven surface.
Once the surface is level, you can use a straight edge and clamps to true up the sides of the wood.
First, clamp the straight edge along one side of the wood so that it extends beyond the crooked cut. Then, use a saw or router to follow along the straight edge and make a new, straighter cut.
Finally, if all else fails, you can always cover up the crooked cut with trim molding or another decorative element.
By taking your time and following these steps, you can easily fix any crooked cuts in your woodworking projects!
How Do You Even Out a Piece of Wood?
If you have a piece of wood that is warped or bowed, there are a few ways to try to even it out. One way is to use clamps and weights. First, clamp the wood at both ends.
Then, place weights on the center of the board. Leave the clamps and weights overnight, and check to see if the board has straightened out. If not, you can try steaming the board.
Place the board over a pot of boiling water, and put a towel over it to trap in the steam. After 10-15 minutes, remove the board and check to see if it has straightened out. If neither of these methods work, you may need to replace the piece of wood altogether.
How Do You Repair a Cut in Wood?
If you have a cut in wood that needs to be repaired, there are a few different options that you can choose from. One option is to use wood glue and clamps to hold the pieces of wood together while the glue dries. Another option is to use a dowel rod and drill holes in both pieces of wood so that the dowel can be inserted and glued into place.
Whichever method you choose, make sure that the surfaces of the wood are clean and free of debris before you begin repairs.
How Do You Fix Woodworking Mistakes?
No one is perfect, and that includes woodworkers. Even the most experienced professionals make mistakes from time to time. The key is to learn from those mistakes so you can avoid making them in the future.
Here are some tips on how to fix woodworking mistakes:
1. If you drilled a hole in the wrong place, try using a dowel plug to fill it. First, drill a pilot hole in the plug slightly smaller than the original hole.
Next, glue the plug into the hole and let it dry overnight. Finally, sand it flush with the surrounding surface.
2. If you accidentally glued two pieces of wood together, don’t panic!
You can usually separate them by heating up the joint with a hair dryer or heat gun set to low heat. Once the glue has softened, use a putty knife or chisel to pry the pieces apart.
3. If you made a mistake when cutting a piece of wood, try using a router to trim off any rough edges.
First, mark where you need to remove material with a pencil or chalk line. Next, use a straight bit in your router set to just barely take off the top layer of wood along your line. Be careful not go too deep – you don’t want to ruin your project!
7 Ways to Fix Common Woodworking Mistakes
Conclusion
If you’re working with wood and you notice that your cuts are uneven, don’t worry – there’s an easy fix. You can use a hand plane to even out the cuts. Just make sure that the hand plane is set to the correct depth and angle, and then start shaving off the high spots.
Once you’ve got the cuts evened out, sand them down so they’re smooth.