Woodworking is a craft that is both timeless and rewarding. Whether you’re a beginner or a seasoned carpenter, it’s not uncommon to encounter gaps in your woodworking projects. These gaps can be frustrating and can mar the overall beauty and functionality of your piece. However, fear not! In this guide, we will explore the art of filling gaps in woodworking, equipping you with the knowledge and techniques to seamlessly mend those imperfections.
Filling gaps in woodworking requires a delicate balance of skill and precision. From small hairline cracks to larger voids, there are various methods and materials at your disposal. We will delve into the different types of gaps you may encounter, such as those caused by shrinkage, joinery errors, or natural defects in the wood. Additionally, we will explore the step-by-step process of filling these gaps, including the tools and materials needed for each scenario. So, whether you’re a hobbyist looking to enhance the aesthetics of your project or a professional seeking to deliver flawless craftsmanship, this guide will provide you with the insights and techniques to successfully fill gaps in your woodworking endeavors.
How to Fill Gaps in Woodworking
If you want to fill gaps in your woodworking project, follow these simple steps:
- Step 1: Clean the gap thoroughly to remove any debris or loose material.
- Step 2: Select a suitable wood filler that matches the color and grain of the wood.
- Step 3: Apply the filler into the gap using a putty knife or a finger, ensuring it is level with the surface.
- Step 4: Allow the filler to dry completely, following the manufacturer’s instructions.
- Step 5: Sand the filled area until smooth and blend it with the rest of the wood surface.
- Step 6: Finish the wood as desired, such as staining or painting, to achieve a seamless finish.
Introduction:
Woodworking is a craft that requires precision and attention to detail. However, even the most skilled woodworker may encounter gaps in their projects. These gaps can occur due to a variety of reasons, such as wood movement, improper joinery, or simply human error. In this article, we will guide you through the process of filling gaps in woodworking, ensuring a seamless and professional finish.
H3: Assessing the Gap
Before diving into the process of filling gaps, it is important to assess the size and nature of the gap. Small gaps can be easily filled with wood putty or epoxy, while larger gaps may require more complex techniques. Start by measuring the width and depth of the gap using a ruler or caliper. This will help you determine the most suitable filler and technique for the job.
Paragraph 1:
For small gaps, wood putty is an ideal solution. Wood putty is a premixed filler that comes in various colors to match different wood tones. Begin by cleaning the gap thoroughly, ensuring there is no dust or debris present. Then, using a putty knife, apply the wood putty to the gap, pressing it firmly into place. Smooth out the excess putty with the putty knife, ensuring a flush surface. Allow the putty to dry according to the manufacturer’s instructions before sanding it down to a smooth finish. Finally, apply a matching wood stain or finish to blend the filled gap seamlessly with the surrounding wood.
Paragraph 2:
In the case of larger gaps, epoxy is a more suitable option. Epoxy is a two-part adhesive that creates a strong bond and can be tinted to match the wood color. Begin by mixing the epoxy according to the manufacturer’s instructions. Using a putty knife or syringe, apply the epoxy to the gap, ensuring it fills the entire space. If necessary, use a small brush or toothpick to spread the epoxy evenly. Once applied, allow the epoxy to cure completely, following the recommended drying time. After curing, sand the epoxy down to a smooth finish, blending it with the surrounding wood. To achieve a seamless look, apply a matching wood stain or finish to the entire surface.
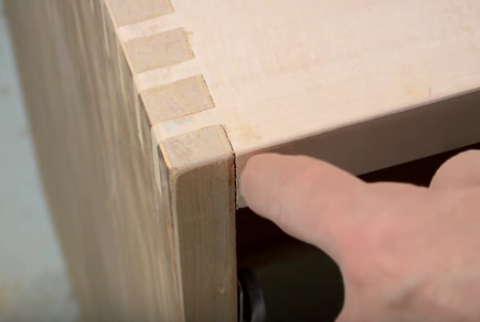
H3: Repairing Gaps in Miter Joints
Miter joints are commonly used in woodworking projects, but they can be prone to gaps due to the nature of the joint. Repairing gaps in miter joints requires a slightly different approach.
Paragraph 1:
Begin by assessing the size and nature of the gap in the miter joint. If the gap is small, wood putty can be used to fill it. Clean the gap thoroughly, removing any dust or debris. Apply the wood putty to the gap, pressing it firmly into place. Smooth out the excess putty with a putty knife, ensuring a flush surface. Allow the putty to dry before sanding it down and applying a matching wood stain or finish. For larger gaps in miter joints, a technique called “spline and glue” can be used. This involves cutting a slot (spline) along the length of the joint and inserting a piece of wood with a corresponding groove. The spline is then glued in place, filling the gap and providing additional strength to the joint.
Paragraph 2:
To implement the “spline and glue” technique, start by cutting a slot along the length of the miter joint using a table saw or router. The slot should be deep enough to accommodate the spline. Next, cut a corresponding groove on a separate piece of wood that matches the width and depth of the slot. Apply glue to the spline and insert it into the slot, ensuring a snug fit. Clamp the joint together and allow the glue to dry completely. Once dry, sand down the excess spline and finish the surface with a matching wood stain or finish.
By following these steps, you can effectively fill gaps in your woodworking projects, ensuring a professional and seamless finish. Remember to choose the appropriate filler and technique based on the size and nature of the gap. With a little patience and attention to detail, you can achieve outstanding results in your woodworking endeavors.
Frequently Asked Questions
Here are some commonly asked questions about how to fill gaps in woodworking:
Q: What causes gaps in woodworking projects?
A: There are several factors that can cause gaps in woodworking projects. One common reason is wood movement due to changes in humidity and temperature. As wood expands and contracts, it can create gaps between individual pieces or joints. Another cause of gaps can be improper joinery techniques or inaccurate measurements during construction. Additionally, wood shrinkage over time can result in gaps appearing in previously tight-fitting joints.
Q: What materials can be used to fill gaps in woodworking?
A: There are various materials that can be used to fill gaps in woodworking projects. One popular option is wood filler, which is a putty-like substance that can be applied to gaps and then sanded down to create a smooth surface. Wood filler is available in different colors to match the wood being used. Another option is epoxy resin, which can be mixed and poured into larger gaps. Epoxy resin is durable and can be sanded and finished like wood. Some woodworkers also use natural materials such as sawdust mixed with glue to create a custom filler that matches the wood’s color.
Q: How should I prepare the gap before filling it?
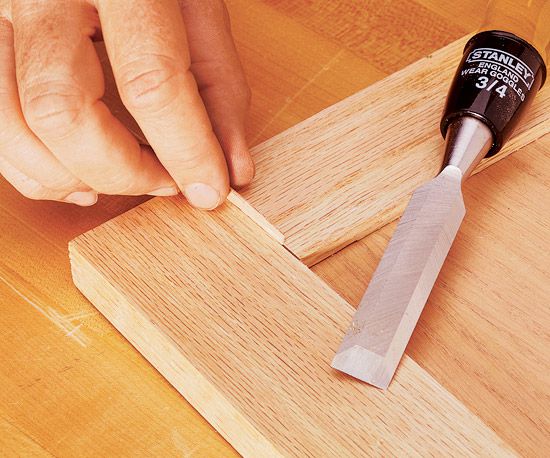
A: Before filling a gap in woodworking, it is important to prepare the area properly. Start by cleaning the gap and removing any debris or loose wood particles. If there are any rough edges or splinters around the gap, gently sand them down. For larger gaps, consider using a chisel or other tools to clean and shape the edges of the gap. It is also a good idea to ensure the wood is dry and free from any finishes or coatings that may interfere with the adhesion of the filler. Taking the time to properly prepare the gap will result in a better final result.
Q: How do I apply wood filler to fill gaps?
A: To apply wood filler to fill gaps in woodworking, start by selecting the appropriate filler for your project. Using a putty knife or a similar tool, scoop a small amount of filler onto the blade. Then, press the filler into the gap, ensuring it completely fills the space. Use the putty knife to smooth out the surface of the filler, removing any excess. Allow the filler to dry according to the manufacturer’s instructions. Once dry, sand the filled area until it is smooth and level with the surrounding wood. Finally, finish the wood as desired to match the rest of the project.
Q: How can I prevent gaps in woodworking projects?
A: While it is not always possible to completely prevent gaps in woodworking projects, there are steps you can take to minimize their occurrence. First, choose appropriate wood for your project that is less prone to movement and shrinkage. Avoid using wood with high moisture content, as it is more likely to change shape over time. Properly acclimate the wood to the environment where it will be used before starting the project. When joining pieces together, ensure accurate measurements and use precise joinery techniques. Additionally, consider using mechanical fasteners such as screws or dowels to reinforce joints and minimize the risk of gaps appearing in the future.
Beginner Wood Filling Mistakes | How to Fill Cracks and Gaps
In conclusion, filling gaps in woodworking is a crucial skill that every woodworker should possess. Whether you are a beginner or a seasoned professional, learning how to effectively fill gaps can enhance the overall quality and appearance of your projects. By following the step-by-step techniques outlined in this guide, you can confidently tackle any gaps that may arise and achieve seamless results.
Remember, the key to filling gaps in woodworking lies in proper preparation, selection of appropriate filling materials, and meticulous application. Take the time to assess the size and nature of the gap before choosing the most suitable filling method. Whether you opt for wood fillers, epoxy, or even sawdust mixed with glue, always strive for a precise color match and a smooth finish. With practice and patience, you can master the art of gap filling and take your woodworking skills to new heights. So go ahead, embrace the challenge, and let your creativity soar with flawlessly filled gaps in your future woodworking projects.