How to Enable Sata Port in Bios Msi

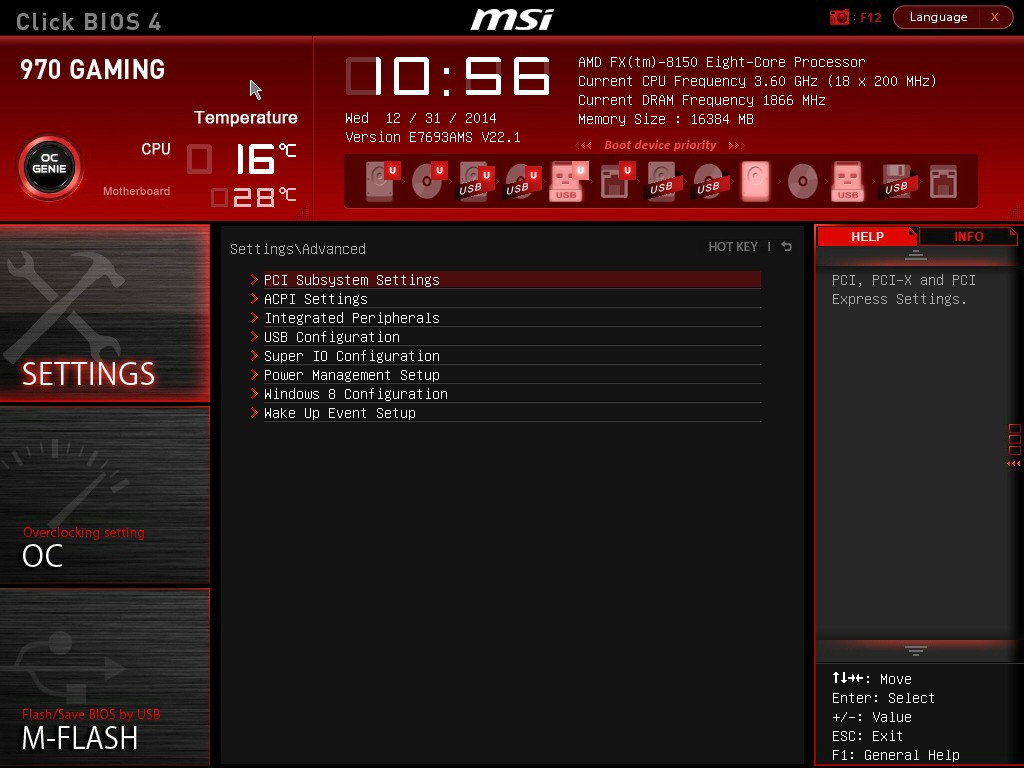
If you have an MSI motherboard with a SATA port that isn’t working, you may need to enable it in the BIOS. This is a relatively simple process, but it’s important to follow the instructions carefully. First, boot into the BIOS by pressing the appropriate key for your motherboard (usually F2 or DEL).
Then, use the arrow keys to navigate to the “Integrated Peripherals” menu. From here, find the option for “SATA Port0” and set it to “Enabled”. Finally, save your changes and exit the BIOS.
Your SATA port should now be working properly.
Fix New Hard disk Drive or SSD not detected on MSI Mainboard
- Enter your computer’s BIOS menu
- This is usually done by pressing a key during bootup, such as F2, ESC, or DEL
- Use the arrow keys to navigate to the Storage tab
- Select SATA Controller and set it to Enabled
- Press F10 to save your changes and exit the BIOS menu
How to Enable Sata Port in Bios Msi Click Bios 5
SATA is the most common type of hard drive connection. If your computer doesn’t have a SATA port, you’ll need to enable it in the BIOS before you can connect a SATA drive. This process will vary depending on your motherboard and BIOS, but here’s a general overview:
1. Enter the BIOS menu. This is usually done by pressing F2 or Del during bootup.
2. Navigate to the Storage tab.
This is where you’ll find the options for configuring SATA ports.
3. Enable the SATA port(s) you want to use. You may need to change the mode as well (IDE, AHCI, RAID, etc.), but that’s usually not necessary unless you’re using special drives or features.
How to Enable Sata Port in Bios Gigabyte
Most newer computers have SATA ports on the motherboard to connect storage devices. If you have a Gigabyte motherboard, you can enable the SATA ports in the BIOS to use them.
To do this, first enter the BIOS by pressing the F2 key when your computer starts up.
Then go to the Advanced tab and select Storage Configuration.
Scroll down to the SATA Port 0 section and set the Mode to AHCI. This will enable the port so that you can use it with an AHCI-compliant device like a hard drive or SSD.
You can also change the other settings in this section if needed, but most of them can be left at their default values.
Once you’ve made your changes, press F10 to save and exit from the BIOS. Your computer will reboot and you’ll be able to use your SATA devices!
How to Enable Hard Drive in Bios Msi
If you have an MSI motherboard, you may need to enable the hard drive in BIOS before you can use it. This process is simple and only takes a few minutes to complete.
First, power on your computer and enter the BIOS settings.
To do this, press the F2 key when the MSI logo appears on your screen.
Once in the BIOS settings, navigate to the “Boot” tab. Here, you will see a list of all of the devices that your computer can boot from.
Find your hard drive in this list and make sure that it is set as the first priority device. If it is not, use the arrow keys to move it up in the list until it is at the top.
Save your changes and exit out of BIOS.
Your computer should now boot from your hard drive without any issues!
How to Enable Sata Port in Bios Asus
Assuming you would like a blog post discussing how to enable the SATA port in BIOS on an ASUS computer, here is one possible solution:
ASUS computers come with a built-in SATA port that can be used to connect an external hard drive or other storage device. In order to use this port, you must first enable it in the BIOS settings.
Here’s how:
1. Start your ASUS computer and press the “F2” key repeatedly until the BIOS menu appears.
2. Use the arrow keys to navigate to the “Advanced” tab and then select “SATA Configuration.”
3. Select the “Enable SATA Port” option and then press the “Enter” key.
4. Press the “F10” key to save your changes and exit from the BIOS menu.
Sata Port on Msi Motherboard
If you have an MSI motherboard with a SATA port, congratulations! You now have one of the most flexible and fastest data storage ports available. But what is a SATA port, and what can you do with it?
A SATA port is a type of data storage interface. It stands for Serial AT Attachment, and it’s basically an improved version of the older Parallel ATA (PATA) standard. A single SATA port can provide up to 6 Gbps of data transfer speed, which is much faster than PATA.
One of the main advantages of using a SATA port is that it allows you to connect devices such as hard drives and SSDs directly to your motherboard. This eliminates the need for a separate IDE controller, which can free up valuable resources on your system. Additionally, SATA ports are much more compact than PATA connectors, so they take up less space on your motherboard.
Another great feature of SATA ports is hot-plugging support. This means that you can plug or unplug devices while your system is running without having to power down first. This can be extremely convenient if you need to swap out hard drives or make other changes to your storage configuration on the fly.
If you’re looking to get the most out of your MSI motherboard, be sure to take advantage of its built-in SATA ports. With their high speed and flexibility, they’re sure to give you a boost in performance and convenience.
How to Enable Sata Port in Bios Hp
If you have an HP computer with a SATA port and you want to enable it in the BIOS, here’s how. First, enter the BIOS by pressing F10 when the computer first starts up. Then, go to the Advanced tab and select Integrated Peripherals.
Next, scroll down to Serial ATA and press Enter. Finally, set the SATA controller to Enabled and press F10 to save your changes and exit the BIOS. Now your SATA port will be enabled and you can use it to connect SATA devices like hard drives or SSDs.
How to Enable Sata Port in Bios Dell
SATA (Serial Advanced Technology Attachment) is a high speed interface for connecting hard drives and optical drives to a motherboard. Dell computers use SATA interfaces for both internal and external data storage devices. If you have recently installed a SATA hard drive or optical drive on your Dell computer, you will need to enable the SATA port in BIOS in order for the device to be recognized by the system.
This article will show you how to do that.
First, enter BIOS setup by pressing F2 during bootup. Then navigate to the System Configuration tab and select Serial ATA (SATA).
Finally, press Enter to enable the SATA port. Save your changes and exit BIOS setup. Your SATA hard drive or optical drive should now be recognized by the system.
Sata Port Enable Or Disable
SATA (Serial Advanced Technology Attachment) is a computer bus interface that connects host bus adapters to mass storage devices such as hard disk drives and optical drives. SATA is the successor to the older Parallel ATA (PATA) standard, offering several advantages over the older interface:
– Increased data transfer rates: SATA supports data transfer rates of up to 6 Gbps, while PATA only supports up to 133 Mbps.
– Hot plugging: SATA devices can be plugged in and unplugged without having to power down the system, making it easier to add or remove storage devices.
– Smaller cables: SATA cables are much smaller and thinner than PATA cables, making them easier to route inside a case.
So should you enable or disable your SATA ports?
The answer depends on what you’re using your computer for. If you’re just using it for basic tasks like browsing the web or working with documents, then there’s no need to enable all of your SATA ports. However, if you’re doing more demanding tasks like gaming or video editing, then you’ll want to make sure all of your ports are enabled so that you can take advantage of the increased speed and performance that they offer.
Credit: www.anandtech.com
How Do I Enable Sata Ports in Bios?
If you’re looking to enable SATA ports in your BIOS, there are a few things you’ll need to do. First, identify which SATA ports are available on your motherboard. Next, locate the BIOS settings for your particular model of computer.
Once you’ve found the correct settings, enable the SATA ports that you want to use. Finally, save your changes and exit the BIOS.
Enabling SATA ports in the BIOS is a pretty straightforward process, but there are a few things to keep in mind.
First, make sure that you know which SATA ports are available on your motherboard. You don’t want to accidentally enable a port that doesn’t exist! Second, take note of the BIOS settings for your particular model of computer.
Every manufacturer uses different terminology and locations for their settings, so it’s important to have this information handy before making any changes. Lastly, remember to save your changes before exiting the BIOS; otherwise, they’ll be lost when you reboot.
With these tips in mind, enabling SATA ports in your BIOS should be a breeze!
How Do I Fix Sata Port Not Detected?
If you’re having trouble getting your SATA port detected, there are a few things you can try. First, check your BIOS settings to make sure that the SATA port is enabled. If it is, then try resetting the BIOS to its default settings.
If that doesn’t work, you may need to replace the motherboard or the SATA controller.
Which Sata Ports are Disabled With M 2 Msi?
If you’re looking to use an M.2 SSD with your MSI motherboard, you might be wondering which SATA ports are disabled when doing so. The answer is that it depends on the specific model of MSI motherboard that you have.
Some models will disable all SATA ports except for the port directly connected to the M.2 slot, while others will only disable the SATA port directly below the M.2 slot. You can check your motherboard’s manual to be sure.
In general, though, using an M.2
SSD with an MSI motherboard should not pose any problems. All of the necessary drivers and BIOS updates are readily available from MSI’s website, and installation is a relatively straightforward process. So if you’re looking to upgrade your storage solution, don’t hesitate to give MSI a look!
How Do I Enable My Msi Hard Drive?
If your MSI hard drive has been disabled, there are a few ways that you can enable it. One way is to go into the BIOS settings and enable the hard drive from there. Another way is to use the MS-DOS Command Prompt to enable the hard drive.
To enable your MSI hard drive from the BIOS settings, first restart your computer and press the key that opens up the BIOS menu. This key varies depending on your computer’s make and model, but is usually one of the F keys (F2, F4, F8, etc.) or DEL. Once you’re in the BIOS menu, use the arrow keys to navigate to the Storage tab.
On this tab, you should see an option for SATA Configuration. Select this option and then press Enter. Find the entry for your MSI hard drive on this screen and change its status from Disabled to Enabled.
Press F10 to save your changes and exit out of BIOS. Your MSI hard drive should now be enabled and working properly.
If you’re unable to access BIOS or if changing the SATA Configuration doesn’t work, you can try using MS-DOS Command Prompt to enable your MSI hard drive.
To do this:
1) Restart your computer and boot into MS-DOS mode by pressing F8 during startup. If you don’t see a prompt asking which operating system you want to boot into after pressing F8, try again until you do see it.
2) At the “Choose an operating system” screen, select “Command Prompt.”
3) In Command Prompt, type “diskpart” (without quotes) and press Enter
4) Type “list disk” (without quotes) at the DISKPART> prompt and press Enter
5) Make note of which number corresponds to your MSI hard drive (it will likely be Disk 0).
6) Type “select disk #” at the DISKPART> prompt (replacing “#” with actual number of your MSI HDD), then press Enter
7) Type “attributes disk clear readonly”, then press Enter
Your MSI HDD should now be enabled!
Conclusion
If you have an MSI motherboard with a SATA port that isn’t working, it’s likely because the SATA port is disabled in the BIOS. To enable the SATA port, you’ll need to go into the BIOS settings and enable it there.
To do this, first restart your computer and press the key that opens up the BIOS menu (this will vary depending on your motherboard).
Once you’re in the BIOS menu, look for an option called “SATA Configuration” or something similar. Select that option and then change the setting from “Disabled” to “Enabled”. Save your changes and exit the BIOS menu.
Your SATA port should now be working.