To edit categories in Quickbooks, go to Settings, then select Products & Services. From there, select the dropdown menu labeled “More,” and then click on “Manage categories.”
Choose the category you want to edit, make the necessary changes, and save your modifications. Alternatively, you can remove a category by selecting “Remove” and confirming your decision. Deleting a category requires moving any items within it or its sub-categories beforehand.
In Quickbooks, it’s important to have accurate and organized categories to effectively manage your finances. Whether you need to make changes to existing categories or remove unnecessary ones, Quickbooks offers a straightforward process. By following a few simple steps, you can easily edit your categories to match your business needs. In the following sections, we will provide a step-by-step guide on how to edit categories in Quickbooks, ensuring that your financial records are organized and up to date.
Credit: www.mycloudbookkeeping.org
Creating And Editing Categories
Steps For Creating Categories:
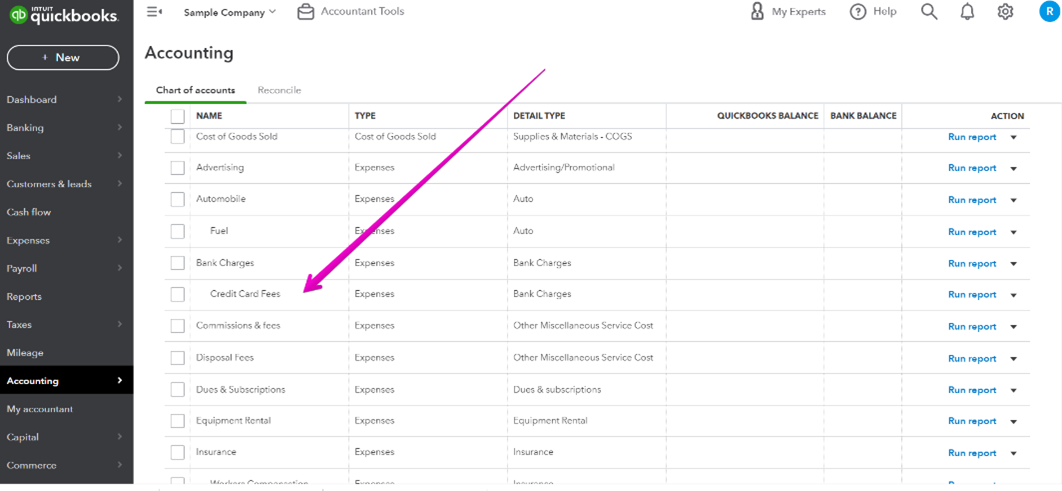
- Create new categories by going to Settings ⚙ and selecting Chart of Accounts.
- Click on New and choose Category from the Account Type drop-down menu.
- Enter the Category name and additional details if needed, then click Save and Close.
Steps For Editing Categories:
- Access Category List under Lists in QuickBooks.
- Locate the category you want to edit, right-click, and select Edit Category.
- Make the necessary changes to the category details and click Save to apply the edits.

Credit: quickbooks.intuit.com
Managing Category List
Knowing how to effectively manage your category list is crucial in keeping your QuickBooks organized and accurately reflecting your business expenses. In this section, we will explore various tasks related to managing your category list in QuickBooks, such as removing unwanted categories and cleaning up your existing categories.
Removing Categories
If you no longer need a particular category in your QuickBooks, removing it is a simple process. Follow these steps to remove a category:
- Go to the Lists menu and select Category List.
- Right-click on the category you want to delete.
- Select Delete category.
- Before deleting the category, make sure that you have moved any items in that category or its sub-categories.
- Confirm the deletion by selecting Yes, delete.
By following these steps, you can easily remove unwanted categories from your QuickBooks, reducing clutter and helping you maintain a clean and organized category list.
Cleaning Up Categories
Over time, your category list in QuickBooks may become cluttered with unnecessary or duplicate categories. Cleaning up your categories is essential to ensure accurate financial reporting and simplified bookkeeping. Here are some tips for cleaning up your category list:
- Regularly review your category list and identify categories that are no longer relevant or needed.
- Merge duplicate categories into one, consolidating similar expenses for better categorization.
- Ensure consistent naming conventions and descriptions for your categories.
- Consider creating subcategories to further organize your expenses.
By following these tips, you can ensure that your category list in QuickBooks is clean, well-organized, and efficient, leading to more accurate financial data and easier bookkeeping.
Changing Category Details
To edit categories in Quickbooks, navigate to the Banking menu, select the For review tab, and click the transaction. Then, choose the appropriate category from the Category* field to modify it. In the Chart of accounts section, you can also create a new account, select the Expense icon, and enter a new expense category.
Changing Expense Category In Quickbooks Desktop
One of the vital tasks in managing your finances effectively is to accurately categorize your expenses in QuickBooks. Whether you need to reassign an expense to a different category or edit the details of an existing category, QuickBooks Desktop provides a user-friendly interface to help you make these changes seamlessly. In this section, we will walk you through the process of changing expense categories in QuickBooks Desktop.
Renaming Or Editing Category Type
At times, you might need to rename or edit the type of a particular category in QuickBooks Desktop. Perhaps your business has undergone a rebranding, or you simply want to streamline your expense categories for better organization. With QuickBooks Desktop, making these modifications is a breeze.
Here’s how you can rename or edit a category type in QuickBooks Desktop:
- First, open QuickBooks Desktop and navigate to the Lists menu.
- Select Chart of Accounts.
- Locate the category you wish to rename or edit.
- Right-click on the category and choose Edit Account.
- In the Edit Account window, you can modify the name and type of the category as needed.
- Make sure to click Save once you have made your modifications.
By following these simple steps, you can easily rename or edit the type of a category in QuickBooks Desktop, ensuring your expense tracking is accurate and tailored to your business needs.
Credit: www.mycloudbookkeeping.org
Advanced Category Operations
To edit categories in QuickBooks, navigate to the “Products & Services” section in the Settings ⚙. Click on “Manage categories”, then select “Edit” to make the necessary changes. Ensure to save your modifications to update the category effectively. Additionally, clean up and organize your categories for efficient bookkeeping management.
Editing Categories Within Rules
One way to manage your categories efficiently in QuickBooks is by editing them within rules. By customizing rules, you can ensure transactions are automatically categorized correctly.
Correcting Transactions Categorized To Wrong Category
If you find transactions categorized incorrectly in QuickBooks, you can easily correct them. Simply locate the transaction, update the category, and save the changes to ensure accurate financial tracking.
Frequently Asked Questions On How To Edit Categories In Quickbooks
How Do I Fix Categories In Quickbooks Online?
To fix categories in QuickBooks Online, go to Settings, select Products & services, manage categories, edit or remove, and save changes.
How Do I Clean Up Categories In Quickbooks?
To clean up categories in QuickBooks, follow these steps: 1. Go to Lists and select Category List. 2. Right-click on the category you want to delete. 3. Select Delete category. 4. Move any items in that category or its sub-categories before deleting.
5. Confirm by selecting Yes, delete.
How Do I Find Categories In Quickbooks?
To find categories in QuickBooks: 1. Go to the Banking menu and select the For review tab. 2. Click on the transaction you need to categorize. 3. The categories will be shown in the Category* field.
How Do I Change The Expense Category In Quickbooks Desktop?
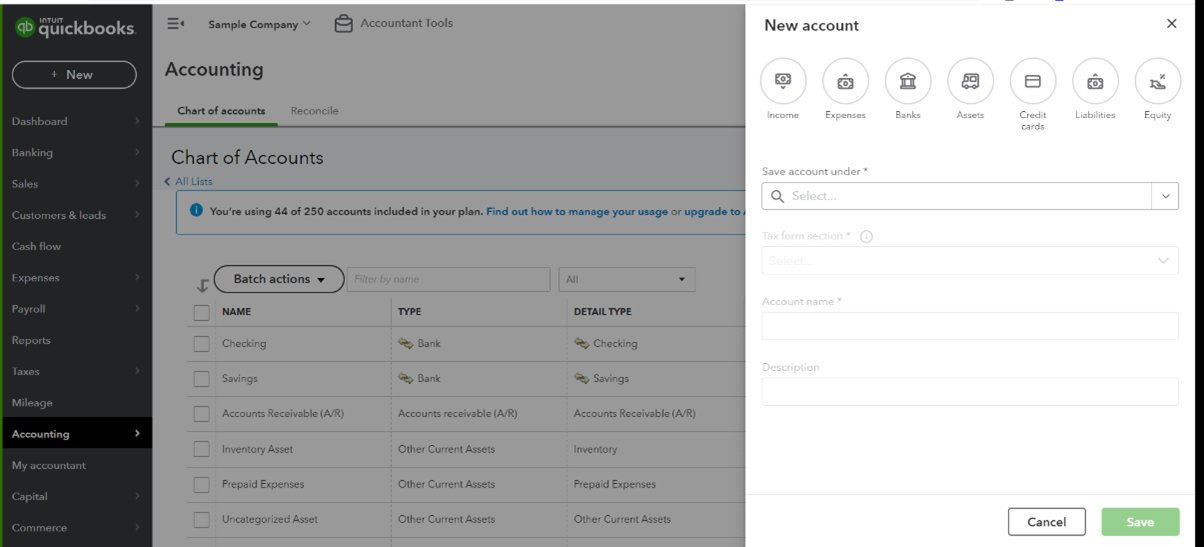
To change an expense category in QuickBooks desktop, select Accounting > Chart of accounts > New account > Expense.
Conclusion
To wrap things up, editing categories in QuickBooks is a breeze with these simple steps. Managing your expenses efficiently is crucial for accurate financial tracking. Stay organized and save time by customizing categories to suit your business needs. Start optimizing your QuickBooks today!