How to Craft a Powered Rail

In Minecraft, a powered rail is a block used to help push or pull minecarts along a track. The rails are placed like any other block, but they must be connected to a power source, such as redstone dust, in order to work. When the power is turned on, the powered rail will emit a brief burst of particles and make a clicking sound.
Any minecart that passes over the rail will be given a boost of speed (or slowed down if the power is turned off).
Minecraft Survival: How to Make Powered Rail
- Obtain a block of obsidian and a block of gold
- Place the obsidian in the center of your crafting grid, and the gold blocks on either side of it
- Use a pickaxe to mine a block of redstone ore, then place the redstone in the center slot above the obsidian
- Craft nine pieces of iron ingot into rails using your crafting table, then place them around the outside of your crafting grid
- Collect one glowstone dust from a Nether fortress, and place it in any remaining slot in the crafting grid
- Drag the powered rail icon from your inventory onto the square to complete the recipe and add it to your inventory
How to Craft Rails
If you’re like most people, you probably think of Rails as a web development framework. However, there’s more to it than that! Rails is also an incredibly powerful tool for crafting data-driven applications.
In this post, we’ll take a look at how to craft Rails applications that are built around data. We’ll start by looking at the different types of data that can be used in a Rails application, and then we’ll dive into some of the ways that data can be used to drive the development process.
First, let’s take a look at the different types of data that can be used in a Rails application.
There are three primary types of data: static data, dynamic data, and persistent data. Static data is simply text or images that don’t change often (if ever). Dynamic data is information that changes frequently, such as stock prices or weather conditions.
Persistent data is information that needs to be stored permanently, such as user accounts or product catalogs.
Next, let’s talk about how to usedata to drive the development process. One way to do this is by using scaffolding .
Scaffolding automatically generates code based on the structure of your database . This can save you a lot of time when you’re first getting started with an application. Another way to usedata is by using generators .
Generators create boilerplate code for common tasks , such as creating new controllers or models . This can save you even more time when you’re building an application from scratch .
Finally , let’s talk about some tips for working withdata .
First , always remember to validate your input ! This will help ensure that bad data doesn’t make its way into your database . Second , keep your controllers skinny ! Focus on writing code that interacts with your models , and leave the view logic for your views . Third , use ActiveRecord callbacks judiciously ! These callbacks can help keep your code DRY , but they can also lead to messy code if not used carefully .
That’s it for now! In this post, we’ve covered just scratching the surface when it comes to working withdata in Rails applications .
Minecraft Powered Rail
In Minecraft, a Powered Rail is a block that allows for rapid transportation of players and mobs along a track. Powered Rails are activated by redstone power, and can be deactivated by cutting the power off. When activated, a Powered Rail will boost any entity that passes over it in the direction the rail is facing.
If the rail is placed uphill, it will slow entities down; if placed downhill, it will speed them up.
How Many Powered Rails Per Rail
In Minecraft, a powered rail is a block that allows for rapid transportation of minecarts along a track. The amount of power rails needed per rail depends on the length of the track and the number of turns. For example, if you have a straight track that is 100 blocks long, you will need 8 powered rails to keep your minecart moving at full speed.
If you have a track with two 90 degree turns, you will need 12 powered rails.
How to Use Powered Rails in Minecraft
In Minecraft, powered rails are a great way to move heavy loads around your world. Here’s how to use them:
1. Place your powered rail on the ground.
2. Right-click on the powered rail with a redstone torch in hand to power it up.
3. Place a minecart on the powered rail and hop in!
4. The cart will now travel along the rail at high speed.
To stop, simply right-click on the powered rail with an empty hand to deactivate it.
How to Make Rails
In order to make Rails, you will need the following supplies:
-1/2 pound of copper wire
-1/2 pound of aluminum wire
-1/4 pound of lead
The first step is to create a base for your rails. This can be done by taking the copper wire and shaping it into a rectangle.
Once you have your base, take the aluminum wire and weave it around the perimeter of the base. Make sure that the aluminum is tightly woven so that it will form a strong foundation for your rails.
Next, take the lead and shape it into thin strips.
These strips will be used to create the track for your train to travel on. Once you have your strips ready, lay them out on top of the aluminum foundation. Make sure that they are evenly spaced apart so that your train can travel smoothly along them.
Now all you need to do is weld the lead strips onto the aluminum foundation. You can do this using a welding torch or by soldering them in place. Once they are securely attached, your rails are ready to use!
Credit: www.sportskeeda.com
How Do You Make a Powered Rail in Minecraft?
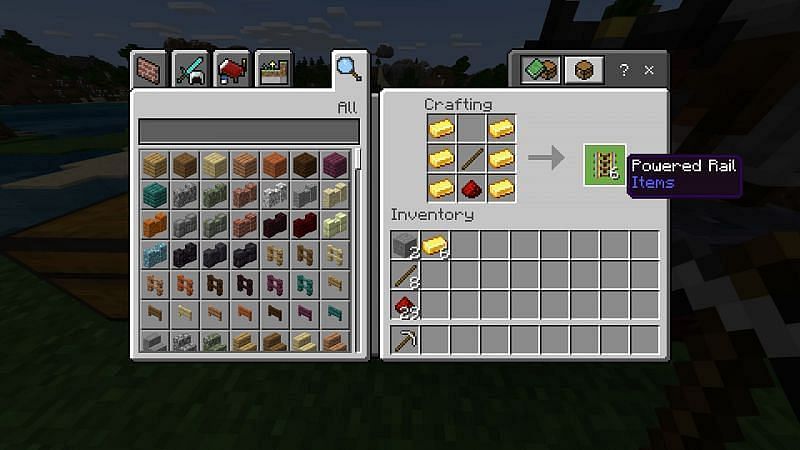
In Minecraft, you can create a powered rail by using 6 pieces of gold ingot, 1 redstone dust, and 1 piece of iron ingot. Here’s how to do it:
1. First, open your crafting table so that you have the 3×3 crafting grid that looks like this:
2. Next, add the 6 pieces of gold ingot to the top row of the grid.
3. In the middle row of the grid, add 1 piece of redstone dust to the left box and 1 piece of iron ingot to the right box.
4. Now that all of your ingredients are in the crafting grid, simply drag and drop them into your inventory so that you can use them later.
5. To use a powered rail, first place down a regularminecraft track . Then place a powered rail on top of it every 18 blocks or so (you’ll need at least one power source for every 20 rails). When activated by an activating item such as a redstone torch , button , or lever , a minecart will be able to travel much faster along these tracks than with regular rails alone!
How Do You Make a Power Rail?
If you’re looking to build a power rail, there are a few things you’ll need to do. First, identify what type of power supply you’ll be using. AC or DC?
Once you know that, determine the voltage and amperage output of your power source. With those two factors in mind, it’s time to start shopping for parts!
For the track itself, you can use either aluminum or copper bus bar.
If budget is a concern, aluminum will be your best bet. It’s not as good as copper in terms of electrical conductivity, but it’s much cheaper. Just make sure that whatever material you choose has a high enough melting point to handle the voltage and amperage of your power source.
Now it’s time to put everything together. Start by attaching your chosen track material to the positive and negative terminals of your power source. Make sure all connections are secure and insulated properly – this is very important!
Once everything is connected, test your setup with a multimeter to ensure proper operation before proceeding.
Assuming everything is working correctly, it’s now time to add any additional features or accessories you desire. This could include switches, fuses, circuit breakers, etc.
Depending on the complexity of your project, wiring everything up can be quite challenging. If you’re not confident in your abilities here, it might be best to consult with an electrician or other professional for assistance.
With all that done, all that’s left is to enjoy your new power rail!
How Do You Make a Powered Minecart in Minecraft?
Assuming you would like a tutorial on how to make a powered minecart in Minecraft:
First, you will need:
– 1 Minecart
– 1 Furnace
– 1 Fuel (coal, charcoal, wood, etc.)
Here are the step-by-step instructions:
1. Place the furnace on the ground.
2. Place the minecart on top of the furnace.
3. Right-click on the furnace to open its GUI.
4. In the lower left slot of the GUI, place your fuel of choice. In this example we will use coal since it is common and easy to find early in the game.
5. Click on the arrow pointing into the furnace to start cooking The coal will smelt into charcoal which is now considered your “fuel”.
How Many Blocks Do You Need a Powered Rail?
A powered rail is a block that allows mobs and players to travel along a set path. Powered rails are used in conjunction with regular rails to create a complete track system. The number of blocks needed for a complete track system will vary depending on the size and layout of the track.
Conclusion
Assuming you would like a summary of the blog post and not the entire thing:
To start, you will need 6 obsidian blocks, 1 redstone dust, and 2 railroad tracks. Place the obsidian in a U shape with 2 spaces in the middle and place the redstone on top of the obsidian in the center space.
Next, take your two tracks and place them on either side of the redstone so they are touching it. Now that everything is set up, all you have to do is right-click on one of the tracks with a flint and steel to activate it. The powered rail will now propel any minecart that goes over it at a faster speed than usual.