How to Connect to Tfs from Visual Studio 2019
In order to connect to Tfs from Visual Studio 2019, you will need to open the Connect page from the Team Explorer window. From there, you will need to select the “Servers” option and click on the “Add Server” button. Enter the URL for your TFS server in the resulting dialog box and then click on the “Connect” button.
- Open Visual Studio 2019 and go to the Tools menu
- Select Options from the drop-down menu
- In the left panel of the resulting dialog box, select Source Control
- In the right panel, select Microsoft Team Foundation Server under Plug-in Settings
- Click the Add button in the right panel
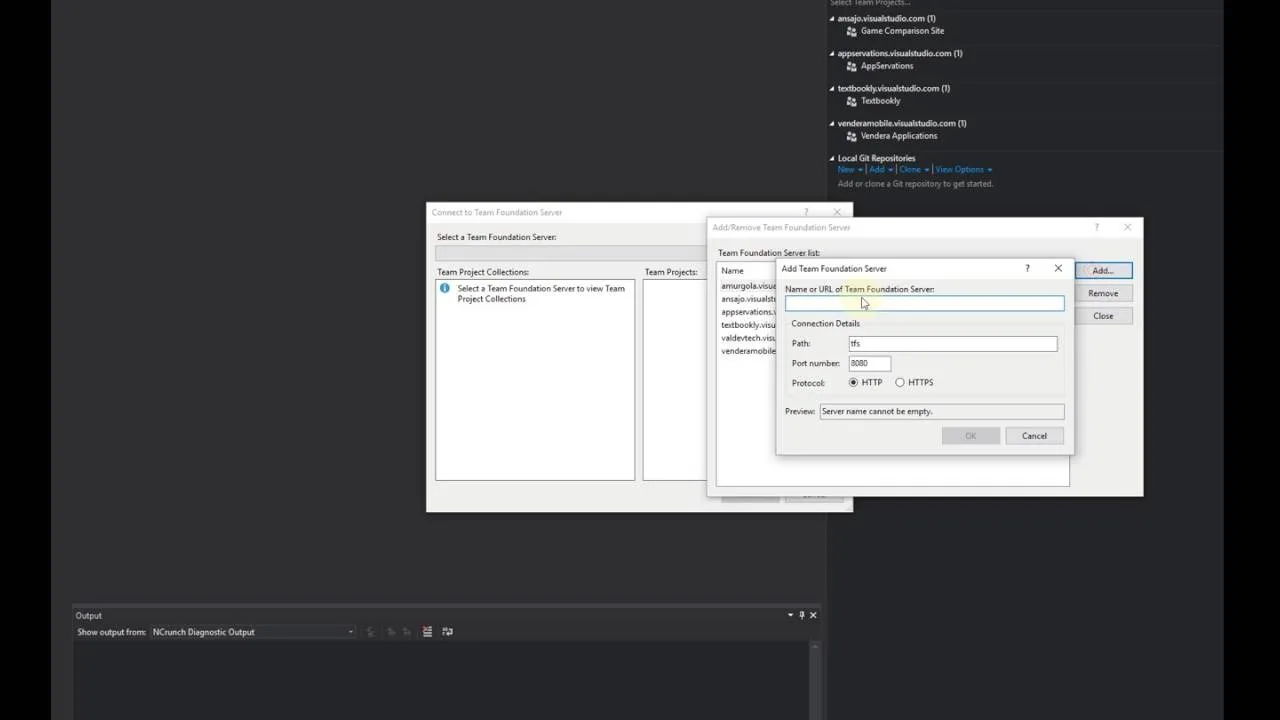
- In the resulting Add Team Foundation Server dialog box, enter https://tfs server name:port/tfs in the Server URL field 7 and click OK 8
- The port number is optional; if omitted, Visual Studio will use port 8080 by default
- 9 If prompted for credentials, provide your TFS user name and password and click OK
- These credentials will be used to connect to TFS and will be cached by Visual Studio for future connections
How to Connect to Tfs from Visual Studio 2022
If you’re using Visual Studio 2022, you’ll need to connect to TFS in order to access your team projects. Here’s a quick guide on how to do that:
1. Open up Visual Studio and go to the Team Explorer window.
2. Click on the “Connect to Team Foundation Server” link.
3. Enter the URL for your TFS server and click “Connect”.
4. You should now see your team projects in the Team Explorer window.
If not, make sure you’re logged in with the correct credentials.
Add Existing Project to Tfs Visual Studio 2019
If you’re using Visual Studio 2019, you can add an existing project to Team Foundation Server (TFS) by following these steps:
1. Open Visual Studio and select the team menu.
2. Choose the Connect to Team Project command.
The Connect to a Project dialog box appears.
3. In the Select a Project dialog box, choose the TFS server and project collection that contain the project you want to add, and then choose the Connect button.
4. In Team Explorer, double-click on the Projects node in your team project to expand it.
Right-click on your team project and select Add Existing Project from the context menu that appears. A file browser window will appear; navigate to and select your existing project’s .sln file, then choose the Open button.
Your existing project will now be added to TFS!
Download Tfs for Visual Studio 2019
If you’re using Visual Studio 2019, you can now download and use TFS for free! Microsoft has made this release available to all users, regardless of whether they have an MSDN subscription or not. This is a great way to get started with TFS if you’re new to the product, or if you just want to try it out without having to pay for it.
Once you’ve downloaded and installed TFS, you’ll need to connect it to your Visual Studio instance. To do this, open up Visual Studio and go to the Team Explorer window. In the Connect section, click on the “Servers” button and then add a new server.
Enter the URL for your TFS server (you can find this in the administration console) and then click OK.
Now that you’re connected, you can start using all of TFS’s great features! Check out our blog post on getting started with TFS for more information on what you can do with the product.
Unable to Connect to Tfs from Visual Studio 2019
If you’re having trouble connecting to your Team Foundation Server from Visual Studio 2019, there are a few things you can check. First, make sure that you’re using the correct URL for your TFS server. The URL should be in the format: http://server:port/tfs/.
If you’re unsure of the correct URL, you can ask your TFS administrator.
Next, check that your firewall is not blocking communication with the TFS server. If you’re using a corporate firewall, there may be specific rules that need to be configured in order to allow communication with TFS.
Consult your network administrator for more information.
Finally, if you’re still having trouble connecting to TFS from Visual Studio 2019, try restarting both Visual Studio and the TFS server. Sometimes this can clear up communication issues between the two applications.
If you continue to have problems connecting to your TFS server from Visual Studio 2019, please contact your system administrator or technical support for further assistance.
How to Check Tfs Version from Visual Studio 2019
If you’re using Visual Studio 2019 and want to know which version of Team Foundation Server (TFS) you’re connected to, there are a few ways to check.
One way is to go to the Team Explorer window. In the Connect page, you should see your server connection information at the top, including the TFS version number.

Another way to check is from the About dialog in Visual Studio 2019. Go to Help > About Microsoft Visual Studio.
In the “Installed products” section near the bottom, look for “Team Foundation Server”. The version number will be listed next to it:

Credit: www.ecanarys.com
Can Visual Studio 2019 Connect to Tfs?
Yes, Visual Studio 2019 can connect to TFS. To do so, simply go to the Connect page under the Team menu and select the server you wish to connect to. You will need to provide your credentials in order to establish a connection.
How Do I Access Tfs in Visual Studio?
If you’re using Visual Studio, you can access TFS in a few different ways. The most common way is to use the Team Explorer pane. You can also use the Source Control Explorer, or connect to TFS through Server Explorer.
To open Team Explorer, go to View > Team Explorer from the menu bar. If you don’t see the Team Explorer pane, you may need to first select it from the list of available panes (go to View > Panes and check Show Team Explorer).
Once you have Team Explorer open, you can click on the Connect button to connect to a TFS server.
If you’ve connected to TFS before, your connection will be listed under Recent Connections. Otherwise, you’ll need to enter the URL for your TFS server.
Once you’re connected, you’ll see a list of team projects that are available on the server.
You can then click into a project and start working with its files and resources.
The Source Control Explorer is another way to access files and resources stored in TFS. To open it, go to View > Other Windows > Source Control Explorer from the menu bar.
Like Team Explorer, if you don’t see the Source ControlExplorer pane initially, you may needto select it fromthe list of available panes (go t oView > Panesand checkShow SourceControlExplorer).
In additionto being ableto workwith filesand resources storedinTFSfrom inside Visual Studio,youcanalso usethe ServerExplorerpane totakea lookat someof themetadataassociatedwith eachserverand project .ToopenServerExplorer ,gotoview> otherwindows> serverexplore rfromthemenubar .
How to Connect Tfs in Visual Studio Code?
If you’re using Visual Studio Code, you can connect to your Team Foundation Server (TFS) and work with your code repositories there. In this blog post, we’ll show you how to connect to TFS in Visual Studio Code.
First, open Visual Studio Code and go to the Team Explorer pane.
Then, click on the “Connect to a Project” option.
In the next dialog, select “Team Foundation Server” from the drop-down list. Enter the URL of your TFS server in the “Server URL” field.
Then, enter your TFS username and password in the appropriate fields.
Click on the “Connect” button and you should now be connected to your TFS server. You can now work with your code repositories in Visual Studio Code!
How Do I Map Tfs in Visual Studio 2019?
Assuming you would like a tutorial on how to map TFS in Visual Studio 2019:
1. Open Visual Studio 2019 and select Team Explorer from the View menu. The Team Explorer window appears.
2. In the Connect page of the Team Explorer window, click the Servers button. The Manage Connections dialog box appears.
3. Click the Add Server button.
The Add Team Foundation Server dialog box appears.
4. In the Name text box, type the name of your team foundation server (for example, MyTFSServer). Note that you can also specify an optional port number by appending a colon (:) and then the port number to the end of the server name (for example, MyTFSServer:8080).
If you do not specify a port number, Visual Studio will use port 8080 by default when it connects to your team foundation server..
5 5 .
In t he Location drop-down list , choose either https:// or http:// , depending on whether your team foundation server is configured for SSL . Most production servers are configured for SSL . For more information about configuring SSL for a team foundation server , see ConfigureSSL .
aspx on MSDN .
6 . Click th e Ok button .
The n ew s erver i s added t o th e M anage C onnections d ialog b ox ..
7 8 .
How Do I Get Team Explorer in Visual Studio 2019?
Assuming you would like to know how to get Team Explorer in Visual Studio 2019:
1. Go to the Visual Studio downloads page (https://visualstudio.microsoft.com/downloads/) and select “Visual Studio 2019.”
2. Once the download is finished, run the installer and follow the instructions.
3. During installation, make sure to select “Individual components” and then choose “Team Explorer” from the list of available components.
4. Finish the installation and launch Visual Studio 2019. Team Explorer should now be available under the “View” menu.
How Do I Connect to Tfs in Visual Studio 2017?
To connect to TFS in Visual Studio 2017, you’ll need to open the Team Explorer window. To do this, go to View > Team Explorer, or press the Ctrl+\ shortcut key. Once you have the Team Explorer window open, click on the Connect button.
In the resulting Connect to Team Foundation Server dialog box, enter the URL of your TFS server. If you’re unsure of what this is, ask your TFS administrator. Once you’ve entered the URL, click OK to continue.
Visual Studio will now attempt to connect to your TFS server. If all goes well, you should see a list of all of the team projects that are available on that server. If you don’t see any projects listed, then check with your TFS administrator to make sure that you have access to at least one team project.
Once you’ve verified that you can see your team project(s) in Visual Studio, it’s time to start working!
Azure DevOps – How to Connect to Visual Studio Team Services in Visual Studio 2019
Conclusion
If you’re using Visual Studio 2019 and need to connect to a TFS server, there are a few steps you’ll need to follow. First, open Visual Studio and go to the Tools menu. From there, choose Options and then choose Environment Variables.
In the Environment Variables window, click on the New button and enter “TFS” for the Variable name and your TFS server URL for the Variable value. Next, go back to the Tools menu and choose Connect to Team Foundation Server. In the Connect dialog box that appears, select your TFS server from the list of available servers and then click OK.
You should now be connected to your TFS server from within Visual Studio 2019!