To build a shower pan on a concrete floor, you will need to prepare the area, create a sloped base, install a waterproof membrane, and finally lay the tile. This process ensures a durable and water-resistant shower floor that will last for years to come.
When renovating a bathroom or building a new one, the shower area is a crucial element to consider. A properly built shower pan is essential for preventing water leaks and protecting the underlying concrete floor from moisture damage. In this guide, we will outline the step-by-step process of building a shower pan on a concrete floor, providing you with the necessary knowledge and confidence to tackle this project successfully.
By following these instructions, you can create a sturdy and waterproof foundation for your shower, ensuring a reliable and long-lasting bathroom fixture.

Credit: www.wikihow.com
Prepare The Concrete Floor
To build a shower pan on a concrete floor, you first need to ensure that the floor is properly prepared. This includes cleaning the surface and filling any cracks that may be present.
Clean The Floor
Before you begin any work on the shower pan, take the time to thoroughly clean the concrete floor. Removing any dirt, dust, or debris will ensure that the new shower pan adheres properly to the surface.
Here are the steps to clean the floor:
- Sweep the floor to remove any loose dirt or debris.
- Use a solution of warm water and mild detergent to mop the floor, paying special attention to any areas that may be particularly dirty.
- Rinse the floor thoroughly with clean water to remove any soap residue.
- Allow the floor to dry completely before moving on to the next step.
Fill And Level Any Cracks
After cleaning the floor, it’s essential to fill and level any cracks that may be present. This step will ensure that the shower pan sits flat and prevents any water leakage.
Follow these instructions to fill and level cracks:
- Inspect the floor for any cracks or holes. Use a putty knife to remove any loose debris from the cracks.
- Fill the cracks with a concrete patching compound, following the manufacturer’s instructions.
- Smooth the compound using a trowel, ensuring that it is level with the surrounding floor surface.
- Allow the compound to dry completely before proceeding.
- If necessary, sand down any uneven areas to create a smooth and even surface.
Install The Shower Drain
Installing the shower drain is an essential step in building a shower pan on a concrete floor. This process involves locating and marking the drain position, cutting and removing the concrete around the drain, and finally, attaching the drain assembly. Let’s dive into each step.
Locate And Mark The Drain Position
To begin, you need to locate and mark the position where the shower drain will be installed. This is typically done during the initial planning phase of your shower pan construction. Make sure you position the drain in the center of the shower floor to ensure proper drainage. Once you’ve determined the exact spot, mark it using a pencil or any other suitable marking tool.
Cut And Remove The Concrete Around The Drain
Next, cut and remove the concrete around the drain marked area. Use a suitable concrete saw or a hammer and chisel to carefully cut through the concrete surface. Take caution to avoid damaging any pipes or plumbing lines underneath. Once the concrete is cut, use a pry bar or any other appropriate tool to remove the concrete pieces. Ensure that you completely clear the area around the drain so that the drain assembly can be installed properly.
Attach The Drain Assembly
Now it’s time to attach the drain assembly. Begin by placing the rubber gasket or the waterproof membrane over the drain hole. This will help create a watertight seal. Next, insert the drain body into the hole, making sure it fits snugly. Finally, secure the drain body in place using the provided screws or locking mechanism.
It’s important to double-check that the drain assembly is tightly secured and level with the shower floor. Any gaps or loose fittings can lead to leakage issues down the line.
That’s it! You’ve successfully installed the shower drain on your concrete floor. The shower pan construction can now progress to the next steps, such as waterproofing and tiling. Remember to follow the manufacturer’s instructions for the specific drain kit you’re using, as the installation process might vary slightly.
Build The Shower Pan Base
Looking to build a shower pan on a concrete floor? Learn how to expertly build a shower pan base with our step-by-step guide. Create a sturdy and waterproof foundation for your shower with this easy-to-follow tutorial.
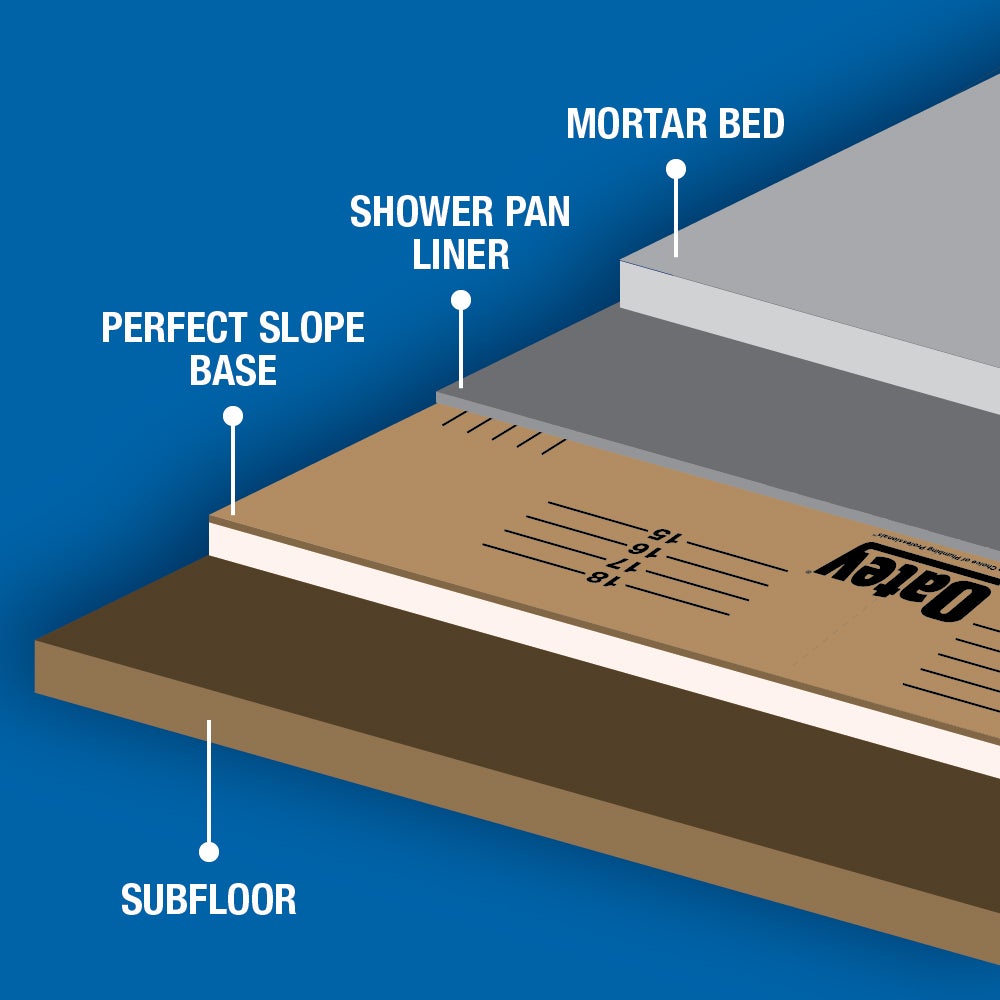
Create A Mortar Bed
Before you can build a shower pan on a concrete floor, you’ll need to create a mortar bed. This acts as a solid base for your shower pan and helps to ensure proper drainage. Here’s how to do it:
- Mix the mortar according to the manufacturer’s instructions. You’ll want to achieve a thick but workable consistency.
- Spread a layer of the mixed mortar evenly across the concrete floor using a trowel. Make sure the mortar is at least 1 inch thick.
- Smooth out the mortar bed with the flat side of the trowel, pressing down gently to remove any air bubbles and create a level surface.
Trowel And Smooth The Mortar
Once you’ve created the mortar bed, it’s time to trowel and smooth the surface to ensure a solid foundation for your shower pan. Follow these steps:
- Hold the trowel at a 45-degree angle and use it to smooth out any ridges or uneven areas in the mortar bed.
- Continue to trowel the entire surface of the mortar bed, working from one side to the other in smooth, even strokes.
- Check for any remaining imperfections and use the trowel to level them out. The surface should be smooth and even.
Install Waterproofing Membrane
To prevent water damage and leaks, it’s essential to install a waterproofing membrane over the mortar bed. This will create a barrier that keeps water from seeping into the concrete. Follow these steps:
- Measure and cut the waterproofing membrane to fit the size of your shower pan. Leave an overhang of a few inches on all sides.
- Apply a layer of thin-set mortar to the surface of the mortar bed using a trowel.
- Place the waterproofing membrane onto the mortar bed, starting at one corner and working your way across. Smooth out any wrinkles or air bubbles as you go.
- Secure the membrane to the concrete floor by pressing it down firmly with a rubber float or trowel.
- Trim any excess membrane with a utility knife, leaving a slight overhang along the edges to ensure complete coverage.
By following these steps, you’ll be well on your way to building a sturdy and waterproof shower pan on a concrete floor. Remember to take your time and ensure each step is done correctly for the best results.
Credit: www.oatey.com
Construct The Curb
Learn how to build a shower pan on a concrete floor with Construct the Curb. Our step-by-step guide will help you create a sturdy and waterproof surface for your shower.
Determine The Curb Height And Length
To begin constructing the curb for your shower pan on a concrete floor, it is essential to determine the correct height and length for your curb. The height of the curb should typically be between 4 to 6 inches, ensuring it provides a proper barrier to prevent water from overflowing onto the bathroom floor. Measure the length of the curb to match the width of your shower area. Taking accurate measurements at this stage will ensure a seamless installation process, avoiding any future leaks or water damage issues.Build The Curb Structure
Once you have determined the height and length of the curb, it’s time to build the structure. Begin by marking the position of the curb on the concrete floor using a chalk line or similar marker. This will serve as a guide during the construction process. Using 2×4 or 2×6 lumber, align and secure the boards along the marked lines, forming the shape of the curb. Make sure the boards are level and plumb, ensuring a sturdy and stable base for your shower pan. Secure the boards to the concrete floor using concrete screws or adhesive, guaranteeing a strong bond.Apply Waterproofing To The Curb
To protect your curb from water damage, it is crucial to apply a waterproofing membrane. This additional layer will act as a barrier, preventing moisture from seeping into the curb structure. Use a waterproofing membrane, such as a liquid or sheet membrane, and apply it to the entire surface of the curb. Follow the manufacturer’s instructions for proper application and drying time. Ensure that all joints and corners are thoroughly covered, leaving no gaps or exposed areas. Once dry, the waterproofing membrane will provide long-lasting protection, ensuring your shower pan remains watertight and free from leaks. In conclusion, constructing the curb for your shower pan on a concrete floor is a vital step in creating a durable and waterproof showering area. By carefully determining the curb height and length, building a sturdy structure, and applying a reliable waterproofing membrane, you can ensure a successful and leak-free installation. Taking the time to construct the curb properly will provide you with a secure base for your shower pan, allowing you to enjoy a functional and water-resistant bathroom for years to come.Tile The Shower Pan
Once you have successfully mixed and applied the thinset mortar, it’s time to take the next step in building your shower pan on a concrete floor: laying the tiles. This crucial step is where the visual transformation begins and your shower pan starts to take shape.
Mix And Apply Thinset Mortar
Before you can start tiling, you need to mix and apply thinset mortar. This strong adhesive material will ensure that your tiles stick securely to the shower pan. Here’s how to do it:
- Gather your materials: thinset mortar, water, mixing paddle, and a bucket.
- Follow the manufacturer’s instructions to mix the thinset mortar with water. Aim for a consistency similar to peanut butter.
- Using a trowel, spread a layer of thinset mortar onto the shower pan, covering a small area at a time.
- Hold the trowel at a 45-degree angle and create ridges in the thinset mortar using the notched side.
Lay The Tiles On The Pan
With the thinset mortar applied, it’s time to lay the tiles on the shower pan. Here are the steps to follow:
- Start at one corner of the shower pan and place the first tile, pressing it firmly into the mortar.
- Continue to lay the tiles, working your way across the pan in a straight line.
- Use tile spacers between each tile to ensure consistent spacing.
- Check the level periodically to ensure that the tiles are aligning correctly.
- Cut tiles as needed to fit around any fixtures or edges using a tile cutter or wet saw.
Grout The Tile
After the tiles are laid, the final step is to grout the tile, which will give your shower pan a polished and finished look. Follow these steps:
- Mix the grout according to the manufacturer’s instructions.
- Using a grout float, apply the grout to the spaces between the tiles, pressing it firmly in.
- Wipe off any excess grout with a damp sponge, being careful not to remove too much from the grout lines.
- Allow the grout to dry according to the manufacturer’s instructions.
- After the grout has dried, use a tile sealer to protect the grout and tiles from moisture and stains.
By following these steps to tile the shower pan, you’ll be one step closer to completing your DIY shower project with a professional touch. The beauty and functionality of a tiled shower pan will enhance the overall appearance of your bathroom, while also providing a durable and waterproof solution.

Credit: www.maramani.com
Frequently Asked Questions Of How To Build A Shower Pan On A Concrete Floor
How Do You Build A Shower Pan On A Concrete Floor?
To build a shower pan on a concrete floor, first, ensure the floor is clean and level. Then, create a bed of mortar and install a shower liner. Next, add another layer of mortar to create the pan slope. Finally, install the tile or a suitable flooring material over the pan.
Conclusion
To sum it up, building a shower pan on a concrete floor may seem daunting, but with our step-by-step guide, it can be a manageable and rewarding DIY project. By following the proper preparation, installation, and waterproofing techniques, you can ensure a durable and leak-free shower base.
Remember to use high-quality materials and take your time to achieve the best results. So go ahead, give it a try, and enjoy the satisfaction of having built your own custom shower pan!