How to Boot Godmode9
Godmode9 is a custom firmware for the Nintendo 3DS that allows you to access certain areas of the system that are normally restricted. To boot Godmode9, you will need a compatible flashcart and a way to access the BootROM (boot9). Once you have these things, follow these steps:
1. Download the latest version of Godmode9 from its official website.
2. Extract the contents of the ZIP file to your SD card.
3. Insert your SD card into your 3DS and turn it on.
4. Launch Godmode9 by holding down the START button while booting up your 3DS.
5. Follow the on-screen instructions to complete the installation process.
How to install and boot GodMode9 | An all access File Browser for Nintendo 3DS (2DS)
- Download the latest release of Godmode9 from https://github
- com/d0k3/GodMode9/releases 2
- Extract the
- zip file and copy the contents to the root of your 3DS SD card 3
- Insert your SD card into your 3DS and turn it on 4
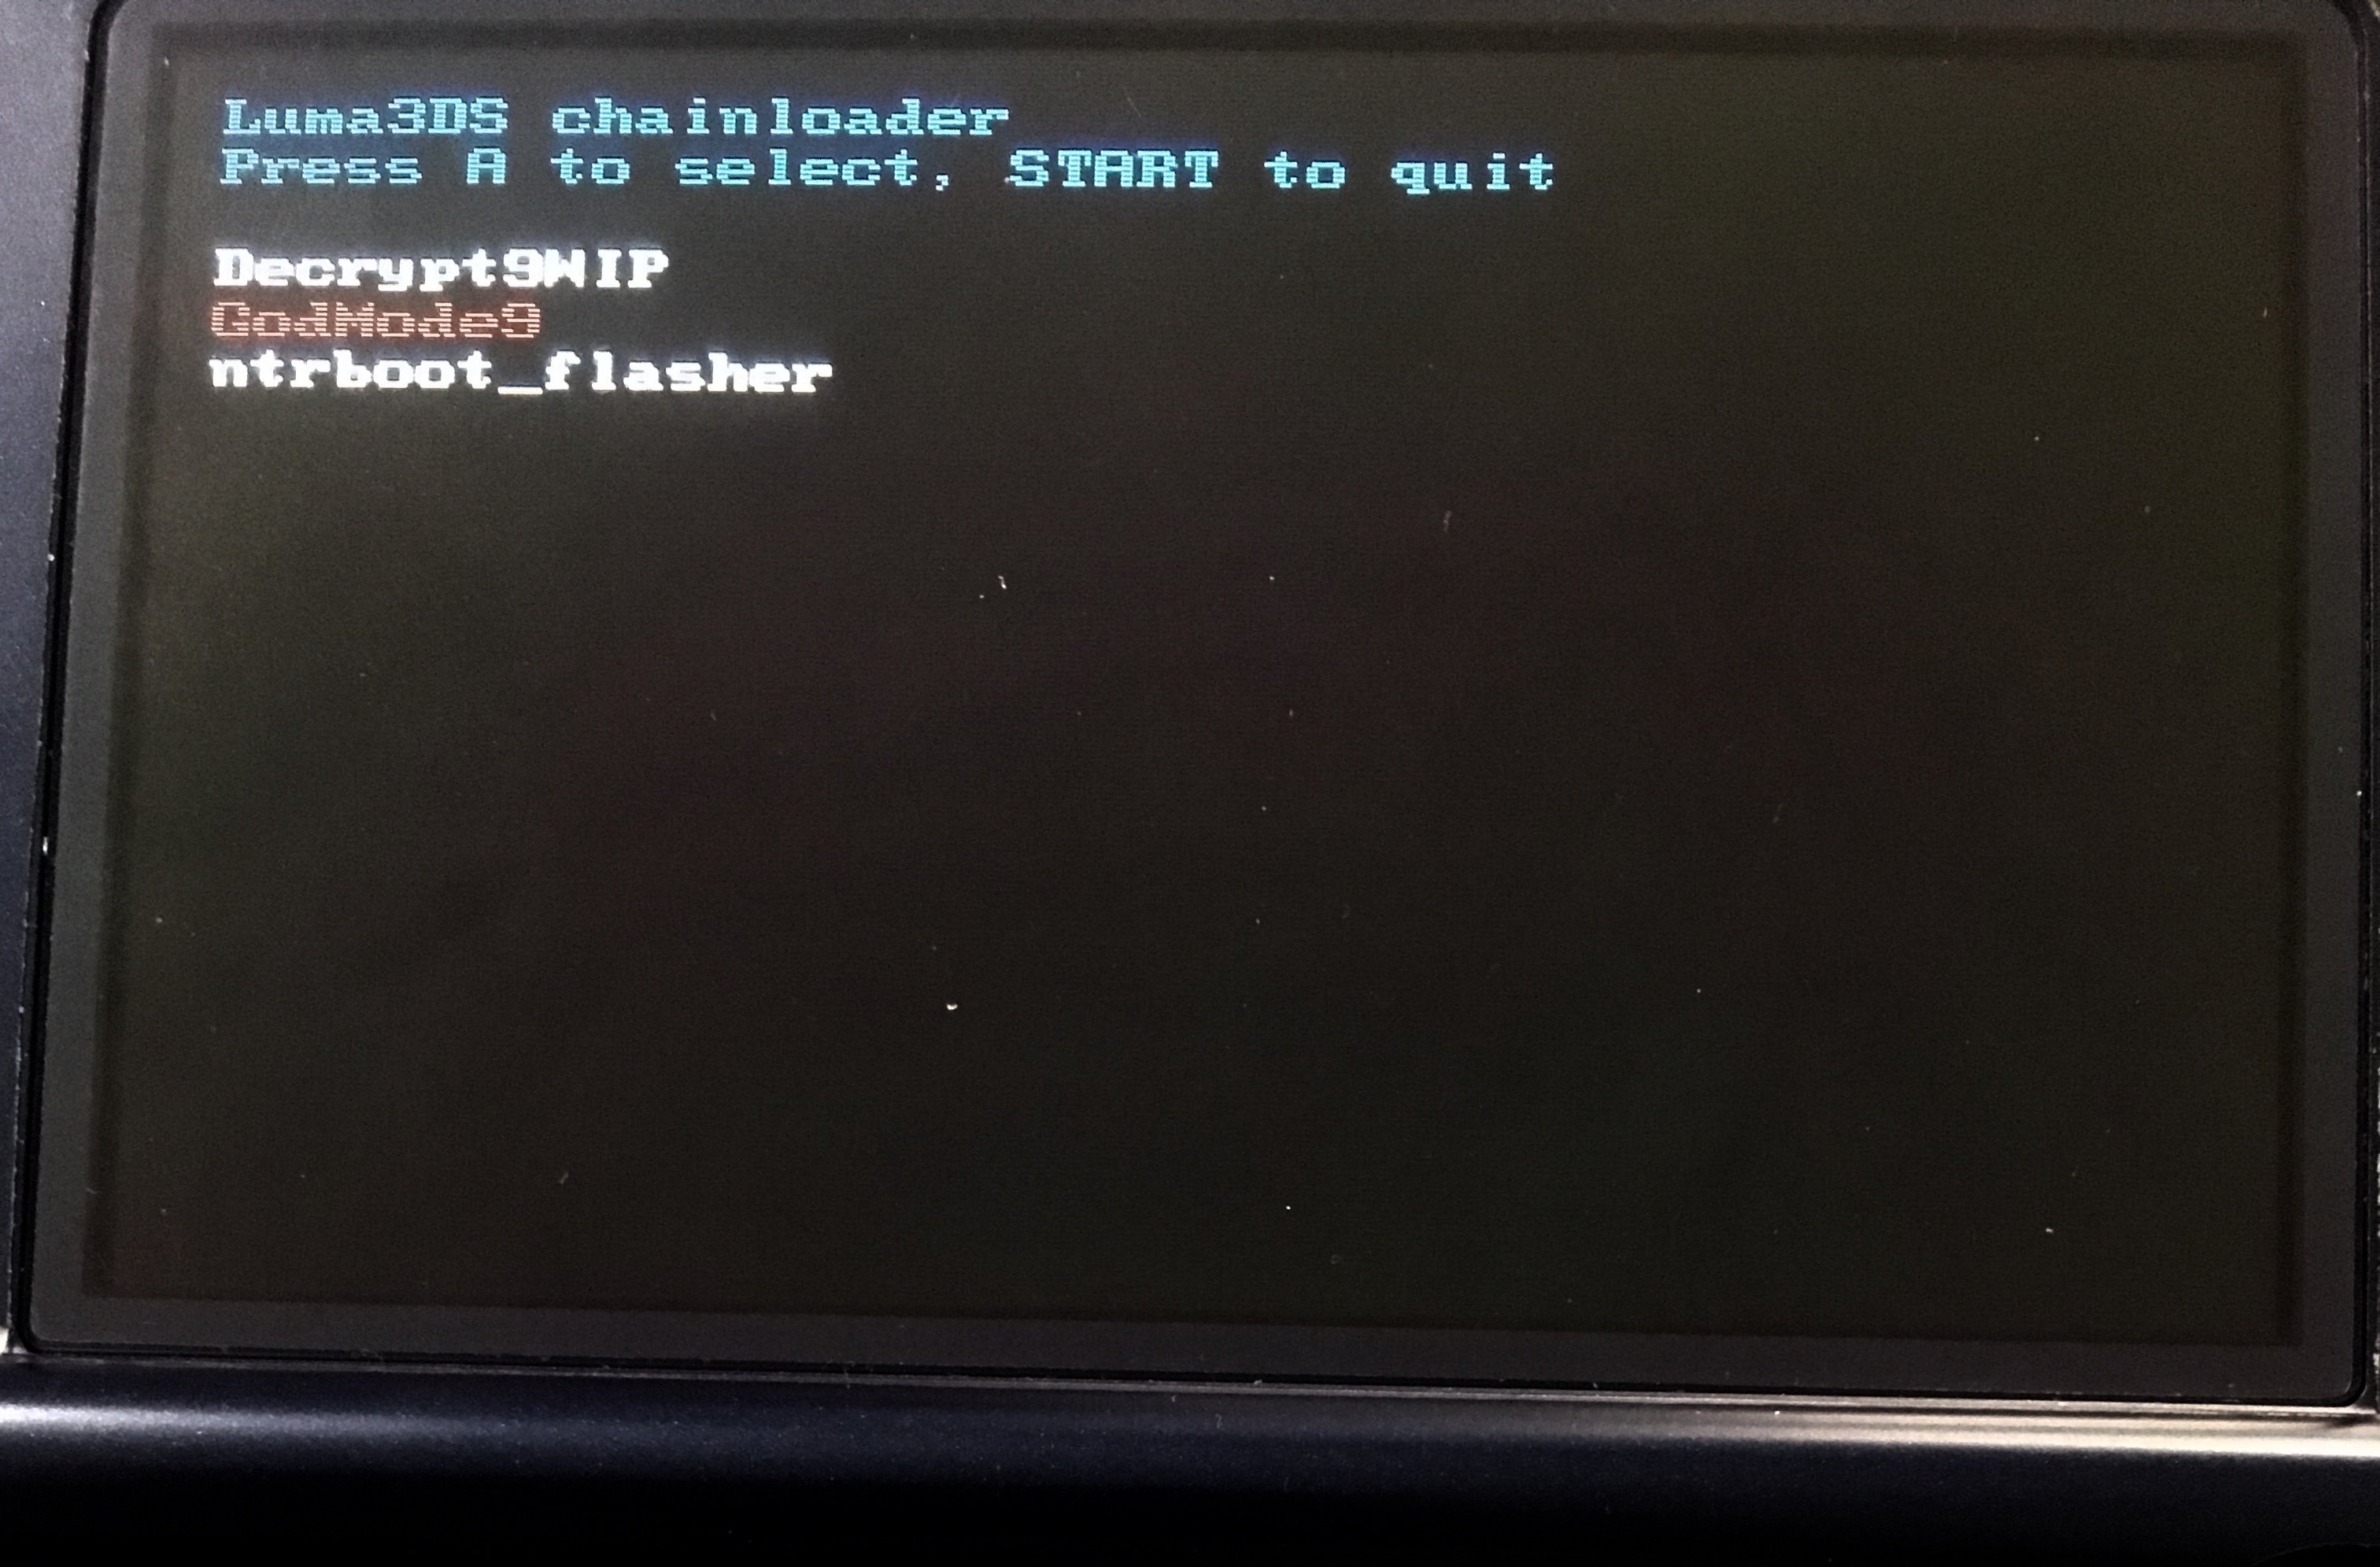
- Press Start + Select to open the CFW boot menu 5
- Navigate to Godmode9 and press A to launch it 6
- Press L+R together while in Godmode9 to access the full menu options 7a
- If you want to backup your system NAND, navigate to [0:] SDCARD -> gm9out -> nand_hb back up both files (nand_hb & nand_hb lpinfo) by pressing A on each one, then choose Copy-> Yes-> Choose destination as SDCARD:/gm9backups/(date&time)
- bin once both are done copying, press B twice to go back to the main screen 7b
- If you want to restore a previously made NAND backup, navigate to SDCARD:/gm9backups/(date&time)
- bin press A on it, then choose Backup Options-> Restore NAND Backup-> Yes
Godmode9 Not Launching
If you’re having trouble launching Godmode9, there are a few things you can try. First, make sure that you have the latest version of the software. You can download it from the official website.
If you’re still having trouble, try restarting your computer. Sometimes Godmode9 will launch if you run it as an administrator. Right-click on the icon and select “Run as Administrator.”
If that doesn’t work, try uninstalling and reinstalling Godmode9. Make sure to delete any leftover files in your system after uninstalling.
How to Update Godmode9
Godmode9 is a custom firmware for the Nintendo 3DS that allows you to run unsigned code and access sensitive areas of the system. It’s a powerful tool that can be used for things like backing up your games, transferring data between two 3DS systems, or even running homebrew applications. While godmode9 is usually updated automatically by its developer, there may be times when you need to update it manually.
Here’s how:
1. Download the latest version of godmode9 from its official website.
2. Copy the .
firm file to the /luma/payloads/ folder on your SD card. If you don’t have a /luma/ folder, create one now.
3. Insert your SD card into your 3DS and launch godmode9 by holding down the START button while booting your system.
4. Press A on “Select GodMode9 Options.” Then press A again on “Miscellaneous options…” Finally, press A once more on “Update GodMode9.”
5. Follow the prompts to install the update. Once complete, reboot your 3DS and enjoy the latest version of godmode9!
Godmode9 Not Booting Black Screen
If you’re getting a black screen when you try to boot up Godmode9, there are a few things that could be causing the problem. Here are some troubleshooting tips that may help you get your game up and running again:
1. Make sure your console is properly powered on and that all cables are securely connected.
2. If you’re using an SD card, try removing it and reinserting it into the slot.
3. Try holding down the POWER button for 10 seconds to reset the system.
4. If none of these solutions work, please contact customer support for further assistance.
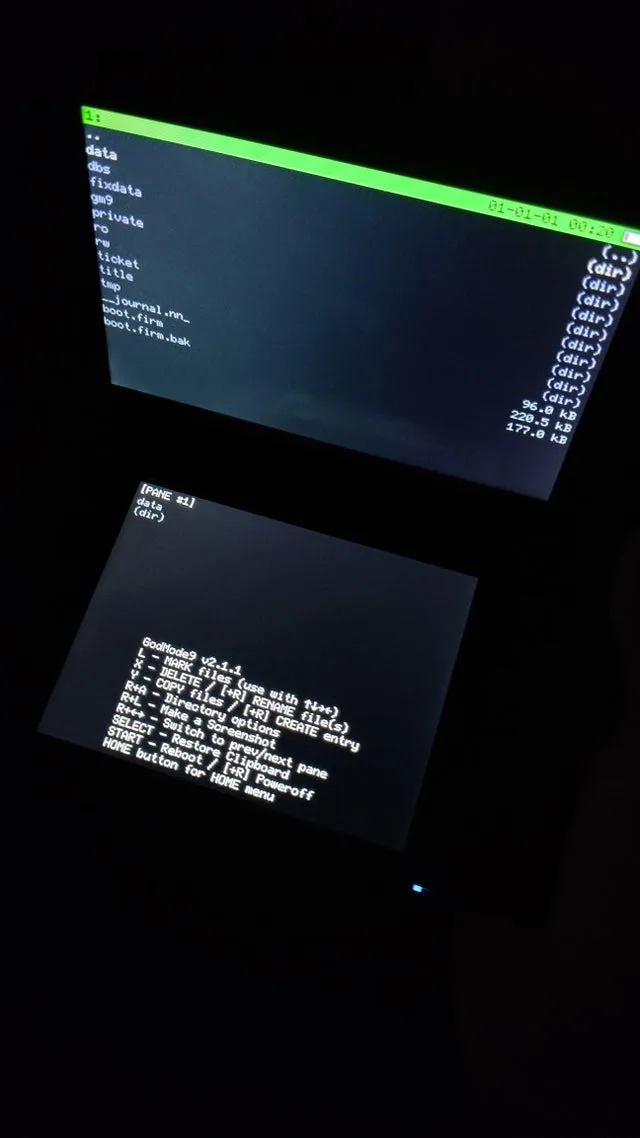
How to Use Godmode9
Godmode9 is a powerful file manager for the Nintendo 3DS that gives you access to your device’s internal storage and SD card. It also allows you to modify your game files, backup and restore your saves, and more. In this article, we’ll show you how to use Godmode9 to its full potential.
First, you’ll need to launch Godmode9 by holding the L button while booting up your 3DS. If done correctly, you should see the Godmode9 logo on the screen. From here, press A to continue.
Next, you’ll be presented with a list of options. The first thing you’ll want to do is navigate to the drive_sdmc:/gm9/out folder and copy over the godmode9 .firm file to your SD card’s root directory.
Once that’s done, reboot your 3DS and launch Godmode9 again.
This time around, press Y when prompted so that Godmode9 can patch itself into memory. Now select “Accessible vehicles” from the main menu followed by “Nintendo DSiWare”.
You should now see all of your installed DSiWare titles listed onscreen. Press A on one of them to dump it to your SD card as a .cia file which can then be installed on a CFW 3DS using FBI or BigBlueMenu.
How to Install Godmode9
Godmode9 is a custom firmware for the Nintendo 3DS that gives you access to many features that are not normally available on a stock 3DS. One of those features is the ability to backup and restore your 3DS games and saves. In this post, we’ll show you how to install Godmode9 and use it to backup your 3DS games and saves.
First, you’ll need to download the latest version of Godmode9 from its website. Once you have it downloaded, extract the contents of the zip file to your SD card. Then, insert your SD card into your 3DS and turn it on.
Next, go into the settings menu and scroll down until you see “Other Settings”. Select that option, then select “Profile” from the sub-menu. You should now see an option for “godmode9” – select it and press A to boot into Godmode9.
Once in Godmode9, navigate to the “SYSTEM” folder on your SD card and delete any existing “gm9outline.txt” file that may be there. This file is no longer needed as of v1.6 of Godmode9. Next, go back up one level to the root of your SD card and create a new folder called “gm9backups”.
This is where we will store our backups.
Now we’re ready to start backing up our games! To do so, simply navigate to the game or save file you want to backup inGodmode9’s file browser, then press (Start) + (Select) + (X) simultaneously.
This will bring up a menu with several options – choose “Backup savegame/extdata” and press A . The backup process will now start – when it’s done, you’ll find your backup files in the “gm9backups” folder on your SD card!
Credit: projectpokemon.org
What Can You Do With Godmode9?
If you’re a fan of Nintendo devices, then there’s a good chance you’ve heard of GodMode9. It’s a custom firmware that allows you to do all sorts of things with your device, from backing up and restoring saves to dumping games and installing custom firmwares. In this blog post, we’re going to take a look at what GodMode9 can do and how it can benefit you.
One of the most useful features of GodMode9 is its ability to backup and restore save files. This is especially useful if you ever need to factory reset your device or if you want to transfer your save files to another device. GodMode9 can also dump games and applications, which can be useful for archival purposes or for creating backups.
Another handy feature of GodMode9 is its ability to install custom firmwares. This can be used to add new features and functionality to your device, or simply to change the way it looks. There are many different custom firmwares available for Nintendo devices, so whether you want something simple like Ahezard CFW or something more complex like Luma3DS, there’s sure to be something out there for you.
GodMode9 is an incredibly powerful tool that can be used for all sorts of things. Whether you want to back up your saves, install a custom firmware, or just explore the inner workings of your Nintendo device, GodMode9 is definitely worth checking out.
What is Nand 3Ds?
Nintendo 3DS is a handheld game console produced by Nintendo. It was announced in March 2010 and released in June 2010. The console succeeds the Nintendo DS, featuring backward compatibility with older Nintendo DS video games.
Its primary competitor is the Sony PlayStation Vita.
The Nintendo 3DS features two screens. The top screen is a 3D capable LCD display with a resolution of 800×240 pixels (400×240 for each eye).
The bottom screen is a resistive touchscreen with a resolution of 320×240 pixels. Both screens are capable of displaying 16-bit color images.
The Nintendo 3DS also features a camera on the back side of the console, which takes 3D photographs as well as standard 2D images.
The console also has a microphone and stereo speakers.
The Nintendo 3DS XL was released on July 28, 2012 and features larger screens than the original model – 4.88 inches for the top screen and 4.18 inches for the bottom screen – as well as an upgraded battery that provides up to six hours of play time on a single charge (compared to three to five hours for the original model).
How to Backup 3Ds?
3DS games can be backed up and restored from a computer using various software programs. One such program is Citra, which is available for free online. Citra can backup and restore 3DS games as long as they are in .3ds or .
cia format. Another program that can be used is FBI, which is also available for free online. FBI can backup and restore 3DS games in both .3ds and .
cia format.
Conclusion
The Custom Firmware (CFW) scene for the Nintendo 3DS is still going strong, even with Nintendo’s recent release of the New 2DS XL. One of the most popular CFWs for the 3DS is GodMode9, which was created by d0k3. In this post, we’ll show you how to boot GodMode9 on your 3DS.
GodMode9 is a custom firmware that gives you access to many features that are not available on a stock 3DS. With GodMode9, you can backup and restore your 3DS games and save files, install custom themes and homebrew apps, and much more.
Booting GodMode9 is simple: just hold the L Button while powering on your 3DS.
This will bring up the GodMode9 menu. From here, you can navigate using the D-Pad and A/B/X/Y buttons. To exit GodMode9, press START+SELECT+HOME or power off your 3DS completely.