Welcome to the world of sourdough bread baking, where science and art come together to create a crusty, tangy, and utterly delicious loaf. As a professional chef, I have spent countless hours perfecting the art of sourdough bread making, and I am thrilled to share my knowledge with you. From the humble beginnings of flour, water, and wild yeast, we will embark on a journey that will not only teach you the step-by-step process of baking sourdough bread but also unlock the secrets behind its unique flavor and texture. So, roll up your sleeves, dust off your apron, and get ready to dive into the wonderful world of sourdough bread baking.
How to Bake Sourdough Bread: A Delicious and Flavorful Recipe
Sourdough bread has gained immense popularity for its unique flavor and chewy texture. Baking sourdough bread at home may seem intimidating, but with a little patience and practice, you can create a mouthwatering loaf that rivals your favorite bakery. In this recipe, we’ll guide you through the process of making sourdough bread from scratch, step by step. Get ready to embark on a delicious baking adventure!
Ingredients:
- 500g bread flour
- 350g water
- 150g active sourdough starter
- 10g salt
General Information:
- Making Difficulty: Intermediate
- Preparation Time: 8-10 hours
- Cooking Time: 45-50 minutes
- Servings: 1 large loaf
Instructions:
Step 1: Preparing the Starter
Before diving into the bread-making process, ensure that your sourdough starter is active and bubbly. If you haven’t already done so, feed your starter with equal parts flour and water and let it sit at room temperature for several hours until it becomes lively and vigorous.
Once your starter is ready, take the required amount (150g) and transfer it to a large mixing bowl. Reserve any remaining starter for future bakes. Remember to refresh your starter after using some to ensure its longevity.
Step 2: Mixing the Dough
In the same mixing bowl with the starter, add the bread flour and water. Mix well using a wooden spoon or your hands until the flour is fully incorporated. Cover the bowl with a kitchen towel or plastic wrap and let it rest for 30 minutes. This stage is known as autolyse, and it helps hydrate the flour and develop gluten.
After the autolyse, add the salt to the dough and knead it for about 10-15 minutes, until it becomes smooth and elastic. You can also perform a series of stretches and folds every 30 minutes during the first 2 hours of the dough fermentation, which will further strengthen the gluten structure.
Step 3: Bulk Fermentation
Once the dough is well-kneaded, cover the bowl again and let it undergo bulk fermentation. Place the bowl in a warm spot, ideally around 24-26°C (75-78°F), and let the dough rise for 3-4 hours. During this time, the dough will bulk up and develop complex flavors.
Perform a set of gentle stretches and folds every hour during the bulk fermentation. This process helps improve the dough structure and redistributes the yeast and bacteria, ensuring an even rise.
Step 4: Shaping the Loaf
After the bulk fermentation, transfer the dough onto a lightly floured surface. Gently shape it into a round or oval loaf, being careful not to deflate it completely. You can also try experimenting with different shapes or even use a proofing basket to lend a beautiful pattern to your bread.
Place the shaped loaf on a parchment-lined baking sheet or inside a proofing basket. Cover it loosely with a kitchen towel and let it rest for 30-60 minutes. This process, known as the final proof, allows the dough to relax and rise one last time before baking.
Step 5: Preheating the Oven
While the dough is going through the final proof, preheat your oven to 450°F (230°C). Place a Dutch oven or a cast-iron pot inside the oven as it preheats. Heating the pot beforehand helps create a steamy environment, resulting in a crusty and golden-brown exterior.
Step 6: Baking
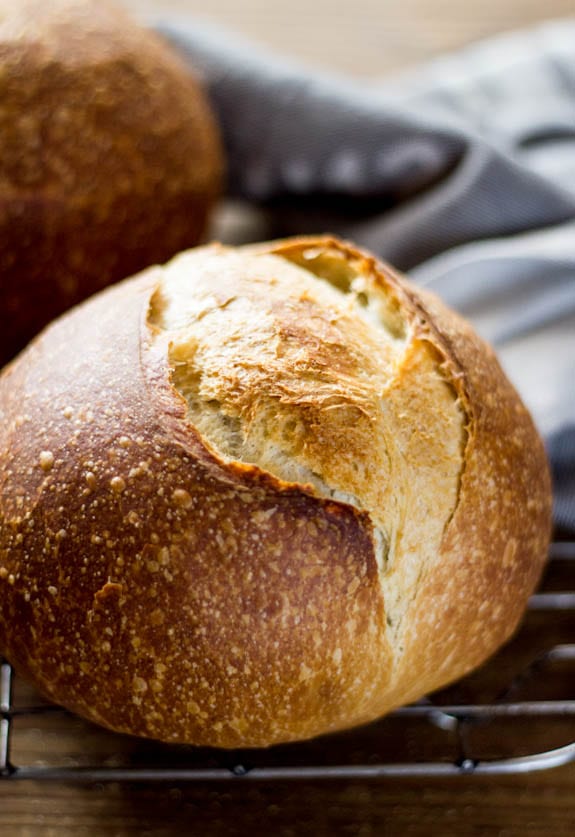
Once the oven reaches the desired temperature, carefully remove the hot pot. If your dough is on a separate baking sheet, gently transfer it into the preheated pot to achieve better oven spring and a more distinctive crust formation. Score the top of the dough with a sharp knife or razor blade to allow for proper expansion during baking and create an aesthetically pleasing pattern.
Place the covered pot back into the oven and bake for 20 minutes. After 20 minutes, remove the lid to allow the bread to brown and develop a crisp crust. Continue baking for an additional 25-30 minutes or until the bread is deep golden brown.
Step 7: Cooling and Enjoying
Once the baking is complete, carefully remove the pot from the oven, then transfer the loaf onto a wire rack to cool completely. It’s essential to let the bread cool for at least an hour before slicing to ensure the interior is fully set.
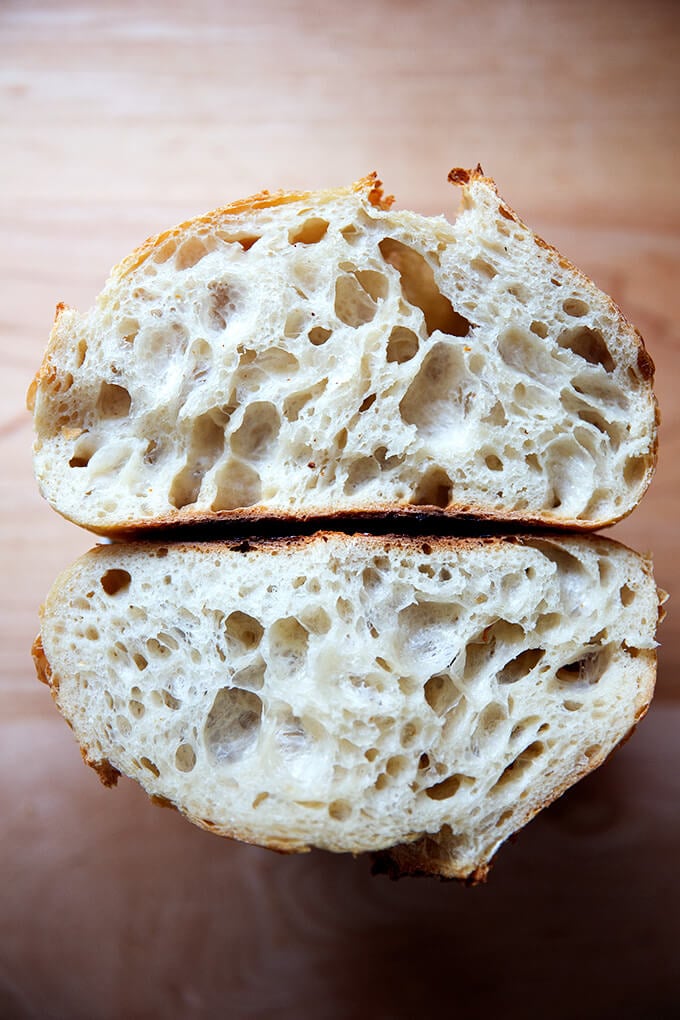
Once cooled, slice into your homemade sourdough bread and enjoy the flavorful aroma and chewy texture. Sourdough bread is best enjoyed fresh, but you can also store it in a bread box or a paper bag to maintain its crustiness for a day or two.
In conclusion, making sourdough bread from scratch may require some time and effort, but the end result is truly rewarding. By following these step-by-step instructions, you’ll be able to create a delightful loaf with a beautiful crust and tangy flavor. Don’t be afraid to experiment and make adjustments along the way to suit your personal taste preferences. So, put on your apron, grab your ingredients, and get ready to embark on a sourdough baking adventure that will leave your taste buds begging for more!
Important Things to Keep in Mind When Making Homemade Sourdough Bread
Baking sourdough bread is an art form that requires patience, skill, and attention to detail. From creating the starter to kneading the dough and finally baking the loaf, each step has its own importance. Whether you’re a seasoned baker or a novice in the kitchen, here are some important things to keep in mind when making homemade sourdough bread that will help you achieve that perfect crust and airy crumb.
1. Quality and Consistency of the Starter: The starter is the heart and soul of sourdough bread, so it’s crucial to have a healthy and active one. Make sure your starter is vibrant, with a slightly sour smell and lots of bubbles. Keep it consistent by feeding it regularly and at the right temperature. Remember, a strong starter will give your bread that distinct tang and excellent rise.
2. Proper Fermentation Time: Sourdough bread needs time to develop its complex flavors and unique texture. Allow the dough to ferment for the appropriate amount of time, usually overnight or up to 24 hours. This slow fermentation process not only enhances the taste but also improves the digestibility of the bread. Keep in mind that the room temperature and hydration level of the dough will affect the fermentation time, so adjust accordingly.
3. The Power of Gluten Development: The success of your sourdough bread lies in the gluten structure. Properly developing gluten is essential for a light and airy crumb, so don’t rush this step. When kneading the dough, use the stretch and fold technique to strengthen the gluten bonds. Be patient and do several rounds until you have a smooth and elastic dough. This will result in better rise and a beautiful crumb.
4. Mastering the Baking Process: Baking sourdough bread requires meticulous attention to detail during the baking process. Preheat your oven to the proper temperature with a baking stone or Dutch oven to create the perfect bake. Score the dough before it goes into the oven to control the expansion and create an attractive pattern. Steam is vital for achieving crisp crust, so make sure to introduce it at the beginning of baking by placing a tray of hot water in the oven or using a spray bottle to mist the dough.
Remember, making sourdough bread is a journey, and it may take a few attempts to perfect your technique. Embrace the process and enjoy the rewards of a beautifully baked loaf of bread. With these important tips in mind, you’ll be well on your way to mastering the art of sourdough baking and impressing your friends and family with your homemade creations.
Frequently Asked Questions
Welcome to our FAQ section on baking sourdough bread! Whether you’re a baking enthusiast or a beginner, we’ve got you covered with answers to some common questions. Read on to expand your knowledge and elevate your sourdough baking skills.
1. What is sourdough bread and how is it different from regular bread?
Sourdough bread is a type of bread made by the fermentation of dough using naturally occurring lactobacilli and wild yeast. What sets it apart from regular bread is the absence of commercial yeast. Instead, it relies on a starter culture of flour and water that ferments over time, giving the bread its unique tangy flavor and chewy texture.
In contrast, regular bread uses commercial yeast, which provides a faster rise but lacks the nuanced flavor profile and health benefits of sourdough. Sourdough bread is often well-tolerated by those with gluten sensitivities due to the fermentation process that breaks down gluten proteins.
2. How do I make a sourdough starter?
Making a sourdough starter is relatively simple. Start by combining equal parts of flour and water in a container. Stir well, cover loosely, and let it sit at room temperature for 24 hours. The following day, discard half of the mixture and feed it by adding equal parts of flour and water.
Repeat this feeding process every day for about a week until your starter becomes active, bubbly, and doubles in size within a few hours. It’s important to remember that the fermentation process can vary depending on temperature and environment, so be patient and adjust the feeding schedule accordingly.
3. How do I know when my dough is properly fermented?
Proper fermentation is one of the keys to a successful sourdough loaf. One way to determine if your dough is properly fermented is the “poke test.” Gently press your finger into the dough, and if it slowly springs back, leaving a slight indentation, it’s ready for the next step. If it springs back quickly, it needs more time to ferment, while a dough that collapses or fails to spring back may have over-fermented.
Additionally, visual cues such as increased volume, visible air bubbles on the surface, and a slightly domed shape are signs that your dough has undergone adequate fermentation.
4. How can I achieve a crusty exterior on my sourdough bread?
To achieve a crusty exterior on your sourdough bread, there are a couple of methods you can try. One is to bake the bread in a preheated Dutch oven or a baking stone, which helps create a steamy environment during the initial stages of baking. The steam ensures a crisp crust formation. Another technique is to mist the dough with water prior to baking or placing a pan of water in the oven to create steam.
Avoid opening the oven door frequently during baking, as this can release steam and affect crust development. Finally, baking the bread at a higher temperature initially, then reducing the temperature after a few minutes, can also contribute to a crustier exterior.
5. How do I store homemade sourdough bread to keep it fresh?
To keep your homemade sourdough bread fresh for longer, it’s essential to store it properly. Once the bread has cooled completely, store it in a paper bag or a bread box at room temperature. Avoid plastic bags, as they can trap moisture and make the crust soggy. If you prefer a softer crust, you can transfer the bread to a sealed container.
Sourdough bread tends to stale faster than commercially-made bread due to the absence of preservatives. If you have leftover stale sourdough bread, you can repurpose it by toasting it, making breadcrumbs, or using it in recipes like bread pudding or croutons.
YOUR FIRST SOURDOUGH (Sourdough Bread For Complete Beginners)
In conclusion, mastering the art of baking sourdough bread is truly a journey worth embarking on for any aspiring chef. The process may seem daunting at first, but with practice and dedication, you can unlock the secrets to creating a loaf that is both delicious and satisfyingly tangy. From cultivating and maintaining a vibrant sourdough starter to perfecting your dough’s fermentation and shaping techniques, every step is an opportunity to learn and grow as a baker. So, gather your ingredients, roll up your sleeves, and let the magic of sourdough unfold in your kitchen. With time and patience, you’ll be rewarded with the intoxicating aroma, crispy crust, and soft, chewy crumb that only homemade sourdough bread can offer. So go ahead, embrace the challenge, and elevate your baking skills to new heights as you embark on this timeless culinary adventure. Happy baking!