Welcome, aspiring sculptors and craft enthusiasts! Today, we embark on a creative journey that combines the artistry of sculpture with the deliciousness of baking. As a professional chef, I am thrilled to guide you through the captivating process of baking Sculpey clay. Just like the delicate balance of flavors in a culinary creation, baking Sculpey clay requires precision, technique, and a touch of creativity. So, roll up your sleeves, preheat your ovens, and let’s dive into the world of sculpting masterpieces that will leave you both satisfied and inspired.
How to Bake Sculpey Clay: A Step-by-Step Guide
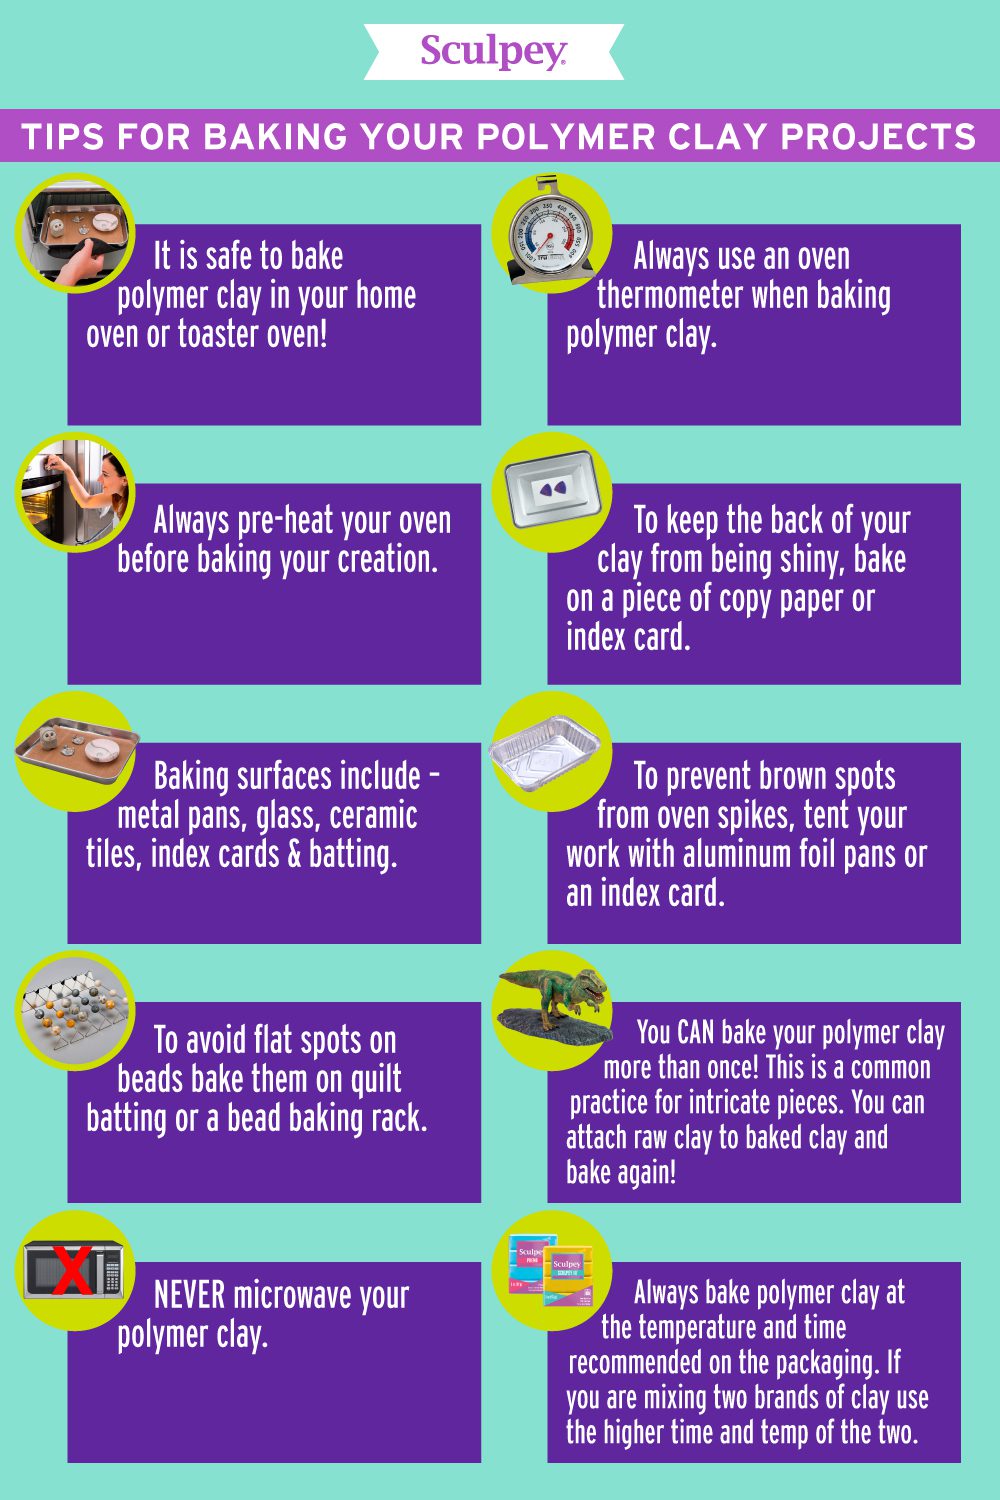
Are you ready to get creative and bring your artistic visions to life? Learning how to bake Sculpey clay is an essential skill for any sculptor, whether you’re a seasoned professional or a beginner. With its versatility and ability to hold intricate details, Sculpey clay has become a popular medium for various crafts and sculptures. In this step-by-step guide, we will show you how to properly bake Sculpey clay to achieve stunning and long-lasting results. Get ready to unleash your imagination and create masterpieces!
Ingredients:
- Sculpey clay (in your preferred colors)
- Sculpey Glaze (optional, for sealing and adding a glossy finish to your creations)
- Baking sheet or oven-safe surface
- Oven thermometer
- Timer
General Information:
- Making Difficulties: Easy
- Preparation Time: 10 minutes
- Cooking Time: Varies based on the thickness and size of your Sculpey clay creation
- Serving Size: Unlimited creativity!
Instructions:
Step 1: Prepare Your Workstation
Before you begin, make sure you have a clean and organized workspace. Lay down a baking sheet or use an oven-safe surface to place your Sculpey clay creations on. Preheat your oven according to the instructions on the packaging of your Sculpey clay. It’s important to follow the recommended temperature for optimal baking results.
Step 2: Sculpt Your Masterpiece
Now it’s time to let your creativity shine! Take your Sculpey clay and start shaping it into your desired form. Whether you’re making intricate jewelry, adorable figurines, or unique home decor, Sculpey clay allows you to bring your imagination to life. Remember to take breaks and wash your hands occasionally, as clay residue can transfer onto your creations.
Step 3: Smooth Out Imperfections
After sculpting, take a few minutes to inspect your creation for any rough edges or imperfections. Sculpey clay is soft and malleable, making it easy to smooth out any unwanted marks. Use your fingers or a clay tool to gently press and smooth the clay surface, ensuring a flawless finish in your final piece.
Step 4: Check the Thickness
Before baking, it’s crucial to check the thickness of your Sculpey clay creation. Thinner pieces generally require less baking time, while thicker pieces may need additional time to fully cure. Use a ruler or measuring tool to ensure that your clay is of even thickness throughout, as this will help it bake evenly and prevent cracking.
Step 5: Bake in the Oven
Place your Sculpey clay creation on the prepared baking sheet or oven-safe surface and carefully transfer it to the preheated oven. Set a timer based on the recommended baking time provided in the Sculpey clay instructions. Keep in mind that larger and thicker creations may require longer baking times. It’s essential to monitor the oven temperature using an oven thermometer to ensure accuracy.
Pro Tip: Avoid opening the oven door frequently while baking, as temperature fluctuations can affect the curing process.
Step 6: Cool and Inspect
Once the baking time has elapsed, carefully remove the baking sheet from the oven and place it on a heat-resistant surface. Allow your Sculpey clay creation to cool completely before handling it. Use this time to inspect the final piece for any cracks or blemishes, as they can be fixed using additional clay or sanding after cooling.
Step 7: Optional: Apply Sculpey Glaze
If you desire a glossy finish and added protection for your Sculpey clay creation, consider using Sculpey Glaze. This optional step involves applying a thin, even layer of glaze over the fully cooled clay. Follow the instructions on the Sculpey Glaze packaging for the best application results. Allow the glaze to dry completely before displaying or using your masterpiece.
Now that you’ve mastered the art of baking Sculpey clay, the possibilities are endless! Let your imagination run wild and continue creating beautiful sculptures that will amaze and inspire. Remember to properly store any leftover clay in an airtight container to maintain its freshness. Start your next clay adventure, experiment with different colors, and unleash your creativity one sculpt at a time!
When it comes to unleashing your creative spirit, few things compare to the tactile joy of molding Sculpey clay into your desired shape and then watching it turn into a solid masterpiece in the oven. Whether you’re a seasoned sculptor or a curious beginner, here are some important things to keep in mind to make the most of your Sculpey clay baking experience.
1. Choose the Right Clay and Tools:
Before diving into your Sculpey clay project, it’s crucial to select the right clay and tools for the task at hand. Sculpey offers a range of products, from Original Sculpey for basic projects to Sculpey III for more intricate designs. Consider the level of details you aim to achieve, the color palette you desire, and the overall finish of your final piece. Additionally, ensure you have a set of quality sculpting tools, such as silicone brushes and shaping tools, to help bring your vision to life.
2. Follow the Baking Instructions:
Temperature and baking time are key factors in achieving a successful Sculpey clay project. Before placing your masterpiece in the oven, carefully read the instructions provided with the specific Sculpey clay you’re using. Generally, most Sculpey clays should be baked at a low temperature (around 275°F or 130°C), but it’s crucial to check the package for specific guidelines. Overbaking can cause your creation to become brittle or lose its vibrant colors, while underbaking may result in a piece that’s not fully cured. So, take the time to set your oven correctly and monitor your creation as it bakes.
3. Create a Safe Baking Environment:
While Sculpey clay is non-toxic, it’s important to create a safe environment when baking your creations. Avoid using the same oven for food preparation to prevent any potential cross-contamination. Designate a separate baking tray or line it with aluminum foil or parchment paper to create a barrier. This practice ensures a hygienic experience and helps maintain the quality of your baked Sculpey pieces. Additionally, make sure your working or baking space is well-ventilated to prevent the buildup of fumes.
4. Finish with Care:
Once your Sculpey clay masterpiece comes out of the oven, it’s time to enhance its beauty and durability. Depending on your desired outcome, there are a few options for finishing. For a shiny, polished look, you can sand your piece with fine-grit sandpaper and then buff it with a soft cloth. Alternatively, you can add a layer of protective gloss or satin glaze to seal the clay and enhance its colors. This will also give your piece a professional touch and help it withstand the test of time.
Remember, making Sculpey clay is a creative journey and a chance to indulge in self-expression. So, while it’s important to follow the instructions and be mindful of the technical aspects, don’t forget to let your imagination run wild. Experiment with mixing colors, try different sculpting techniques, and most importantly, embrace the joy of creating something truly unique. With the right mindset and these important tips in mind, your Sculpey clay creations are bound to be little works of art that bring you endless satisfaction.
Frequently Asked Questions
In this section, we’ll address some common questions about baking Sculpey clay.
Can I bake Sculpey clay in my regular oven?
Yes, you can bake Sculpey clay in a regular oven. To do this, preheat your oven to the temperature specified on the packaging or instructions of the Sculpey clay you are using. Place your clay creation on a baking sheet lined with parchment paper or aluminum foil. Bake the clay for the recommended time, usually around 15-30 minutes per ¼ inch of thickness. Make sure to monitor the oven and avoid overheating the clay as it may cause it to burn or emit toxic fumes.
It’s essential to use a dedicated oven thermometer to ensure that your oven is at the correct temperature. Avoid using the oven for food preparation after baking Sculpey clay, as the residual fumes or particles from the clay may contaminate your food.
Can I paint Sculpey clay after baking?
Absolutely! Once your Sculpey clay creation is baked and cooled, you can paint it using various types of paint. Acrylic paints tend to work well on baked Sculpey clay. Before painting, make sure to clean the surface of your creation with a damp cloth to remove any dust or debris. You can then apply the paint using small brushes or even sponges for an interesting texture.
Allow the paint to dry thoroughly before handling the piece. If you wish to add additional protection, you can apply a clear varnish or sealer to the painted surface. This will give your creation a protective layer and a more polished look.
Can I mix different colors of Sculpey clay?
Yes, mixing different colors of Sculpey clay is a fantastic way to create unique shades and effects. Start by breaking off small pieces of the colors you want to mix. Knead each piece separately until they become soft and pliable. Then, combine the pieces and continue to knead them until you achieve an even color throughout.
Keep in mind that some colors may blend more easily than others, so experiment with small amounts first. Additionally, mixing too many colors at once can result in a muddy or grayish hue, so it’s best to start with just a few colors until you become more familiar with the process.
How do I prevent my Sculpey clay from cracking during baking?
To prevent your Sculpey clay from cracking during baking, there are a few things you can do. First, make sure to properly condition your clay before shaping it. Conditioning involves kneading the clay until it is soft, pliable, and free of air bubbles. Cracks can often occur if the clay is not conditioned well.
You can also try adding a small amount of clay softener or mineral oil to your clay if it feels dry or crumbly. Another tip is to avoid making thick or bulky pieces, as uneven heating can cause cracks. If you’re working with thick sections, consider baking your project in stages, allowing each part to cool before baking the next.
Can I eat food off Sculpey clay surfaces?
No, it is not safe to eat food off Sculpey clay surfaces. Sculpey clay is not food-grade and may contain chemicals that can be harmful if ingested. It’s crucial to keep your clay creations and any food items separate to avoid any potential health risks.
If you plan to create functional items like plates or bowls, consider using a food-safe glaze specifically designed for clay. This will provide a protective barrier between the clay and the food, making it safe for use. Always read the product labels and instructions to ensure you are using the appropriate materials for food-contact items.

Remember to always follow the manufacturer’s instructions and recommendations when it comes to temperature and baking time, as this will ensure the best results for your creations. Experiment with different techniques, tools, and finishes to add your personal touch and bring your visions to life.
As a professional chef, I understand the importance of honing your skills and continuously seeking new knowledge. So, keep exploring the wonderful world of Sculpey clay, embrace the joy of creating, and let your imagination run wild. With practice, dedication, and a sprinkle of creativity, you’ll be amazed at the masterpieces you can create through the art of baking Sculpey clay. Happy crafting!