How To Bake Sculpey Clay
Welcome, aspiring artists and crafters! Today, we’re going to dive into the fascinating world of baking Sculpey clay. Just like a master chef carefully crafts a culinary masterpiece, you too can create stunning sculptures and intricate designs using this versatile medium. Whether you’re a seasoned artist looking to expand your repertoire or a beginner eager to explore the art of clay sculpting, this guide will provide you with all the essential tips and techniques to bring your creations to life. So, roll up your sleeves, preheat your oven, and let’s embark on this exciting journey of baking Sculpey clay together!
How to Bake Sculpey Clay: A Guide for Creating Beautiful Sculptures
Whether you’re a passionate artist or a beginner in the world of sculpting, baking Sculpey clay is an essential skill to master. Sculpey clay is a versatile and user-friendly medium that allows you to create intricate and detailed sculptures. In this guide, we’ll take you through the step-by-step process of baking Sculpey clay, ensuring that your creations turn out beautifully every time. So let’s get started and unleash your creative potential!
Ingredients:
- Sculpey clay (choose your desired colors)
- Oven-safe baking tray
- Parchment paper
- Oven thermometer
- Oven mitts
General Information:
- Making Difficulties: Easy
- Preparation Time: 10 minutes
- Cooking Time: Varies depending on the size and thickness of the sculpture (approximately 15-30 minutes)
- Skill Level Required: Beginner
Instructions:
-
Knead the Clay:
-
Create Your Sculpture:
-
Preheat the Oven:
-
Prepare the Baking Tray:
-
Bake the Sculpture:
-
Cool and Inspect:
-
Finishing Touches:
Start by preparing your workspace. Clean the surface and wash your hands to ensure there are no unwanted particles on the clay. Next, take a small portion of the Sculpey clay and begin kneading it with your hands. The heat from your hands will soften the clay, making it more pliable and easy to work with.
Roll the clay between your palms until it becomes smooth and free of any lumps. If the clay feels too hard, you can warm it up by applying gentle pressure between your hands or by using a hairdryer on low heat.
Once the clay is properly kneaded, you can start shaping it into your desired sculpture. Let your imagination run wild! Whether you’re crafting a small figurine, a decorative pendant, or an intricate piece of jewelry, ensure that you take your time to create intricate details. Use sculpting tools and your fingertips to add texture, carve lines, or smoothen surfaces.
Remember to work on a clean surface and take breaks to wash your hands if you switch between colors to prevent any unwanted color mixing. Trust your instincts and enjoy the process of bringing your vision to life!
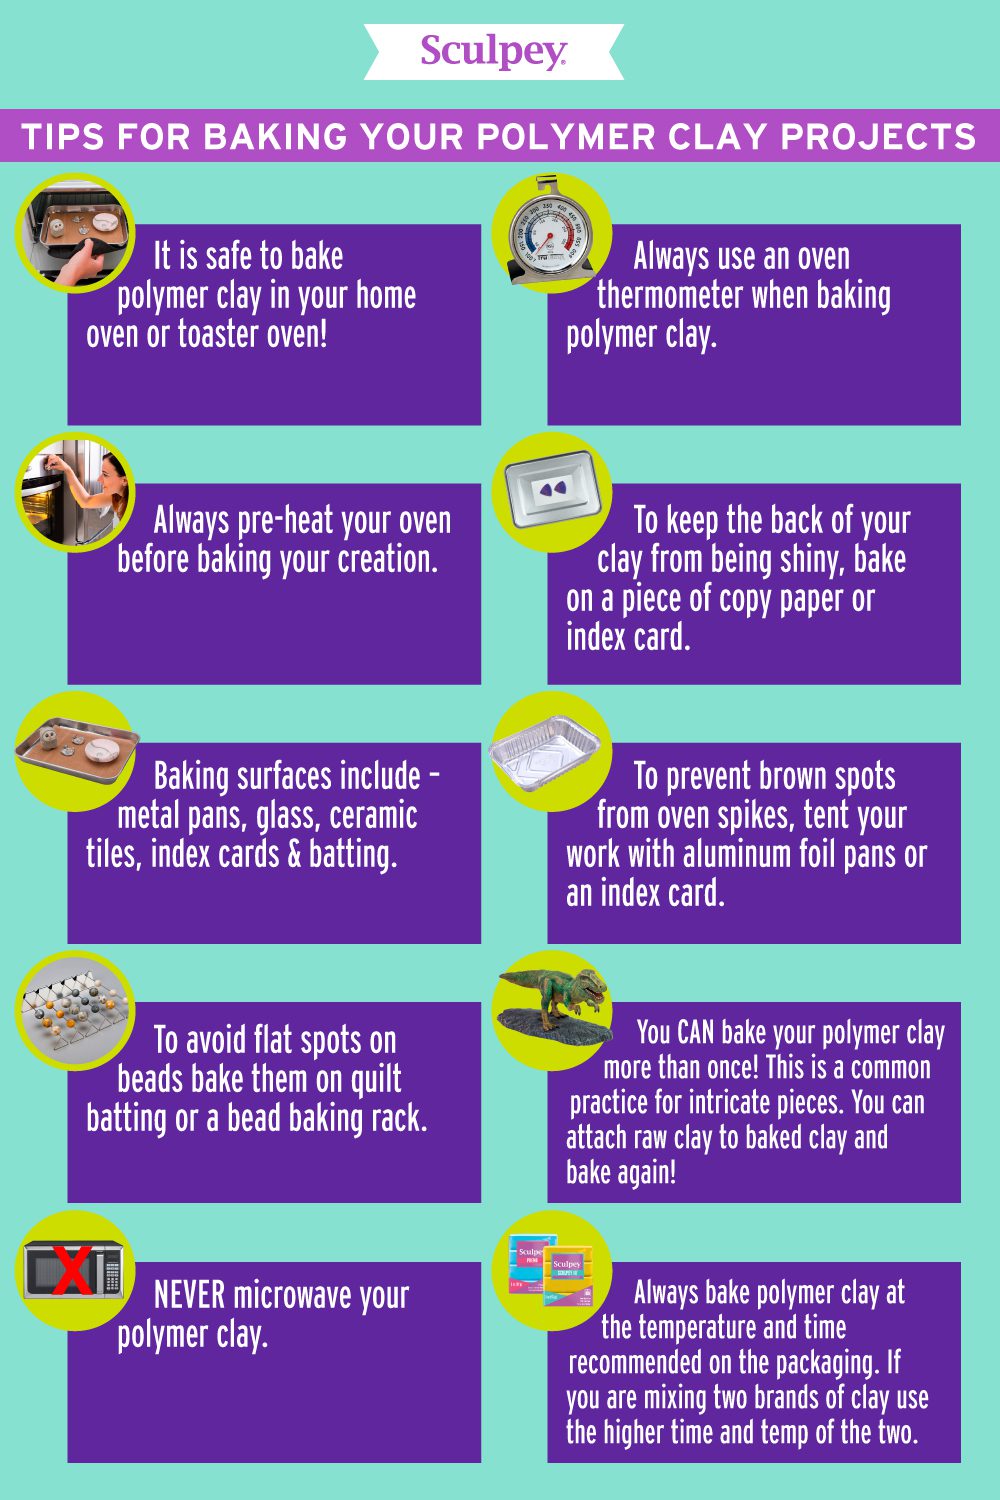
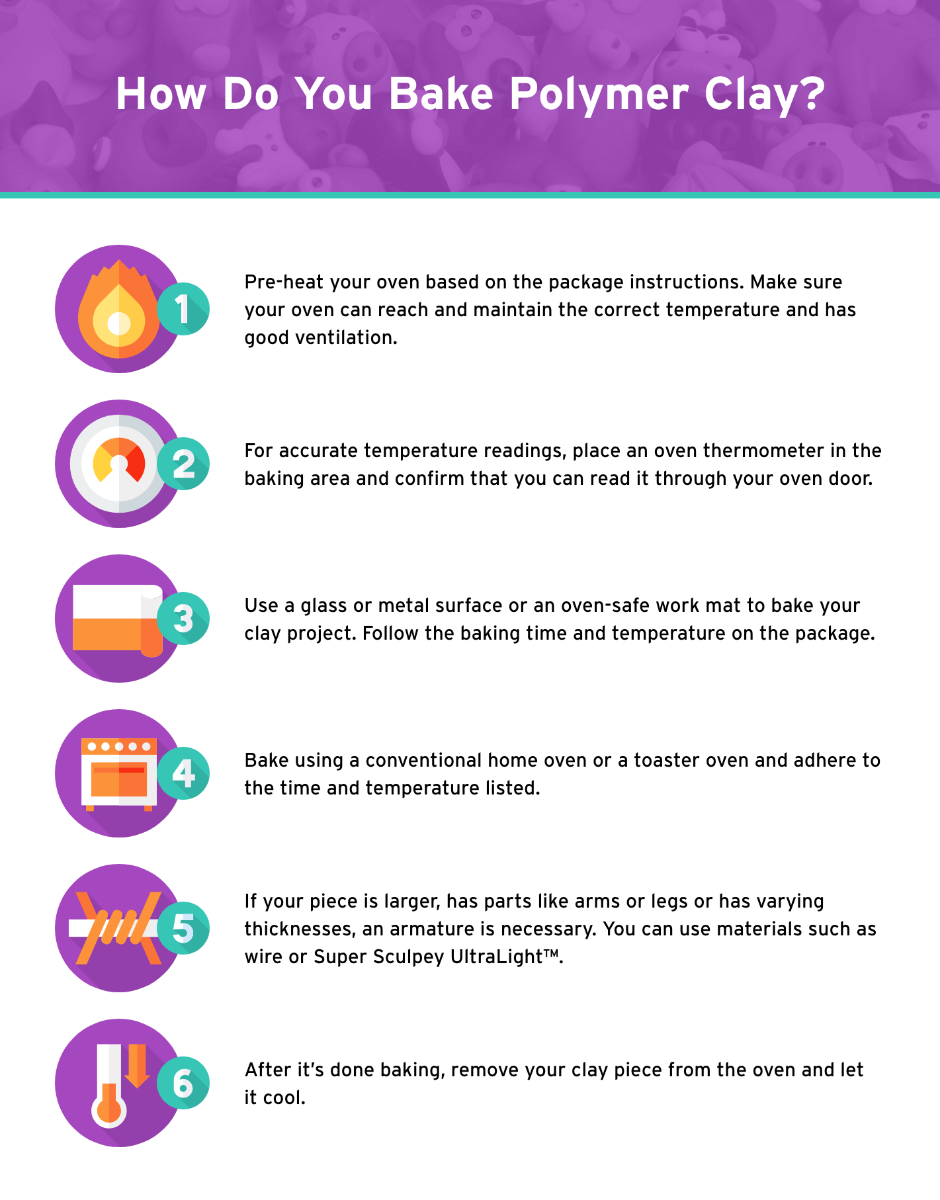
While you marvel at your masterpiece, preheat your oven to the recommended temperature. Consult the packaging of your Sculpey clay for specific guidelines, as different types of Sculpey may have slightly different baking instructions. It’s crucial to maintain the correct temperature to ensure your sculpture bakes evenly and retains its shape.
Use an oven thermometer to verify that the temperature is accurate, as ovens can often have slight variations. Once the oven has reached the desired temperature, you’re ready to bake!
Line your oven-safe baking tray with parchment paper to prevent the clay from sticking to the surface. The parchment paper acts as a protective barrier and ensures easy removal of your sculpture once it’s done baking. Double-check that the tray fits comfortably in your oven without any obstructions.
If you plan to bake multiple sculptures, ensure there is enough space between each piece to allow for proper airflow during baking. This will help prevent any uneven baking or distortion.
Carefully place your sculpted piece on the prepared baking tray. Gently slide the tray into the preheated oven, ensuring that it’s centered to maximize even heating. Close the oven door and set the timer according to the recommended baking time.
Keep a close eye on your sculpture as it bakes. If you notice any signs of browning or excessive bubbling, reduce the oven temperature slightly or place a sheet of aluminum foil loosely over the sculpture to protect it from direct heat.
Once the designated baking time has elapsed, use oven mitts to carefully remove the baking tray from the oven. Set it aside on a heat-resistant surface and resist the temptation to touch or move your sculpture immediately.
Allow your sculpture to cool completely before handling it. This cooling period is essential to ensure that the clay hardens and retains its shape and durability. Once cooled, inspect your sculpture for any imperfections or cracks. If needed, you can use sandpaper or a fine-grit file to smooth out rough edges or correct minor flaws.
Now that your sculpture is baked and cooled, it’s time to add the finishing touches! You can use acrylic paints, varnishes, or sealants to enhance the colors and protect the surface of your sculpture. Get creative with different painting techniques or experiment with different finishes to achieve the desired effect.
Remember to allow the paint or varnish to dry completely before displaying or handling your finished sculpture. This will prevent any smudging or damage to the artwork you’ve worked so hard to create.
Now that you know the step-by-step process of baking Sculpey clay, you can embark on your sculpting journey with confidence. Remember to trust your artistic instincts, have fun with the process, and let your creativity shine through. With practice and experimentation, you’ll soon master the art of baking Sculpey clay and create stunning sculptures that showcase your unique style. Happy sculpting!
The Delicate Art of Baking Sculpey Clay: Important Things to Keep in Mind
Baking Sculpey clay is a creative and fulfilling endeavor, but it requires careful attention to detail to achieve the perfect results. Whether you’re a seasoned clay artist or just starting out, there are a few important things to keep in mind that will ensure your creations turn out beautifully. From temperature control to protecting delicate details, here’s what you need to know.
1. Temperature Matters: One of the most crucial aspects of baking Sculpey clay is maintaining the right temperature. Each brand and type of clay has its own recommended baking temperature, so be sure to check the packaging or manufacturer’s website for specific instructions. Investing in an oven thermometer is also a wise idea—this will allow you to accurately gauge the internal temperature of your oven and make any necessary adjustments.
2. Avoid Overbaking: Overbaking can cause your Sculpey clay to darken or burn, which can be devastating after all your hard work. Start by baking your clay for the minimum recommended time and keep a vigilant eye on it. If you notice any significant color change or smell, it’s time to remove it from the oven. Remember that Sculpey clay continues to harden as it cools, so it’s better to underbake slightly than risk ruining your masterpiece.
3. Protect Fine Details: If your creation features intricate details or delicate parts, it’s essential to take extra precautions when baking. Consider using a tent made of aluminum foil to shield these areas from direct heat and prevent them from getting burned or warped. You can also use support structures like baking paper or a ceramic tile to prop up any vulnerable sections during baking. Remember to remove these supports carefully after baking to avoid any damage to your finished piece.
4. Allow for Cooling and Curing Time: After you’ve baked your Sculpey clay, it’s crucial to let it cool completely before handling or adding any additional elements. Rushing this step can result in the clay becoming brittle or breaking. It’s also essential to remember that Sculpey clay fully cures and hardens only after it has cooled completely. So, resist the temptation to test its hardness or flexibility while it’s still warm. Give it ample time to cool, and you’ll be rewarded with a durable and long-lasting creation.
5. Experiment and Have Fun: While these guidelines are essential to follow, don’t be afraid to experiment and make the process your own. Baking Sculpey clay is an art form that allows for creativity and personal expression. Try different baking times and temperatures to achieve unique effects. Mix colors and textures to see what combinations spark joy for you. Enjoy the journey of discovering your own style and mastering the art of baking Sculpey clay.
Baking Sculpey clay can be a delightful journey full of surprises and beautiful creations. By keeping these important pointers in mind, you’ll be well on your way to mastering this delicate art form. Remember to respect the temperature guidelines, shield delicate details, allow for proper cooling and curing time, and most importantly, have fun. Now, it’s time to let your imagination run wild and create something truly special.
Frequently Asked Questions
Are you looking to learn how to bake Sculpey clay? We’ve got you covered! Here are answers to some common questions that will help you master the art of baking Sculpey clay.
1. What temperature should I bake Sculpey clay at?
When baking Sculpey clay, it’s important to follow the manufacturer’s instructions. Generally, the temperature ranges between 275°F and 300°F (135°C and 150°C). Preheating your oven is essential to ensure even baking. Place your creations on a baking sheet or aluminum foil to avoid direct contact with the oven surface.
Keep a close eye on the time, as baking durations may vary depending on the size and thickness of your Sculpey clay creation. Overbaking can cause your piece to become brittle or burn, so be sure to set a timer to remind yourself when to remove it from the oven.
2. How long does it take to bake Sculpey clay?
The baking time for Sculpey clay depends on several factors. Generally, small and thin pieces may take around 15-20 minutes to bake, while larger and thicker creations may require 30-45 minutes. However, it’s crucial to refer to the instructions provided by the Sculpey clay manufacturer for accurate baking times and temperatures.
It is important not to rush the baking process, as it can lead to cracks or an uneven finish. Patience is key when it comes to baking Sculpey clay to achieve the best results.
3. Can I bake Sculpey clay in a toaster oven?
Yes, you can bake Sculpey clay in a toaster oven. Toaster ovens can be a convenient alternative to regular ovens, especially if you are working on small projects or have limited space. Similar to baking in a regular oven, preheating the toaster oven is essential.
However, keep in mind that toaster ovens may have slight temperature fluctuations, so it’s crucial to monitor the baking process closely. To ensure even baking, turn the Sculpey clay creation halfway through the baking time and adjust the temperature as needed.
4. How can I prevent my Sculpey clay from burning while baking?
To prevent your Sculpey clay from burning, it’s important to follow the recommended baking temperature and duration. Always use an oven thermometer to double-check the accuracy of your oven’s temperature settings.
Additionally, placing a sheet of aluminum foil or a baking sheet under your Sculpey clay creation can help distribute the heat evenly and prevent the bottom from burning. If you notice any signs of overbaking, such as browning or discoloration, it’s best to remove your creation from the oven immediately.
5. Can I paint or varnish my Sculpey clay after baking?
Absolutely! Once your Sculpey clay creation is baked and cooled, you can paint it with acrylic paints or apply a protective varnish. Acrylic paints adhere well to baked Sculpey clay and can bring your creation to life with vibrant colors.
Before painting, make sure to clean the surface of your Sculpey clay. You can use a damp cloth or sandpaper to smooth out any rough edges or imperfections. Once you’re satisfied with the surface, let it dry completely before applying the paint or varnish.