How To Bake Rye Bread
Welcome to the world of baking, where the tantalizing aroma of freshly baked bread fills the air and warms the heart. Today, we embark on a journey to master the art of baking rye bread, a true delight for the senses. As a professional chef, I am thrilled to guide you through the process, sharing my expertise and passion for creating this ancient grain masterpiece. So, roll up your sleeves, dust off your apron, and let’s dive into the wondrous world of baking rye bread, where tradition meets innovation and the result is nothing short of pure culinary magic. Get ready to tantalize your taste buds and impress your loved ones with your newfound baking prowess. Let’s begin!
How to Bake Rye Bread: A Delicious and Nutritious Recipe
Do you love the hearty taste and aroma of freshly baked bread? If so, then you’re in for a treat with our recipe for homemade rye bread. Not only is rye bread a delicious addition to any meal, but it’s also packed with nutrients and fiber. Whether you’re a seasoned baker or a beginner in the kitchen, this recipe will guide you through the process of baking your own mouth-watering rye bread. So let’s get started!
Ingredients:
- 3 cups of rye flour
- 2 cups of bread flour
- 2 tablespoons of caraway seeds
- 2 tablespoons of molasses
- 2 teaspoons of salt
- 2 ½ teaspoons of instant yeast
- 2 cups of warm water
- 2 tablespoons of vegetable oil
General Information:
- Making Difficulty: Intermediate
- Preparation Time: 30 minutes
- Cooking Time: 40 minutes
- Total Time: 4 hours and 10 minutes
- Servings: 1 loaf of rye bread
Instructions:
Step 1: Mixing the Dough
In a large mixing bowl, combine the rye flour, bread flour, caraway seeds, and salt. In a separate bowl, dissolve the instant yeast in warm water and let it sit for a few minutes until it becomes frothy. Once frothy, pour the yeast mixture into the dry ingredients. Add the molasses and vegetable oil as well. Mix everything together until a shaggy dough forms.
Next, transfer the dough onto a lightly floured surface and knead it for about 10 minutes until it becomes smooth and elastic. If the dough is too sticky, add a little more bread flour. Shape the dough into a ball and place it in a greased bowl. Cover the bowl with a clean kitchen towel and let the dough rise in a warm place for about 1 to 1 ½ hours, or until it has doubled in size.
Step 2: Shaping the Loaf
After the dough has risen, punch it down to release any air bubbles. Transfer it to a lightly floured surface and shape it into a loaf by folding the sides inward and rolling it tightly from one end to the other. Pinch the seam together to seal it. Place the shaped loaf onto a greased baking sheet or into a greased bread pan. Cover it with a kitchen towel and let it rise for another 45 minutes to 1 hour.
Step 3: Preparing for Baking
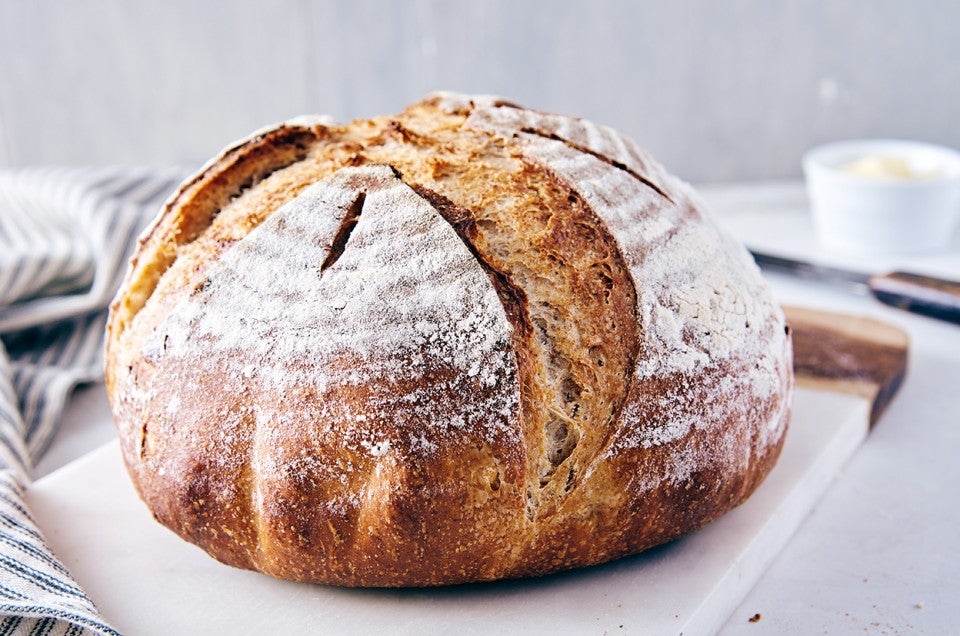
While the loaf is rising, preheat your oven to 400°F (200°C). Once the loaf has completed its final rise, gently brush the top with water and make a few slashes on the surface with a sharp knife. This will allow the bread to expand and release steam while baking.
Step 4: Baking the Rye Bread
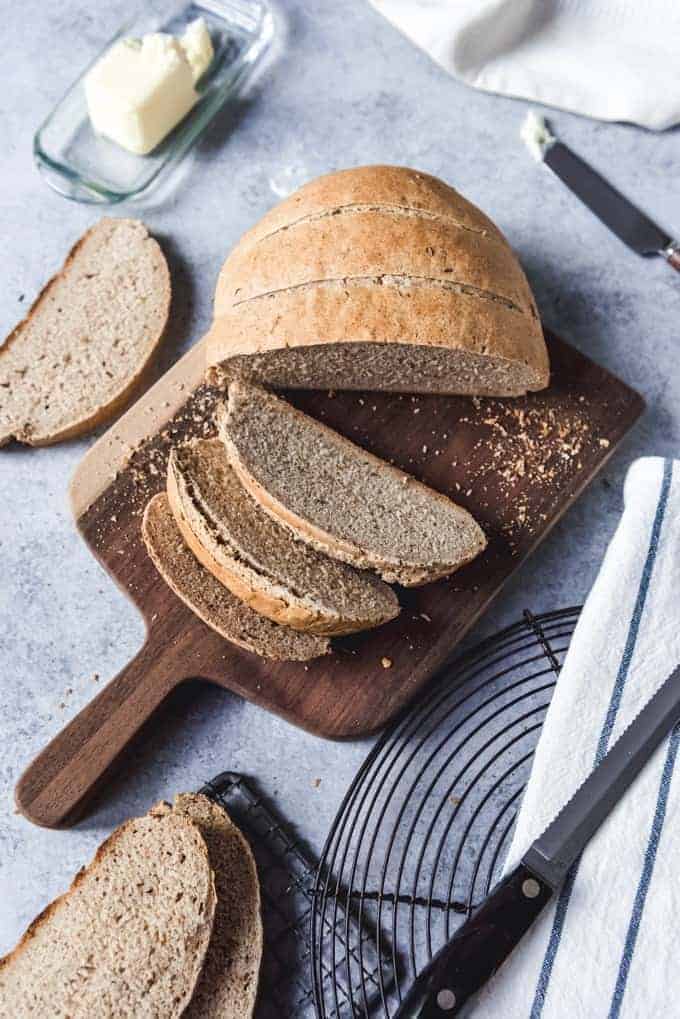
Place the loaf in the preheated oven and bake for 40 minutes or until the bread is golden brown and sounds hollow when tapped on the bottom. If the loaf starts to get too dark, you can cover it loosely with aluminum foil. Once baked, remove the bread from the oven and let it cool on a wire rack for at least 30 minutes before slicing.
Step 5: Enjoying Your Homemade Rye Bread
Once your rye bread has cooled, it’s time to enjoy the fruits of your labor. Slice the bread and serve it with your favorite spreads or use it to make delicious sandwiches and bruschetta. The nutty flavor and chewy texture of this homemade rye bread will surely impress your family and friends.
Step 6: Storing Your Rye Bread
To keep your rye bread fresh, store it in a paper bag or bread box at room temperature for up to 3 days. For longer storage, wrap it tightly in plastic wrap and refrigerate for up to a week. You can also freeze sliced portions of the bread in an airtight container for up to 3 months. Just thaw the slices as needed and toast them for a quick and delicious snack.
Step 7: Experimenting with Variations
Now that you’ve mastered the basic rye bread recipe, feel free to get creative and experiment with different variations. You can add ingredients like chopped onions, garlic, or dried herbs to the dough for added flavor. Or try substituting some of the rye flour with whole wheat flour for a heartier loaf. The possibilities are endless, so let your imagination run wild!
Baking your own rye bread is a rewarding experience that allows you to enjoy the wonderful flavors and textures of homemade bread. With this recipe, you can impress your loved ones with a freshly baked loaf that is both nutritious and delicious. So why not roll up your sleeves, put on your apron, and give it a try? Your taste buds will thank you!
All in all, baking rye bread is a labor of love that requires some time and effort, but the end result is definitely worth it. The combination of rye flour, caraway seeds, and molasses creates a unique flavor profile that is both savory and slightly sweet. The chewy texture of the bread pairs perfectly with your favorite spreads and makes for a satisfying snack or meal. So gather your ingredients, follow the step-by-step instructions, and enjoy the process of baking your own rye bread. Happy baking!
Important things to keep in mind: How to Bake Rye Bread
There’s something incredibly satisfying about the aroma of freshly baked bread filling your home, and when it comes to rye bread, its distinct flavor and hearty texture make it a true culinary delight. Whether you’re a seasoned baker or a novice in the world of bread making, there are a few important things to keep in mind when embarking on the journey of creating your very own rye bread masterpiece. From choosing the right ingredients to perfecting the kneading technique, let’s uncover the secrets to baking the most delectable rye bread right in your own kitchen.
First and foremost, selecting the right flour is essential to achieving the desired texture and flavor in your rye bread. Rye flour comes in different varieties, including light, medium, and dark. Each type has its own unique characteristics that can greatly impact the final result. If you’re new to baking rye bread, it’s wise to start with a lighter variety, as it is more forgiving and easier to work with. As you gain confidence and experience, you can gradually experiment with darker flours to add depth and complexity to your loaves.
Another crucial aspect to consider when making rye bread is the hydration level of your dough. Unlike traditional wheat-based bread, rye bread requires a higher hydration to counteract the lower gluten content in rye flour. Ensuring that your dough is adequately hydrated will result in a moister and more flavorful final product. Keep a watchful eye on the dough during the mixing and kneading process, adding small amounts of water or flour as needed, until you achieve that perfect, slightly tacky consistency that is characteristic of a well-hydrated rye dough.
In addition to flour selection and hydration, fermentation plays a vital role in developing the complex flavors and textures of rye bread. Rye flour contains natural enzymes that break down complex carbohydrates into simple sugars, and a longer fermentation time allows these enzymes to work their magic, resulting in a more robust and full-bodied flavor. Therefore, when making rye bread, it is advisable to opt for a slower fermentation process. This can be achieved by using a smaller amount of yeast and allowing the dough to rise at a slightly cooler temperature. Patience is key; the longer the fermentation, the more flavorful your rye bread will be.
So, as you embark on your rye bread baking journey, remember these important tips: choose the right flour, properly hydrate your dough, and embrace the beauty of a slow fermentation process. With these essential guidelines in mind, you’ll be well on your way to creating mouthwatering rye loaves that will have everyone coming back for more. Now go forth and let the aroma of freshly baked rye bread fill your kitchen, bringing joy and satisfaction to both your taste buds and soul.
Frequently Asked Questions
Are you eager to learn how to bake delicious rye bread at home? Look no further! We’ve got the answers to all your burning questions.
Q: What are the key ingredients needed to bake rye bread?
A: To bake rye bread, you’ll need a few staple ingredients. Start with rye flour, which is the main component. You’ll also need active dry yeast for leavening, warm water to activate the yeast, salt for flavor, and a bit of sugar to feed the yeast and enhance fermentation. Don’t forget about vital extras like caraway seeds, which add a delightful aroma, and unsalted butter for a rich taste.
Once you have these ingredients, you’re ready to embark on your rye bread baking adventure!
Q: Can I use a bread machine to make rye bread?
A: Absolutely! A bread machine can be a convenient tool for baking rye bread. Simply follow the instructions provided by the machine’s manufacturer, but keep a few tips in mind. Start by adding the wet ingredients to the bread machine pan, followed by the dry ingredients. Make a small well in the center of the dry ingredients for the yeast. Use the machine’s dough setting to mix and knead the dough. Lastly, transfer the dough to a traditional loaf pan and bake it in a conventional oven to achieve a classic rye bread shape and texture. Enjoy your freshly baked rye bread with pride!
Q: How can I achieve the perfect texture for my rye bread?
A: The perfect texture of rye bread is a result of proper technique and careful attention to detail. One important factor is the gluten development in the dough. Since rye flour has a lower gluten content than wheat flour, it’s crucial to knead the dough thoroughly to develop gluten strands. This will give the bread a lighter texture and improve its rise. Additionally, make sure to let the dough rest and rise properly. This step allows the yeast to do its magic and creates a lighter and more airy loaf.
By following these steps and being mindful of the details, you’ll achieve a rye bread with a beautiful texture that will make any baker proud!
Q: How long does it take to bake rye bread?
A: The baking time for rye bread can vary depending on different factors such as the size of the loaf, your oven, and the specific recipe you’re using. However, as a general guideline, expect the baking time to be around 30 to 40 minutes at a temperature of 350°F (175°C). To ensure perfect doneness, insert a thermometer into the center of the loaf; it should read about 190°F (88°C) when the bread is fully baked. Once you achieve that golden brown crust and a toothpick or thermometer comes out clean, your rye bread is ready to be devoured!
Q: How should I store homemade rye bread?
A: Proper storage is essential to keep your homemade rye bread fresh and flavorful. After allowing the bread to cool completely, wrap it tightly in plastic wrap or seal it in an airtight container. This will help prevent moisture loss and keep the bread from going stale quickly. If you’ve baked a large loaf, you can also freeze it in slices or as a whole. Just make sure to wrap it securely in plastic wrap and then place it in a freezer bag or container. When you’re ready to enjoy your rye bread, simply thaw it at room temperature or heat it in the oven for a few minutes to bring back that fresh-baked goodness.
By following these storage tips, your homemade rye bread will stay delicious for several days!
How to Make Easy Homemade Rye Bread
In conclusion, mastering the art of baking rye bread can truly elevate your culinary skills to new heights. From understanding the unique characteristics of rye flour to perfecting the fermentation process, this ancient grain offers a world of flavor and texture that is unmatched. By following the steps outlined in this guide, you are well on your way to creating your very own delicious, homemade rye bread. So don your apron, preheat your oven, and let your creativity soar as you embark on this delightful baking adventure. May your kitchen be filled with the comforting aroma of freshly baked rye bread, and may your taste buds be forever grateful for the magic you create. Happy baking!