Welcome, aspiring bakers and pie enthusiasts! Today, we embark on a mouthwatering journey into the art of pie crust making. As a professional chef, I am here to guide you through the flaky, buttery wonder that is the perfect pie crust. Whether you’re a seasoned baker looking to enhance your skills or a beginner eager to embark on a culinary adventure, this guide will equip you with the knowledge and techniques needed to create pie crusts that will leave your taste buds begging for more. So, roll up your sleeves, dust off your apron, and let’s dive into the delightful world of baking the perfect pie crust!
How to Bake the Perfect Pie Crust: A Step-by-Step Guide
Baking a pie from scratch is a delightful experience that fills your home with mouthwatering aromas. But the key to any great pie lies in its crust. The perfect pie crust should be flaky, tender, and just the right amount of golden-brown. If you’ve always wanted to learn how to bake a pie crust like a pro, you’ve come to the right place. In this step-by-step guide, we’ll walk you through the process of creating a delectable pie crust that will have your family and friends asking for seconds.
Ingredients:
– 2 ½ cups all-purpose flour
– 1 teaspoon salt
– 1 cup unsalted butter, cold and cut into small cubes
– ¼ to ½ cup ice water
General Information:
Making Difficulty: Moderate
Preparation Time: 30 minutes
Cooking Time: 15-20 minutes
Instructions:
Step 1: Preparing the Dough
First things first, let’s start by preparing the dough for your pie crust. In a large mixing bowl, combine the all-purpose flour and salt. Using a pastry cutter or your fingertips, cut the cold cubed butter into the flour mixture until it resembles coarse crumbs. The key here is to work quickly to prevent the butter from melting.
Once the butter is incorporated, drizzle ¼ cup of ice water over the mixture. Gently mix the dough with a fork, adding more water as needed, just until the dough comes together. Be careful not to overmix as this can result in a tough crust. The dough should be moist enough to hold together when pressed between your fingers.
Step 2: Shaping the Dough
Now that your dough has come together, it’s time to shape it into a disc. Transfer the dough onto a lightly floured surface and gather it into a ball. Flatten the ball slightly with your hands and then wrap it tightly in plastic wrap. Chill the dough in the refrigerator for at least 1 hour, or overnight if possible. This step allows the gluten to relax and ensures a tender crust.
Step 3: Rolling Out the Crust
Once the dough has chilled, remove it from the refrigerator and let it sit at room temperature for 5-10 minutes to soften slightly. This will make it easier to roll out. Lightly flour your work surface and place the dough on it. Dust the top of the dough with flour, then use a rolling pin to roll it out into a circle about 12 inches in diameter.
To prevent the dough from sticking to the surface or rolling pin, make quarter turns as you roll, and sprinkle more flour if needed. Aim for an even thickness throughout the crust, but don’t worry if it’s not perfectly round. Gently transfer the rolled-out crust to a 9-inch pie dish, pressing it into the bottom and up the sides.
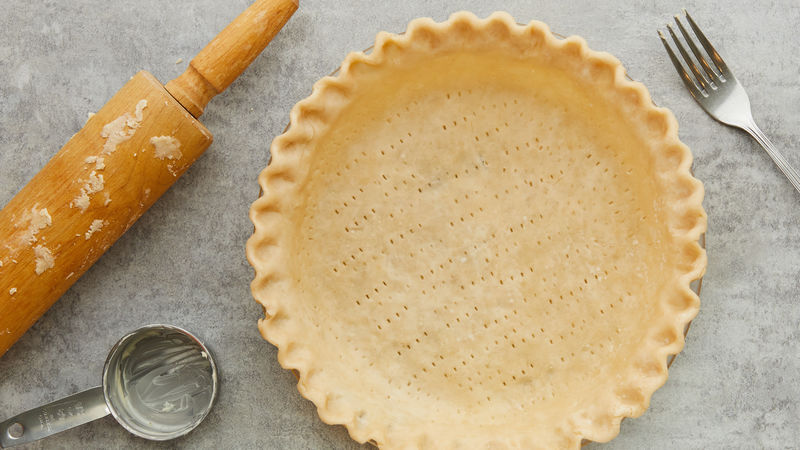
Step 4: Fluting the Edges
With the crust in the pie dish, it’s time to give it those beautiful fluted edges. To achieve this, use your thumb and index finger to pinch the dough together, creating a scalloped pattern all the way around. Alternatively, you can press the tines of a fork into the edge of the crust to create a decorative finish. This step not only adds a touch of elegance but also seals the crust, preventing it from shrinking during baking.
Step 5: Docking the Crust
To prevent the crust from puffing up during baking, it’s important to dock it. Take a fork and gently prick the bottom of the crust all over. This allows steam to escape and ensures your pie crust stays flat and flaky.
Step 6: Blind Baking
In some pie recipes, you may be required to blind bake the crust. This means pre-baking the crust before adding the filling. To blind bake, line the crust with parchment paper and fill it with pie weights, dry beans, or rice. Bake in a preheated oven at 425°F (220°C) for 15 minutes. After 15 minutes, carefully remove the pie weights and parchment paper, then continue baking for an additional 5-10 minutes, or until the crust is golden brown. Blind baking is essential for custard-based pies or recipes with a wet filling.
Step 7: Cooling and Filling
Once your pie crust is beautifully baked, allow it to cool completely on a wire rack. This step is crucial as it ensures that your crust maintains its texture and doesn’t become soggy when you add your filling. Once cooled, your pie crust is ready to be filled with your favorite sweet or savory concoctions. Get creative with fruity fillings, rich custards, or hearty meat fillings — the possibilities are endless!
Baking a homemade pie crust may seem intimidating at first, but with practice and patience, you’ll become a master at creating the perfect crust. Remember to work quickly, handle the dough with care, and have fun experimenting with different fillings. The crisp and flaky crust will be worth the effort, and your loved ones will be impressed by the delicious pies you create. So, roll up your sleeves, preheat that oven, and get ready to embark on a delightful pie-making journey. Happy baking!

Important things to keep in mind when making this “How to Bake Pie Crust” recipe
Are you ready to embark on a delicious culinary adventure? Making a homemade pie crust can be a rewarding and mouthwatering experience. Whether you’re a seasoned baker or a novice in the kitchen, there are a few important things that you should keep in mind to ensure your crust turns out perfectly flaky and delicious. From choosing the right ingredients to mastering the technique, we’ve got you covered. So, roll up your sleeves, dust off your rolling pin, and get ready to create the best pie crust you’ve ever tasted!
1. Use cold ingredients: When it comes to pie crust, one of the key secrets to achieving flakiness is using cold ingredients. Make sure your butter and water are chilled before incorporating them into your dough. The cold fat creates small pockets of air as it melts in the oven, resulting in a light and tender crust. So, pop your butter in the refrigerator and add ice cubes to your water before starting your crust.
2. Be gentle and avoid overworking the dough: While it may be tempting to knead your dough until it’s smooth and elastic, resist the temptation. Overworking the dough can lead to a tough crust. Instead, gently mix the ingredients just until they come together and form a cohesive ball. Remember, a few small lumps of butter in the dough are a good sign as they’ll contribute to the flakiness.
3. Chill the dough: After you’ve made your dough, it’s important to give it some rest in the refrigerator. This cooling time allows the gluten in the flour to relax, making the dough easier to roll and preventing it from shrinking during baking. Wrap your dough in plastic wrap and refrigerate it for at least 30 minutes, or up to 24 hours if you’re prepping in advance. This step is crucial for a tender and easy-to-handle crust.
4. Blind bake for a crisp bottom: Depending on the filling and recipe, you may need to blind bake your pie crust. Blind baking simply means pre-baking the crust before adding the filling. This helps to ensure that the bottom crust is fully cooked, avoiding any soggy or undercooked spots. To blind bake your crust, line it with parchment paper or aluminum foil and fill it with pie weights or dried beans. Bake it at a slightly higher temperature than the recipe suggests to ensure a golden and crisp crust.
Now that you’re armed with these essential tips, you’re ready to tackle your “How to Bake Pie Crust” recipe with confidence. Remember, practice makes perfect, so don’t be discouraged if your first attempt isn’t flawless. With time and experience, you’ll become a pie crust aficionado, delighting your family and friends with your delectable creations. So, grab your apron, gather your ingredients, and let the baking adventure begin!
Frequently Asked Questions
Welcome to our FAQ section, where you’ll find answers to all your burning questions about baking the perfect pie crust. Whether you’re a novice baker or a seasoned pro, we’ve got you covered. Let’s dive in!
1. What are the essential ingredients for a homemade pie crust?
When it comes to baking a delicious pie crust from scratch, you’ll need just a few simple ingredients: all-purpose flour, salt, unsalted butter (preferably cold), and cold water. These ingredients work together to create a flaky and tender crust that will elevate your pie to the next level.
To make the process even tastier, you can also add a touch of sugar for a slightly sweeter crust or a hint of vinegar for extra tenderness. Remember, the key is to use quality ingredients and keep them cold until you’re ready to use them.
2. What’s the secret to achieving a flaky pie crust?
The secret to a flaky pie crust lies in the technique and the temperature of your ingredients. First, make sure your butter is cold. Cut it into small pieces and incorporate it into the flour using a pastry blender or your fingertips. The goal is to create pea-sized crumbs, ensuring that small pockets of butter will melt during baking, producing flaky layers.
Next, don’t overwork the dough. Mix until just combined, as excessive mixing can develop gluten, resulting in a tough crust. Finally, chilling the dough before rolling it out is crucial. This rest period allows the gluten to relax and the butter to firm up, ensuring a tender and flaky crust.
3. Should I use a food processor or do it by hand?
Both methods work well, so it ultimately comes down to personal preference. Using a food processor can be quicker and more convenient. It helps incorporate the butter evenly and prevents it from melting too much due to the heat from your hands. However, if you prefer a more hands-on approach and enjoy the tactile experience, doing it by hand is perfectly fine. Just make sure to work quickly to keep the butter cold.
If you choose to use a food processor, pulse the mixture until you achieve pea-sized crumbs. If you opt for the manual method, cut the butter into the flour until it resembles coarse sand. Either way, the key is to work efficiently to keep the butter cold and ensure a flaky crust.
4. Can I make the pie crust ahead of time?
Absolutely! Making the pie crust ahead of time can be a time-saving option, especially if you’re planning a busy baking day. After preparing the dough, wrap it tightly in plastic wrap and refrigerate for up to three days or freeze it for up to three months. When you’re ready to use it, simply thaw it in the refrigerator overnight before rolling it out.
If you’ve already rolled out the crust and need it for another day, carefully transfer it to a pie dish, cover it with plastic wrap, and refrigerate for up to two days. Just remember to allow the crust to come to room temperature before adding your desired filling and baking.
5. How do I prevent the pie crust from becoming soggy?
To prevent a soggy crust, there are a few simple steps you can take. Firstly, blind-bake the crust. This involves pre-baking the crust without the filling. To do so, line the pie crust with parchment paper or foil and weigh it down with pie weights or dried beans. Bake it in a preheated oven for a short amount of time, usually around 10-15 minutes, until it’s lightly golden.
Another tip is to brush the bottom of the crust with a thin layer of egg white or melted chocolate to create a barrier between the crust and the filling. This will help keep moisture from seeping into the crust and turning it soggy. Finally, avoid adding too much liquid to your filling, as excess moisture can contribute to a soggy crust. Follow these tips, and you’ll be well on your way to a perfect, crisp crust every time.