Welcome, aspiring bakers and culinary enthusiasts! Today, we embark on a unique and creative journey in the world of baking. As a professional chef, I am thrilled to guide you through the art of baking with a twist – glass paint! Yes, you heard it right. In this tutorial, we will explore the fascinating technique of transforming ordinary glass into edible masterpieces. Get ready to unleash your creativity, as we dive into the secrets of baking glass paint, where imagination meets delectable flavors. So, put on your aprons, gather your ingredients, and let’s embark on this extraordinary baking adventure together!
How to Bake Glass Paint: A Vibrant DIY Project to Add Color to Your Home
Glass paint is a versatile medium that allows you to transform ordinary glass objects into stunning works of art. Whether you’re looking to add a splash of color to your windows or personalize your glassware, baking glass paint is the perfect technique to achieve long-lasting, vibrant results. In this step-by-step guide, we’ll show you how to bake glass paint with ease, ensuring that your finished creations are not only beautiful but also durable. Let’s get started!
Ingredients:
- Glass paint
- Glass objects (such as vases, jars, or glassware)
- Paintbrushes
- Rubber gloves
- Alcohol-based glass cleaner
- Cloth or paper towels
- Oven
- Parchment paper
General Information:
- Making Difficulties: Easy
- Preparation Time: 15 minutes
- Cooking Time: Varies depending on the glass object
- Serving Size: Unlimited creativity
Instructions:
Step 1: Prepare the Glass Surface
Before you begin painting, it’s essential to ensure that the glass surface is clean and free from any oils or residues. Start by putting on rubber gloves to protect your hands. Then, use an alcohol-based glass cleaner and a cloth or paper towel to thoroughly clean the glass object you’ll be painting. This step is crucial as it helps the paint adhere better to the glass and prevents any streaks or smudges.
If you’re planning to paint a large area, consider working in sections to maintain control and ensure an even application. Take your time and be patient during this process – a clean surface is the foundation for a successful glass painting project.
Step 2: Choose the Right Glass Paint
When it comes to glass paint, there are various options available in the market. Make sure you select a paint specifically designed for glass surfaces to ensure optimal adhesion and durability. Look for paints that are heat-settable, as this means they can withstand the baking process without fading or chipping.
Consider the opacity of the paint as well. If you want to create vibrant, opaque designs, go for paint with high opacity. If you prefer a translucent effect, opt for paints with lower opacity. Remember to mix and match colors according to your desired design and aesthetic.
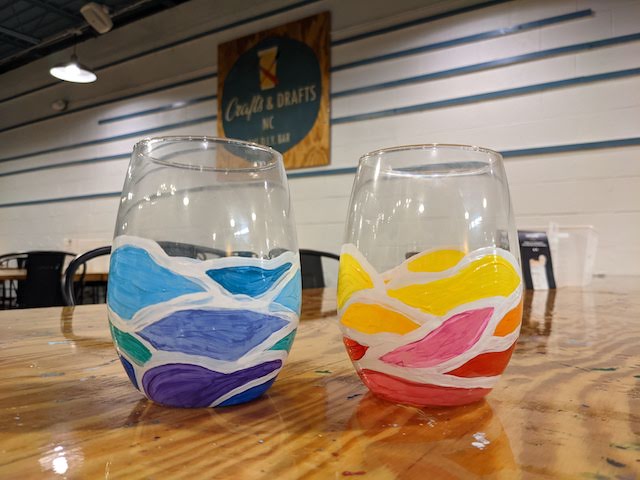
Step 3: Get Creative with Colors and Designs
Now comes the fun part – designing and painting your glass object! Let your creativity shine as you decide on colors, patterns, and designs. You can paint freehand if you have a steady hand, use stencils for more intricate designs, or even use painter’s tape to create clean, geometric shapes.
Start by applying thin, even coats of paint to the glass surface. Allow each layer to dry before adding another to prevent smudging or clumping. If you’re working with different colors, be mindful of how they blend or overlap. Embrace experimentation and don’t be afraid to mix colors right on the glass to create unique shades and gradients.
Step 4: Let the Paint Dry Thoroughly
After you’ve finished painting the glass object, it’s essential to allow the paint to dry thoroughly before moving on to the baking process. This step can take anywhere from a few hours to overnight, depending on the type of paint and the thickness of the layers.
Find a safe and dust-free area where the glass object can rest undisturbed during the drying process. Avoid touching or moving the object to prevent smudges or fingerprints. Patience and attention to detail will ensure a flawless finish.
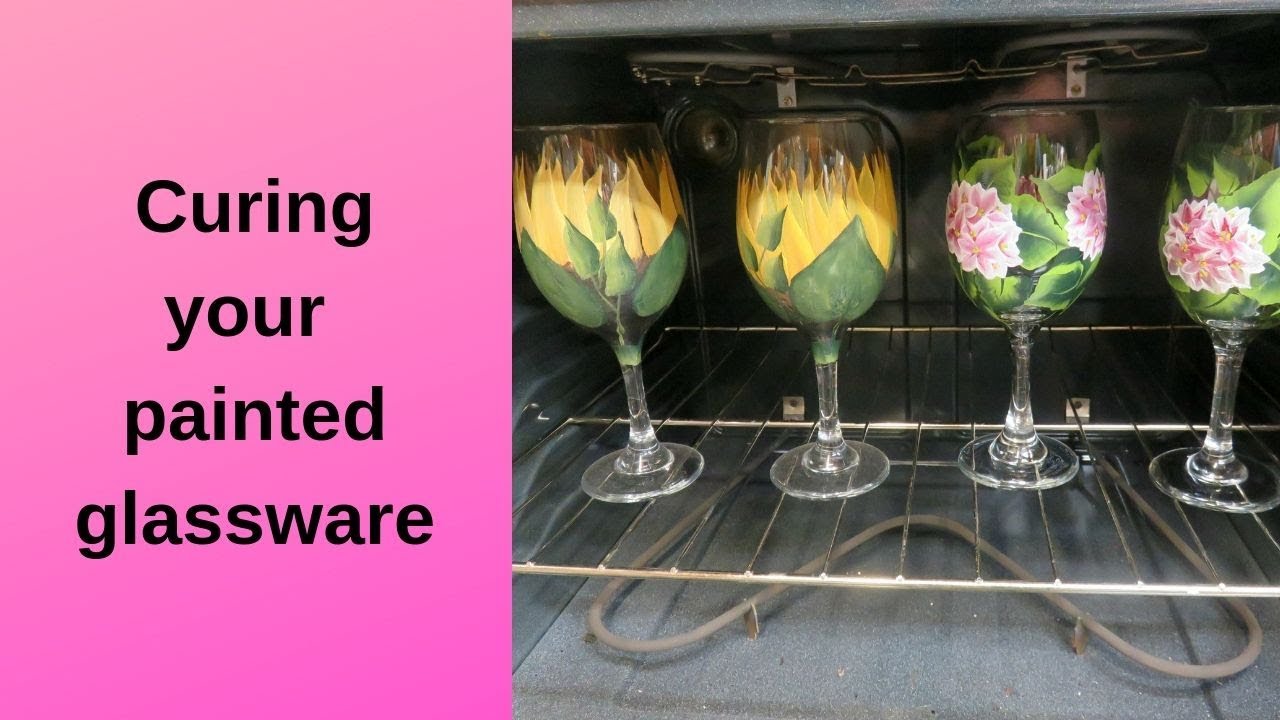
Step 5: Bake the Glass Object
Once the paint has completely dried, it’s time to bake the glass object to set the colors permanently. Preheat your oven to a temperature specified by the glass paint manufacturer. Generally, a temperature between 275°F (135°C) and 350°F (175°C) works well for most glass paints.
Line a baking sheet with parchment paper and place the glass object on it. Make sure the object is stable and won’t tip over during the baking process. Carefully place the baking sheet with the glass object in the preheated oven and set a timer based on the paint manufacturer’s instructions.
Keep a close eye on the glass object while it bakes to prevent any overheating or damage. After the specified time, remove the object from the oven using oven mitts or heat-resistant gloves. Allow it to cool completely before handling.
Step 6: Cure the Glass Paint (optional)
If you want to enhance the durability and longevity of the glass paint, consider curing it. Curing involves allowing the glass object to sit for a specific period to fully harden the paint. While not mandatory for all glass paints, curing can provide additional resistance against scratches and general wear and tear.
Check the instructions provided by the paint manufacturer for the recommended curing time. This can range from a few days to a couple of weeks. It’s essential to follow this step if you plan to use your glass-painted object for functional purposes, such as glassware or vases.
Step 7: Enjoy and Showcase Your Creation
Once the glass object has cooled down and the paint is fully cured (if applicable), it’s time to showcase your beautiful creation. Place it on a windowsill to catch the sunlight, use it as a centerpiece during a special occasion, or proudly display it on a shelf.
Remember to handle your glass-painted object with care, especially when washing or cleaning. Handwashing is usually recommended, as some painted glass objects may not be dishwasher safe. Enjoy the beauty and uniqueness of your creation, and let it bring color and joy to your home or to the recipient if it’s a gift.
Glass painting is a creative and rewarding endeavor that allows you to express your artistic side while adding a personal touch to your surroundings. With the right materials, techniques, and a pinch of imagination, anyone can master the art of baking glass paint. So gather your supplies, let your creativity run wild, and embark on this colorful journey!
Important Things to Keep in Mind When Creating Stunning Baked Glass Paint Art
Glass painting is a mesmerizing art form that allows you to transform ordinary glass surfaces into vibrant works of art. Whether you’re a seasoned painter or a beginner, baking your glass paint is a crucial step that ensures longevity and durability. To help you create stunning and long-lasting glass paint art, here are some important things to keep in mind:
Mind the Surface Preparation
Before diving into your glass painting project, it’s essential to ensure that your glass surface is properly prepared. Start by cleaning the glass thoroughly with warm, soapy water to remove any dirt, oils, or fingerprints. Once dry, wipe the glass with a lint-free cloth and a little rubbing alcohol to ensure a pristine surface for your paint to adhere to. Remember, any residue left on the glass can affect the adhesion and overall quality of your paint design.
Choose the Right Paints
Selecting the right paints for your glass painting project is crucial to achieving vibrant, long-lasting results. Make sure to use specially formulated glass paints that are designed to withstand high temperatures. These paints are often labeled as “permanent” or “bakeable.” Opt for paints that offer a wide range of colors and finishes, allowing you to unleash your creativity. Consider using paints that are water-based and non-toxic, as they are easier to work with and safer for both you and the environment.
Master the Technique
When it comes to glass painting, mastering the technique is key to creating beautiful and professional-looking art. Start by practicing your brushstrokes on a spare piece of glass or even on paper to get a feel for the paints and brushes. Experiment with different techniques such as stippling, sponging, or layering to create interesting textures and effects. Remember to apply thin, even layers of paint to avoid visible brushstrokes and achieve a smooth and polished finish. Additionally, consider using specialized tools like glass outline pens or fine-tip brushes for intricate detailing.
Follow the Baking Instructions
Baking your glass paint is the final step that ensures its durability and longevity. Always refer to the manufacturer’s instructions for the recommended baking time and temperature. Generally, the process involves placing your painted glass in a cold oven and gradually heating it to the specified temperature. Once the baking process is complete, allow the glass to cool down slowly before removing it from the oven. Avoid sudden temperature changes, as they can cause the glass to crack or shatter.
By keeping these important things in mind, you’ll be well on your way to creating breathtaking glass paint art that will stand the test of time. So go ahead, let your imagination run wild, and embark on a journey of creativity and self-expression through the enchanting world of glass painting!
Frequently Asked Questions
Welcome to our frequently asked questions section on baking glass paint! Here, we’ll address some common queries related to the process of baking glass paint. Whether you’re a beginner or have some experience with glass painting, we’ve got you covered. Read on to find answers to your questions!
1. Can I bake glass paint in a regular oven?
Yes, you can bake glass paint in a regular oven. However, it’s essential to consider a few factors. Firstly, ensure that the glass you’re painting is oven-safe and can withstand the baking process. Secondly, set your oven to the recommended temperature specified by the glass paint manufacturer. Baking the glass paint helps to seal and cure it, making it more durable and resistant to chipping or fading over time.
Remember to follow the manufacturer’s instructions for the specific glass paint you’re using. If you’re unsure about the oven-safety of your glass or the baking process, it’s best to consult the instructions or seek guidance from an experienced glass painter.
2. How long should I bake glass paint?
The baking time for glass paint can vary depending on the brand and type of paint you’re using. In general, most glass paints require a baking time of around 30 minutes to an hour. However, it’s crucial to refer to the instructions provided by the manufacturer of your glass paint.
During the baking process, it’s essential to maintain a consistent temperature in your oven. Avoid opening the oven door frequently, as this can lead to temperature fluctuations and affect the final result. Once the recommended baking time is complete, allow the glass to cool completely before handling it.
3. Can I wash glass painted items after baking?
Yes, you can wash glass-painted items after baking, but it’s important to handle them with care. Once the paint has been baked and cured, it becomes more durable and resistant to water. However, it’s always best to wash glass-painted items by hand using a mild soap and warm water.
Avoid using harsh abrasives or scrubbing brushes that could potentially damage the painted surface. Additionally, refrain from soaking the painted glass for extended periods as it may affect the longevity of the paint. Following these precautions will help to preserve the beauty and longevity of your glass-painted creations.
4. Can I use a heat gun instead of baking glass paint?
While using a heat gun to dry glass paint can be an alternative to baking, it’s important to note that the results may not be as durable or long-lasting. Baking glass paint allows the paint to cure and bond more securely to the glass surface, resulting in a stronger finish that is less prone to peeling or fading.
If you choose to use a heat gun, follow the manufacturer’s instructions for the paint and exercise caution to avoid damaging the glass or causing the paint to bubble or burn. Keep in mind that using a heat gun is typically more suitable for smaller glass projects or touch-ups rather than larger surface areas.
5. Can I apply multiple layers of glass paint and bake them together?
Yes, you can apply multiple layers of glass paint and bake them together. Before applying additional layers, make sure each layer has dried completely. Once all the layers are applied, follow the baking instructions provided by the manufacturer. Baking the multiple layers together helps to ensure that they bond well and create a unified, cohesive finish.
It’s important to note that the baking time may need adjustment when working with multiple layers to ensure that each layer cures properly. Always refer to the manufacturer’s instructions for the recommended baking time and temperature for your specific glass paint.