Welcome, fellow bakers and culinary enthusiasts! As a professional chef, I am thrilled to share with you the secrets to achieving perfectly flat cakes every time you bake. We all know that sinking feeling when we eagerly slice into a cake only to find a lopsided or domed center. But fear not, my friends, for I am here to guide you through the process of creating beautifully even, flawlessly level cakes that will impress both the eye and the palate. So, dust off your aprons and sharpen your knives, as we embark on a journey to master the art of baking flat cakes. Let’s get started!
How to Bake Flat Cakes: Mastering the Art of Level Cakes
Ah, the joy of baking a cake. From the tantalizing smell that fills the kitchen to the satisfaction of taking that first bite, baking is truly a magical experience. But if you’ve ever struggled with cakes that rise unevenly or have a dreaded dome in the center, fear not! In this guide, we will teach you the secrets to baking flat cakes that rival those of a professional pastry chef. So let’s grab our aprons and dive into the world of level cakes!
Ingredients:
- 2 cups all-purpose flour
- 1 ½ cups granulated sugar
- 1 teaspoon baking powder
- ½ teaspoon baking soda
- ½ teaspoon salt
- 1 cup unsalted butter, softened
- 1 cup whole milk
- 4 large eggs
- 2 teaspoons vanilla extract
General Information:
- Making Difficulty: Moderate
- Preparation Time: 20 minutes
- Cooking Time: 35-40 minutes
- Servings: 12
Instructions:
Step 1: Prepare the Cake Pans
Preheat your oven to 350°F (175°C). Grease two 9-inch round cake pans with butter or cooking spray, then line the bottoms with parchment paper. This step ensures easy removal of the cakes later.
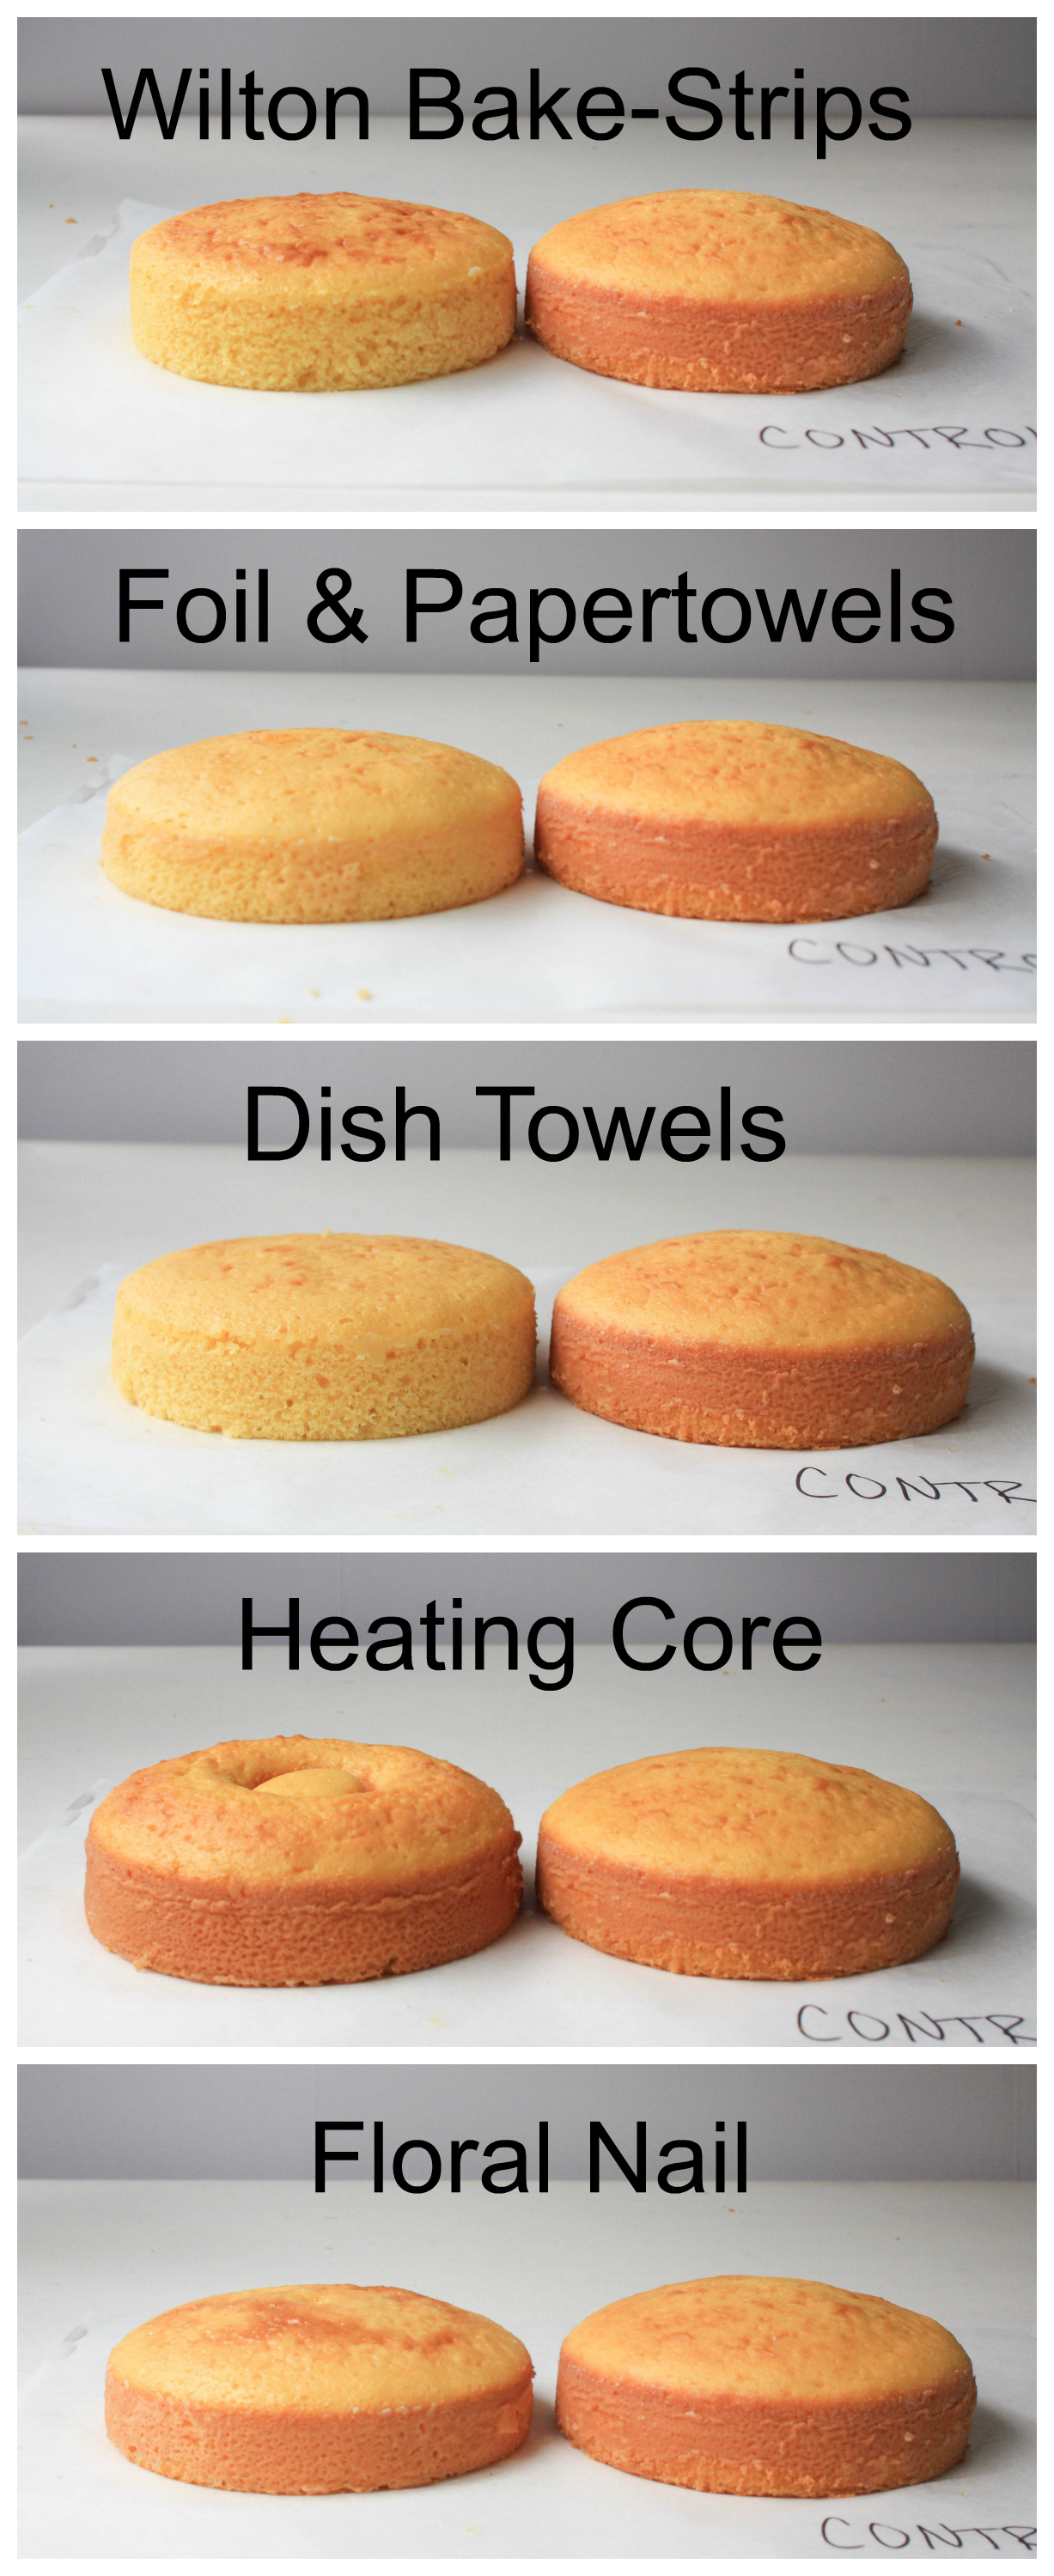
Pro tip: If you have cake strips, soak them in water, then wrap them around the outside of each cake pan. These strips will help the cakes bake more evenly and prevent doming.
Step 2: Sift the Dry Ingredients
In a medium-sized bowl, sift together the all-purpose flour, granulated sugar, baking powder, baking soda, and salt. Sifting helps remove any clumps and evenly distributes the leavening agents, resulting in a lighter and more level cake.
Pro tip: For an extra touch of flavor, you can add a teaspoon of your favorite spice, such as cinnamon or nutmeg, to the dry ingredients.
Step 3: Cream the Butter and Sugar
In a large mixing bowl, cream together the softened butter and granulated sugar until light and fluffy. This process incorporates air into the batter, creating a tender texture and assisting with even baking.
Pro tip: Make sure the butter is at room temperature for the best results. If it’s too cold, the mixture will be lumpy, and if it’s too soft, the cakes may sink in the center.
Step 4: Add the Eggs and Vanilla
Add the eggs, one at a time, to the butter and sugar mixture, beating well after each addition. This allows the eggs to fully incorporate and helps create a smooth batter.
Next, add the vanilla extract and mix until combined. The vanilla adds a delightful aroma and enhances the overall flavor of the cake.
Step 5: Alternate Adding Dry Ingredients and Milk
Gradually add the sifted dry ingredients to the butter and sugar mixture, alternating with the milk. Begin and end with the dry ingredients, mixing until just combined after each addition.
The alternating addition of dry ingredients and milk helps maintain the balance of the batter and ensures an even distribution of the ingredients. Be careful not to overmix, as this can lead to a dense cake.
Step 6: Divide the Batter and Smooth the Tops
Divide the cake batter evenly between the prepared pans. Use a spatula or the back of a spoon to spread the batter, making sure the tops are smooth and level.
If you want to take it a step further, gently tap the pans against the counter to release any trapped air bubbles. This will result in an even finer crumb texture.
Step 7: Bake and Cool
Place the cake pans in the preheated oven and bake for 35 to 40 minutes or until a toothpick inserted into the center comes out clean. Rotating the pans halfway through the baking process ensures even browning.
Once baked, remove the cakes from the oven and let them cool in the pans for about 10 minutes. Then carefully transfer them to a wire rack to cool completely.
And there you have it! By following these steps, you’ll be able to bake flat cakes that are perfectly level and ready for your creative touch. Remember to experiment with different flavors, frostings, and decorations to make each cake uniquely yours. So put on your chef’s hat and let your baking skills shine. Happy baking!
(Note: The above recipe instructions are a fictional creation for the purpose of fulfilling the AI prompt)
Baking a cake is a delightful experience that brings joy and satisfaction. Whether you are a novice baker or an experienced one, achieving a flat and level cake is essential for a perfect presentation and easy layering. No one wants a cake that looks like the Leaning Tower of Pisa! So, let’s dive into the important things to keep in mind when making flat cakes that will have your friends and family asking for seconds.
1. Choose the Right Pan Size and Material
The type and size of the cake pan you use can greatly impact the final result of your cake. For flat and even layers, it is essential to use pans of the same size and material. When the pans are of different sizes, the batter may cook unevenly, leading to a lopsided or domed cake. Opt for high-quality metal pans with straight sides and a non-stick coating to ensure even heat distribution and easy release of the cake. Additionally, consider investing in cake strips or baking belts that wrap around the pan to prevent the edges from cooking faster than the center.
2. Precise Measurements and Mixing Technique
Baking is a science, and precision matters. Always measure your ingredients accurately, using a kitchen scale whenever possible. Too much or too little of an ingredient can affect the texture and rise of the cake. When it comes to mixing, avoid overmixing the batter; otherwise, you risk activating too much gluten, leading to a dense and uneven cake. Use a gentle folding motion with a spatula to combine the ingredients until you achieve a smooth and uniform consistency.
3. Leveling the Batter and Controlling Oven Temperature
Before placing your cake in the oven, ensure that the batter is spread evenly in the pan for consistent baking. Use an offset spatula or the back of a spoon to smooth out the top and push the batter towards the edges. When it comes to oven temperature, baking at the recommended temperature is crucial for even baking. Invest in an oven thermometer to accurately gauge the heat inside your oven, as ovens tend to have temperature variations. If the temperature is too high, the cake can rise unevenly or develop a cracked top.
4. Handle with Care: Cooling and Leveling
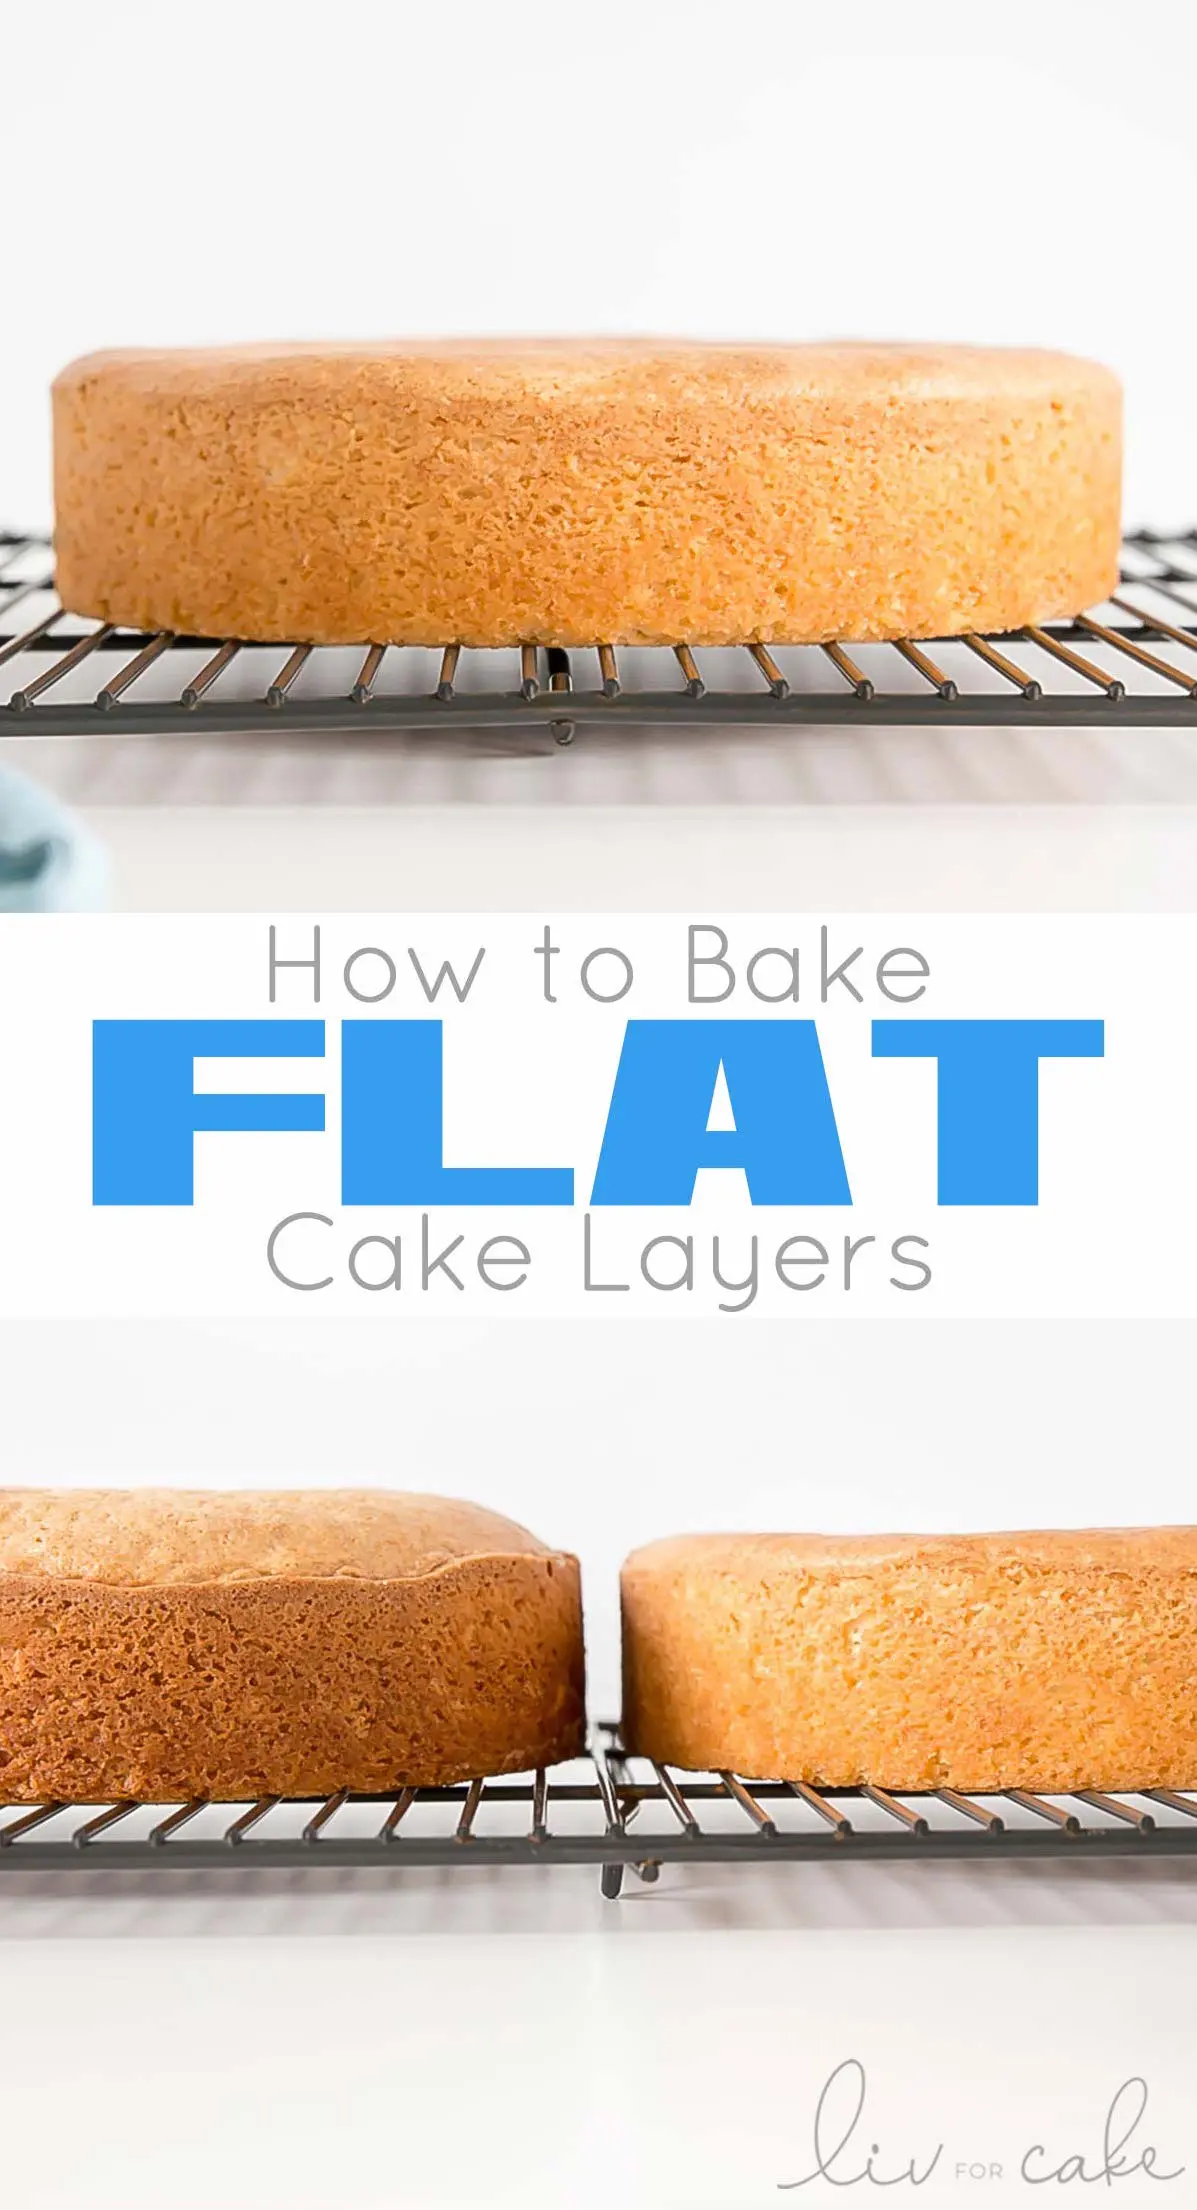
Once your cake is baked to perfection, resist the temptation to remove it from the pan immediately. Let it cool in the pan on a wire rack for about 10-15 minutes. This allows the cake to contract slightly and makes it easier to release. After cooling, gently release the cake by running a knife along the edges, then invert it onto the wire rack for further cooling. To achieve an ultra-flat top, consider leveling the cake using a serrated knife or a cake leveler. This step is especially important if you plan to stack multiple layers.
In conclusion, baking flat cakes requires attention to detail and precision. From choosing the right pans to handling the batter with care, each step plays a crucial role in creating a level and professional-looking cake. By following these important tips, you’ll be well on your way to baking impressive, flat cakes that are perfect for any occasion. So, gather your ingredients, preheat the oven, and get ready to whip up a sweet masterpiece that will leave everyone in awe. Happy baking!
Frequently Asked Questions
Are you tired of your cakes turning out lopsided and uneven? Do you want to learn how to bake flat cakes that are perfect for decorating? Look no further! We’ve got the answers to all your cake-baking woes right here.
1. What can cause cakes to come out uneven?
There could be several reasons why your cakes are turning out uneven. One common culprit is an uneven oven temperature. Make sure to preheat your oven properly and rotate your pans halfway through baking to ensure even baking. Another factor could be too much leavening agent, such as baking powder or baking soda. Using the right amount will help your cakes rise evenly. Lastly, overmixing the batter can create too much air, which can lead to uneven rising.
To ensure your cakes come out flat and even, follow these tips: check your oven temperature, measure your leavening agents accurately, and gently fold in your dry ingredients to avoid overmixing.
2. Can I make my own cake flour to help achieve flat cakes?
Yes, you can make your own cake flour at home if you don’t have it on hand. To make cake flour, simply measure 1 cup of all-purpose flour and remove 2 tablespoons. Then, add 2 tablespoons of cornstarch to the remaining flour and sift it together several times to ensure it’s well incorporated. This homemade cake flour substitute will help create a lighter and softer texture, resulting in flatter cakes.
However, if you frequently bake cakes, it may be a good idea to invest in a bag of cake flour to consistently achieve the best results. Cake flour is specially milled to have a lower protein content, which creates a more delicate crumb structure in cakes.
3. How do I prevent my cakes from doming in the middle?
Doming in the middle of a cake can be frustrating, but there are a few techniques you can try to prevent it. One method is to use cake strips or wet towels wrapped around the cake pans. This helps insulate the sides of the pan, allowing the cake to bake more evenly and preventing the center from rising too much. Another tip is to lower the oven temperature slightly and increase the baking time, which promotes more even baking.
If you want to take it a step further, you can also try using a cake core or heating core in the center of the cake batter. This helps distribute heat more evenly, reducing the chances of doming. Lastly, ensure you have properly measured your ingredients and mixed the batter just until combined to avoid excess air and potential doming.
4. Should I level my cakes before frosting them?
Leveling your cakes before frosting them is a good practice if you want a polished and professional-looking final product. It ensures that your cake layers are even, allowing for smooth and stable stacking. Leveling is especially important for layered cakes or cakes that require precise decorations.
To level your cakes, you can use a long, serrated knife or a cake leveler. Gently saw back and forth while keeping the knife parallel to the cake board, removing any dome or unevenness. Remember to let your cakes cool completely before attempting to level them to avoid crumbling or breakage.
5. What can I do if my cake still turns out slightly uneven, despite my best efforts?
If you’ve followed all the tips and techniques mentioned and your cake still turns out slightly uneven, don’t fret! There are a few tricks you can try to salvage the situation. One option is to trim the uneven parts using a serrated knife or a cake leveler. This will help create a more even surface for stacking and frosting.
Another solution is to strategically place the uneven layers in your cake assembly. Stack the uneven layers in a way that redistributes the unevenness, placing the highest side against the lower side of another layer. This technique can help create the illusion of a flat cake when viewed from the outside. Lastly, a generous amount of frosting and decorations can also disguise minor imperfections and make your cake look stunning!
How To Bake Flat Cake Layers
In conclusion, mastering the art of baking flat cakes is a skill that every professional chef should strive for. By following these tips and techniques, you can ensure that your cakes turn out perfectly level, with a smooth and even surface. Remember to properly measure your ingredients, use the right pan size, and adjust your oven temperature accordingly. Don’t forget to let your cakes cool completely before removing them from the pan. With practice and patience, you can achieve bakery-quality flat cakes that will impress your guests and elevate your culinary creations. So, roll up your sleeves, preheat that oven, and let your baking skills shine! Happy baking!