How To Bake Face
As a professional chef, I am always excited to explore new culinary trends and push the boundaries of what is possible in the kitchen. Today, I am here to introduce you to a unique and fascinating concept that has been making waves in the baking world – face baking. Now, before you jump to any conclusions, let me assure you that we won’t be baking actual faces! Instead, we will be diving into the art of creating beautifully decorated cakes and pastries that resemble human faces. Join me on this creative journey as we explore the techniques, tools, and tips to achieve stunning and realistic face bakes. Get ready to impress your friends and family with this innovative and visually striking form of baking. Let’s dive in and unlock the secrets of how to bake face!
How To Bake Your Face: Achieve a Flawless Makeup Look
Cosmetics and makeup techniques have come a long way, and one of the latest trends to hit the beauty world is “baking.” Baking your face involves a specific application method using translucent powder to create a long-lasting, flawless makeup look. This technique helps to set your foundation, highlight your features, and lock in your makeup for hours. If you’re curious about how to bake your face like a pro, follow this step-by-step guide for stunning results.
Ingredients:
- Moisturizer
- Primer
- Foundation
- Concealer
- Translucent Powder
- Beauty Blender or Makeup Brush
- Powder Brush
- Setting Spray
General Information:
- Making Difficulties: Easy
- Preparation Time: 10 minutes
- Cooking Time: 20 minutes
- Serves: 1 person
Instructions:
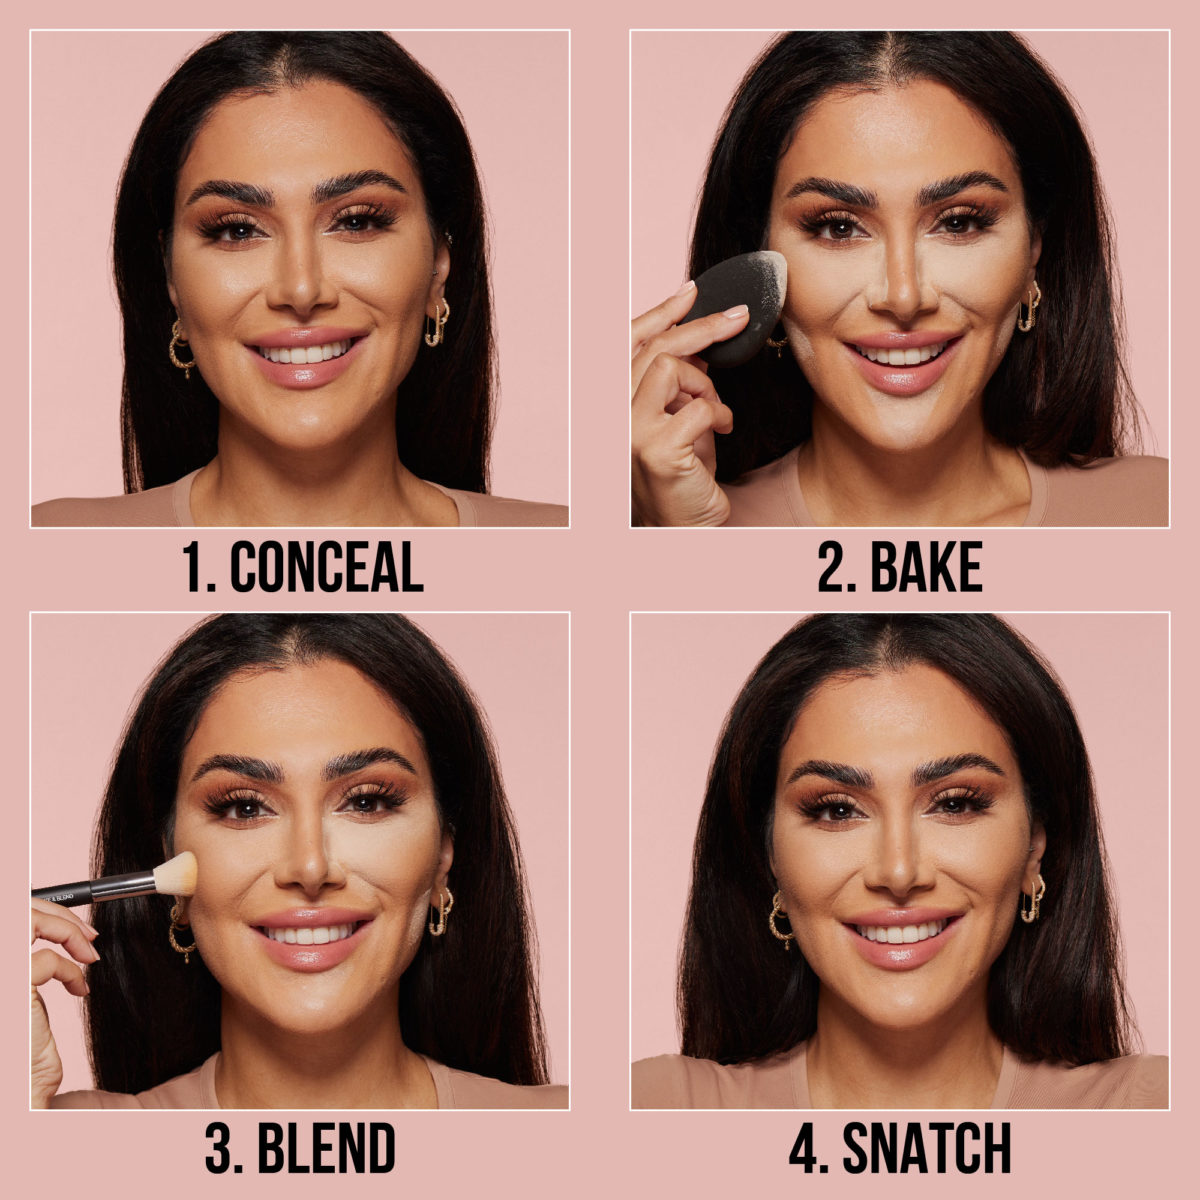
Step 1: Prepping Your Skin
Start by prepping your skin to ensure a smooth makeup application. Cleanse and moisturize your face to create a hydrated canvas. Allow the moisturizer to fully absorb into your skin before moving on to the next step. Next, apply a primer to create a flawless base for your foundation. This will help to minimize pores and extend the longevity of your makeup.
Once your primer is set, apply your favorite foundation using a beauty blender or makeup brush. Blend it evenly all over your face and neck, making sure there are no harsh lines. Use a concealer to cover any blemishes or under-eye circles, and blend it seamlessly into your foundation.
Step 2: Applying Translucent Powder
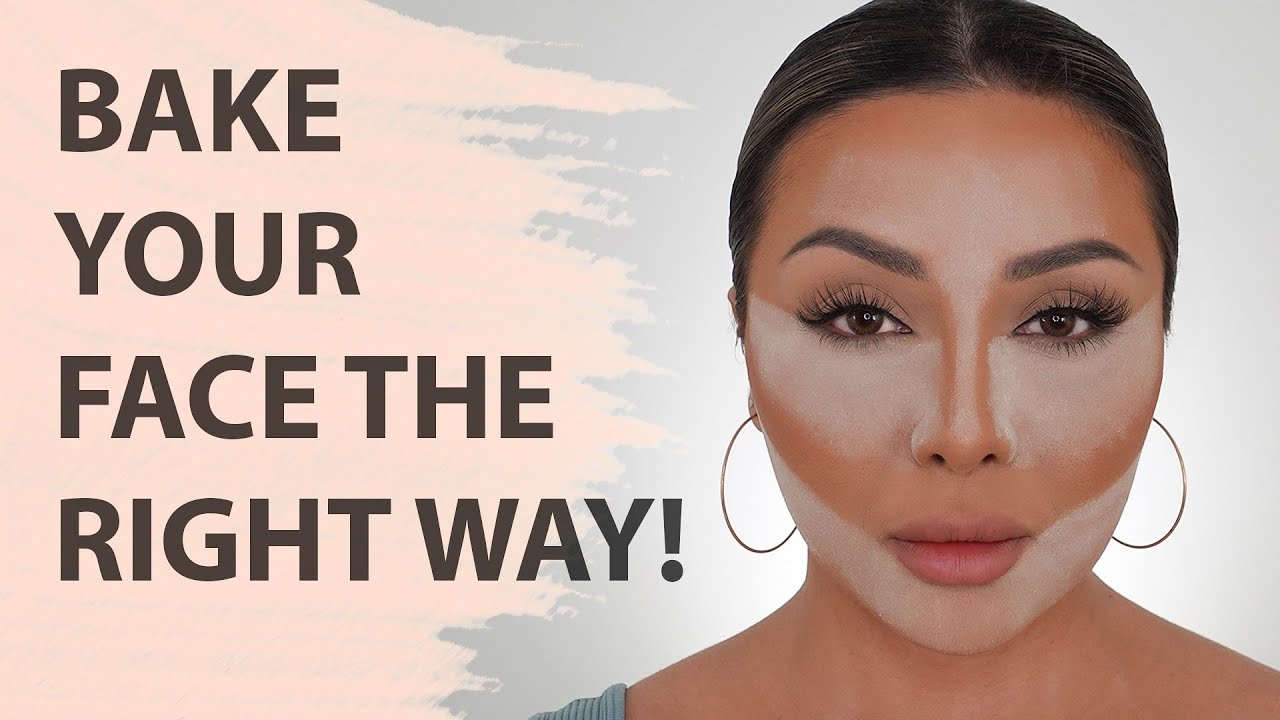
Now it’s time to bake! Take a generous amount of translucent powder on a makeup sponge or powder brush. Gently press the powder onto the areas where you highlighted, such as under the eyes, the center of the forehead, the bridge of the nose, and the chin. This technique helps to set your concealer and prevents creasing throughout the day.
Let the powder “bake” on your face for about 5-10 minutes. During this time, the heat from your face will allow the powder to set and melt into the skin, creating a smooth finish. Feel free to do your eye makeup or any other steps while the powder sets.
Step 3: Dusting Away the Powder
After the baking time is up, gently sweep away the excess powder using a fluffy powder brush. Make sure to brush off any excess powder without disturbing the foundation and concealer underneath. This step is crucial to achieve a natural-looking finish, as it helps to eliminate any excess product that may make your face appear cakey.
Step 4: Setting the Makeup
To ensure your makeup lasts all day, lightly mist your face with a setting spray. This will lock in your makeup and create a dewy, long-lasting finish. Hold the setting spray about 6-8 inches away from your face and spritz it in a circular motion to evenly distribute the product.
Step 5: Perfecting the Look
Now that your face is baked and set, continue with the rest of your makeup routine. Apply your favorite blush, bronzer, and highlighter to add dimension and glow to your face. You can also complete your eye makeup and finish with a swipe of your go-to lipstick or gloss.
Step 6: Maintenance Throughout the Day
To maintain a fresh look throughout the day, carry a compact powder with you for touch-ups. Gently dab the powder on any areas that tend to get oily or shiny, such as your T-zone. Avoid applying too much powder to prevent buildup or cakiness.
Additionally, keep a facial mist or setting spray in your bag to refresh your makeup and give your skin a hydrated boost when needed. This will help to revitalize your baked face and keep your makeup looking flawless.
Step 7: Removing Your Baked Face
At the end of the day, it’s important to properly remove your makeup. Start by using a gentle makeup remover or cleansing oil to dissolve and break down the product. Massage it onto your face in circular motions, paying extra attention to areas where the powder was applied. Rinse your face with lukewarm water and follow up with your regular skincare routine.
Remember to always take good care of your skin by cleansing, moisturizing, and using sunscreen daily. Baking your face is a fabulous technique for special occasions or when you want your makeup to stay put for hours, but it’s equally important to allow your skin to breathe and recover.
With the proper technique and a little practice, you can master the art of baking your face. This method is a game-changer for achieving a flawless, airbrushed look that lasts all day. So go ahead and give it a try! Let your creativity shine, experiment with different products, and enjoy the process of perfecting your makeup skills.
H2: Achieve Flawless Makeup with the Art of Baking
Introduction:
Baking, an innovative makeup technique that has taken the beauty world by storm, promises a long-lasting, flawless finish. Originating from the drag community, this method involves setting your makeup with translucent powder for a smooth, matte, and creaseless look. As you embark on your journey to master the art of baking, it’s crucial to keep a few essential tips in mind. In this guide, we’ll walk you through the most important aspects of this technique, ensuring you achieve a refined, photo-ready face every time you bake.
1. Prep, Prime, Perfection:
Before diving into the world of baking, laying the groundwork for your masterpiece is key. Start by prepping your skin with a moisturizer suitable for your skin type. Next, apply a primer to create a smooth canvas for your makeup. This step helps to minimize the appearance of pores and fine lines, ensuring the foundation adheres better and lasts longer. Choose a primer that aligns with your skin concerns, be it oil control, hydration, or color correction.
2. The Right Tools for the Job:
Investing in quality tools is essential for any makeup routine, and baking is no exception. To achieve a seamless finish, make sure you have a damp beauty sponge or a fluffy powder brush on hand. These versatile tools allow for precise application and blending, ensuring the powder doesn’t sit heavily on your skin. The damp sponge will help to melt the makeup into your skin, while a powder brush can evenly distribute translucent powder for a velvety finish.
3. Finding the Perfect Powder:
Selecting the right powder is crucial for baking success. Opt for a finely milled translucent powder that suits your skin tone. Avoid powders with heavy color or shimmer, as they can alter the overall look and create a cakey appearance. Test different brands and shades to find the perfect match for your skin tone. Remember, the powder should seamlessly blend in and disappear into your foundation, leaving a poreless, airbrushed effect.
4. Timing is Everything:
One of the most important aspects of baking is the timing. After applying a generous amount of translucent powder to your concealed and highlighted areas, allow it to set for at least five to ten minutes. This extended period gives the powder time to absorb excess oil, allowing your foundation to stay in place for longer. While waiting, you can utilize this time to complete other makeup steps or sip on your favorite beverage. Once the time is up, gently sweep away the excess powder with a clean brush or sponge.
Conclusion:
As you embark on your journey to master the art of baking, remember that practice makes perfect. Experiment with different techniques, products, and amounts of powder to find what works best for you. The key is to stay patient and not rush through the process. With these important tips in mind, you’ll be well on your way to achieving a flawlessly baked face, ready to face the world with confidence and style. Happy baking!
Frequently Asked Questions
Are you looking for tips on how to achieve a flawless makeup base? In this article, we have answered some commonly asked questions about baking your face, a popular makeup technique that helps in setting your makeup and achieving a long-lasting finish.
What is the purpose of baking your face?
The purpose of baking your face is to set your makeup, especially in areas where you tend to get oily or where makeup creases, such as under the eyes and around the nose. Baking involves applying a generous amount of setting powder on these areas and allowing it to sit for a few minutes. During this time, the powder absorbs excess oil and helps in the blending and longevity of your makeup. Once you brush off the excess powder, you are left with a smooth and flawless finish that lasts longer.
So, if you want to achieve a base that stays in place all day and helps in minimizing shine and creasing, baking your face can be a game-changer. However, keep in mind that this technique may not be suitable for everyone, especially those with dry or mature skin, as it can sometimes emphasize texture and fine lines.
How do I bake my face?
To bake your face, follow these simple steps:
1. Start by applying your foundation and concealer as usual.
2. Take a loose setting powder and apply a generous amount to the areas you want to bake, such as under the eyes, along the laugh lines, or around the nose.
3. Leave the powder on for at least 5-10 minutes to allow it to set and absorb any excess oils.
4. During this time, you can work on other parts of your makeup, such as eyes or brows.
5. After the baking time is up, use a fluffy brush or a damp sponge to gently brush off the excess powder.
6. Finish off the rest of your makeup routine, and you’re good to go with a flawlessly set base.
Remember, baking is an optional step in makeup application, so if you don’t have the time or simply prefer not to bake, you can skip this technique and still achieve a beautiful finish.
What kind of powder should I use for baking?
When it comes to choosing a powder for baking, opt for a finely milled, translucent setting powder. Translucent powders are ideal because they do not alter the color of your foundation or concealer. Look for a powder that suits your skin type, whether it’s mattifying for oily skin or hydrating for dry skin. Some popular options include loose powders like the Laura Mercier Translucent Loose Setting Powder, the Coty Airspun Loose Face Powder, or the HUDA Beauty Easy Bake Loose Baking & Setting Powder.
It’s important to note that everyone’s skin is different, so what works for one person may not work for another. If you’re not sure which powder to try, do some research, read reviews, or seek recommendations from friends or makeup artists.
Is baking only for under the eyes?
While the under-eye area is one of the most common areas to bake, you can also apply this technique to other parts of your face. Baking can be done in areas where you tend to crease or get oily, such as around the nose, smile lines, or forehead. By applying a generous amount of powder to these areas and allowing it to set, you can achieve a more flawless and long-lasting makeup base.
However, it’s important to use moderation and not go overboard with the amount of powder you apply. Too much powder or excessive baking time can result in a dry and cakey finish, which is not the desired outcome. Start with a small amount and gradually build up if needed, and always remember to blend out any excess powder for a seamless finish.
Can I bake my face if I have dry skin?
Baking can be a bit tricky if you have dry skin, as it has the potential to emphasize dry patches and make your skin appear even drier. However, if you still want to give it a try, there are a few things you can do to make it work for dry skin.
First, make sure you moisturize your skin well before applying any makeup. Hydrated skin provides a smoother canvas for makeup application and helps in preventing dryness and flakiness. Additionally, opt for a hydrating or dewy-finish foundation and avoid overly matte or drying formulas, as they can further accentuate dryness.
When it comes to baking, use a lighter hand with the powder and avoid leaving it on for too long. Instead of baking for 5-10 minutes, try reducing the baking time to 2-3 minutes. This will help set your makeup while minimizing the risk of drying out your skin. Finally, remember to always assess how your skin reacts and adjust your technique accordingly. If you find that baking accentuates dryness or is uncomfortable for your skin, it may be best to skip this step and opt for a lighter setting method.
The “BAKING” Technique
In conclusion, mastering the art of baking is a journey that requires both skill and creativity. As a professional chef, I have shared with you the fundamental steps and techniques to bake a flawless cake. From selecting the right ingredients to achieving the perfect texture and flavor, each aspect plays a vital role in creating a delectable masterpiece. Remember, practice makes perfect, so don’t be afraid to experiment and explore new recipes. With dedication and a passion for baking, you too can become a skilled pastry chef. So, roll up your sleeves, preheat that oven, and let your culinary imagination soar as you embark on the delightful adventure of baking!