Welcome to the world of delectable chicken dishes! As a professional chef, I am thrilled to guide you through the art of baking chicken breast to perfection. Whether you are a novice in the kitchen or a seasoned home cook, this culinary adventure will equip you with the skills to create succulent and flavorful chicken breast dishes that will impress even the most discerning palates. So, put on your apron and let’s dive into the wonderful world of baking chicken breast!
How to Bake Chicken Breast: A Delicious and Healthy Recipe
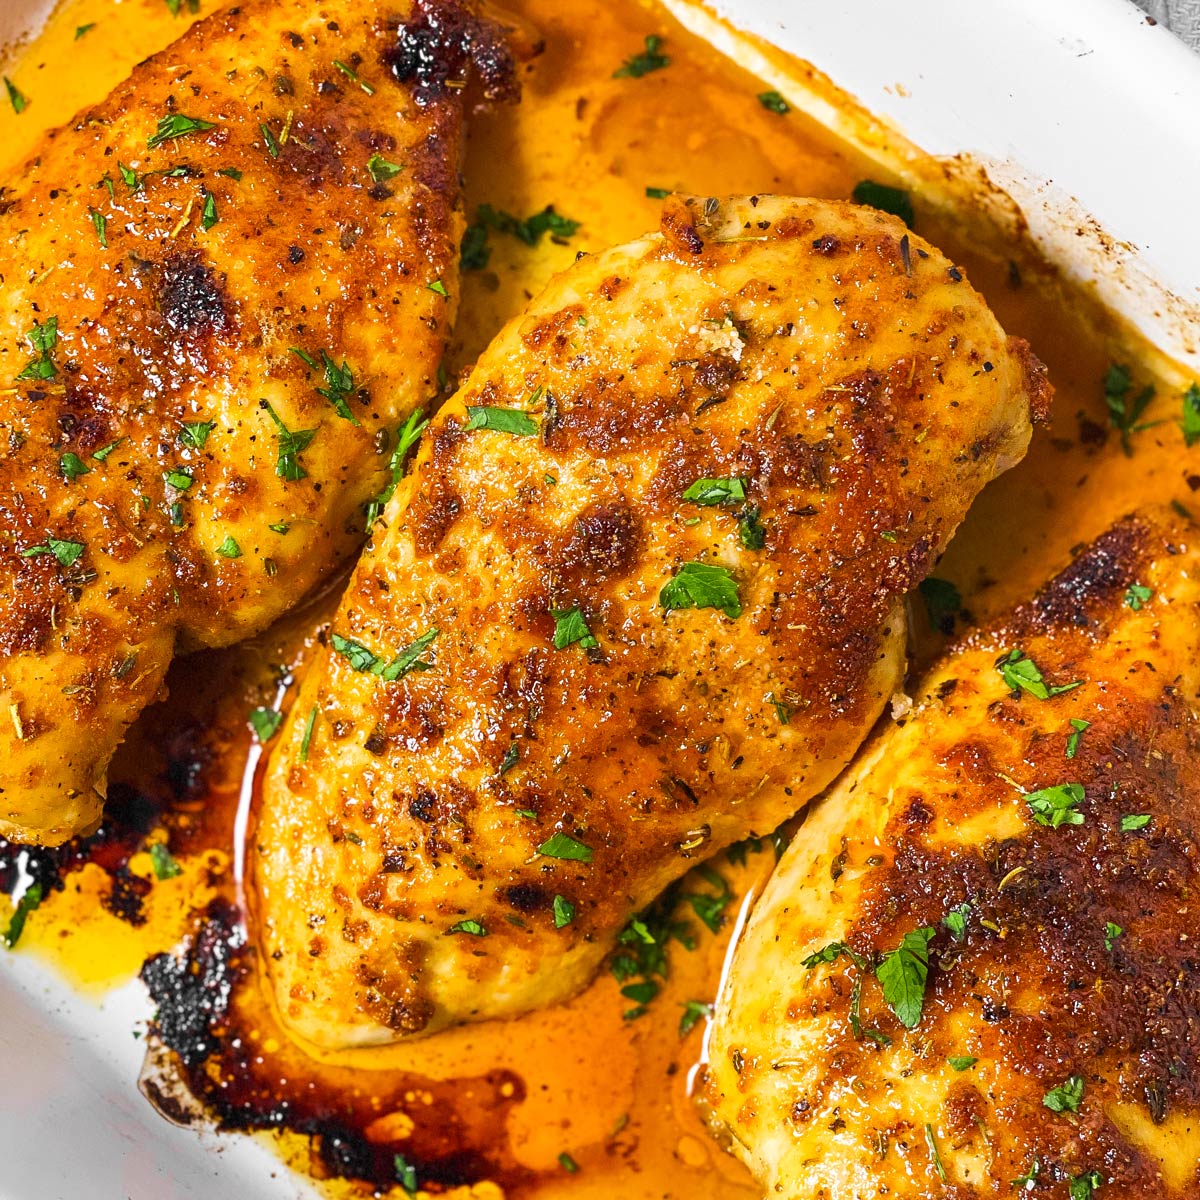
Baking chicken breast is a simple and versatile cooking technique that results in tender, flavorful meat. Whether you’re looking for a quick weeknight dinner or a dish to impress your guests, this recipe is perfect for you. In this guide, we’ll walk you through the process of baking chicken breast to perfection, ensuring that it’s juicy and full of flavor. So, let’s get started!
Ingredients:
- 4 boneless, skinless chicken breasts
- 2 tablespoons olive oil
- 1 teaspoon salt
- 1 teaspoon pepper
- 1 teaspoon garlic powder
- 1 teaspoon paprika
General Information:
- Making Difficulties: Easy
- Preparation Time: 10 minutes
- Cooking Time: 20-25 minutes
- Servings: 4
Instructions:
Step 1: Preheat the Oven and Prepare the Chicken Breast
In order to achieve perfectly cooked chicken breast, it’s important to start with properly preheated equipment. Preheat your oven to 425°F (220°C). Meanwhile, take the boneless, skinless chicken breasts out of the refrigerator and let them come to room temperature for around 15-20 minutes. This will ensure even cooking throughout the meat.
While waiting for the chicken breasts to come to room temperature, pat them dry with paper towels. This will help the seasonings adhere to the meat and give it a nice, crispy exterior. Place the chicken breasts on a clean cutting board and use a sharp knife to trim off any excess fat or tendons.
Step 2: Season the Chicken Breast
Seasoning the chicken breast is the key to infusing it with delicious flavors. In a small bowl, mix together the salt, pepper, garlic powder, and paprika. This spice blend will add a perfect balance of savory and smoky flavors to the chicken breast.
Drizzle the olive oil over the chicken breasts, ensuring that all sides are coated. Sprinkle the spice mixture evenly over both sides of the chicken breasts, gently patting it in to ensure it sticks. Make sure to season the chicken breasts generously for maximum flavor.
Step 3: Prepare the Baking Sheet
Line a baking sheet with parchment paper or aluminum foil. This will help prevent the chicken breasts from sticking to the pan and make cleanup easier. If using foil, lightly grease it with cooking spray or a small amount of olive oil.
Place the seasoned chicken breasts on the prepared baking sheet, leaving enough space between each piece for even air circulation. This will promote even cooking and browning. If desired, you can place a wire rack on top of the baking sheet to elevate the chicken and allow any excess fat to drip away.
Step 4: Bake the Chicken Breast
Transfer the baking sheet to the preheated oven and bake the chicken breasts for 20-25 minutes, or until the internal temperature reaches 165°F (74°C). Cooking times may vary slightly depending on the thickness of the chicken breasts, so it’s important to use a meat thermometer to ensure they are fully cooked.
While baking, avoid opening the oven door too frequently as this can cause heat fluctuations and affect the cooking time. The chicken breasts are done when they are no longer pink in the center and the juices run clear. If you prefer a more golden or crispy exterior, you can broil the chicken for an additional 2-3 minutes after baking.
Step 5: Rest and Serve
After removing the chicken breasts from the oven, let them rest for 5-10 minutes before slicing or serving. This allows the juices to redistribute throughout the meat, resulting in a juicier and more flavorful final product.
Once rested, slice the chicken breast into uniform pieces or serve them whole. Baked chicken breast pairs well with a variety of sides such as roasted vegetables, mashed potatoes, or a fresh salad. Feel free to get creative and experiment with different seasonings and flavor combinations!
Step 6: Storage and Reheating
If you have any leftovers, let the chicken breast cool completely before storing them in an airtight container in the refrigerator. Baked chicken breast can be stored for up to 4 days and reheated by placing it in a preheated oven at 350°F (175°C) for about 10 minutes or until heated through.
Alternatively, you can also slice the leftover chicken breast and use it in sandwiches, wraps, salads, or stir-fries. The possibilities are endless!
Step 7: Enjoy!
Now that your perfectly baked chicken breast is ready, it’s time to sit back and enjoy your delicious creation. Whether you’re incorporating it into a meal or enjoying it on its own, you’ll be amazed at the fantastic flavors and satisfying texture of the baked chicken breast. Bon appétit!
In summary, baking chicken breast is a simple yet rewarding cooking technique that yields tender and flavorful meat. By following these step-by-step instructions, you’ll be able to achieve perfectly cooked chicken breast every time. Remember to season generously, monitor the internal temperature, and let the meat rest before serving. With a little practice, you’ll become a master at baking chicken breast and impress your family and friends with your culinary skills. So go ahead, give this recipe a try and enjoy a delicious and healthy meal!

Important Things to Keep in Mind When Making This “How to Bake Chicken Breast” Recipe
Chicken breast is a versatile and healthy option that can be enjoyed in a variety of ways. Whether you’re a seasoned cook or a beginner in the kitchen, knowing how to bake chicken breast is a skill that will come in handy time and time again. However, there are a few important things to keep in mind to ensure that your chicken breast turns out tender, juicy, and packed with flavor. So, before you preheat the oven and grab that baking sheet, let’s dive into the key points you need to remember.
First and foremost, it’s crucial to choose the right cut of chicken breast. Opt for boneless, skinless chicken breasts that are of similar size and thickness. This ensures even cooking and prevents some pieces from being undercooked while others become dry and overcooked. Additionally, consider purchasing organic or free-range chicken for a tastier and more ethical choice.
Another important consideration is marinating your chicken breast before baking. While this step is optional, marinating helps to infuse the meat with flavor and moisture. You can choose from a variety of marinades, such as lemon and herb, garlic and soy, or even a tangy barbecue sauce. Simply place the chicken breasts in a resealable plastic bag with the marinade and refrigerate for at least 30 minutes (or up to overnight) before baking.
Temperature and timing are two crucial factors that can make or break your baked chicken breast. Preheat your oven to 400°F (200°C) and bake the chicken breasts for approximately 20-25 minutes, or until they reach an internal temperature of 165°F (74°C). Remember to use a meat thermometer to ensure accuracy. Overcooking your chicken breast will result in dry, rubbery meat, while undercooking poses a risk of foodborne illnesses. If your chicken breast is particularly thick, you may need to adjust the cooking time accordingly.
Lastly, give your chicken breast some rest before slicing into it. This allows the juices to redistribute and ensures a moist and delicious final result. Remove the chicken breast from the oven, tent it loosely with aluminum foil, and let it rest for about 5 minutes. This step is often overlooked, but it can make a significant difference in the texture and taste of your chicken.
Now that you’re armed with these important tips, it’s time to put them into practice and create a mouthwatering dish of baked chicken breast. Consider serving it alongside a vibrant salad, roasted vegetables, or even a comforting side of mashed potatoes. With the right technique and a touch of creativity, you’ll have a simple, yet impressive, meal that will delight your taste buds and leave you wanting more.
Frequently Asked Questions
Are you looking to learn how to bake chicken breast to perfection? Look no further! We’ve got you covered with answers to some common questions about baking chicken breast.
Q1: What temperature should I set my oven to when baking chicken breast?
When baking chicken breast, it’s best to preheat your oven to 425°F (218°C). This higher temperature allows the chicken to cook quickly while still maintaining its juicy texture. Make sure to use an oven thermometer to ensure accuracy.
It’s also important to note that the internal temperature of the chicken breast should reach 165°F (74°C) to ensure it’s fully cooked. Use a meat thermometer to check the temperature in the thickest part of the breast.
Q2: How long should I bake chicken breast for?
The baking time for chicken breast depends on the thickness of the meat. As a general rule of thumb, boneless, skinless chicken breasts that are about 1 inch (2.5 cm) thick should be baked for 18-20 minutes. For thicker cuts, adjust the baking time accordingly.
Keep in mind that it’s crucial not to overcook the chicken breast, as it can result in a dry and tough texture. To ensure optimal juiciness, use a meat thermometer to check the internal temperature, which should be 165°F (74°C).
Q3: Should I marinate the chicken breast before baking?
While marinating chicken breast is not necessary, it can enhance the flavor and tenderness of the meat. If you have some extra time, consider marinating the chicken for about 30 minutes to a couple of hours before baking.
For a simple marinade, combine olive oil, garlic, lemon juice, salt, and pepper. This will help infuse the chicken with delicious flavors and keep it moist during the baking process. Remember to discard any leftover marinade that has come into contact with raw chicken to prevent foodborne illnesses.
Q4: How do I prevent the chicken breast from drying out?
To prevent the chicken breast from drying out, there are a couple of key tips to keep in mind. First, make sure not to overcook the chicken. Use a meat thermometer to check the internal temperature and remove it from the oven when it reaches 165°F (74°C).
Additionally, consider using a baking method that helps retain moisture, such as baking the chicken breast in a foil packet or covering it with foil during the initial stages of baking. This will help seal in the juices and prevent the meat from drying out.
Q5: How can I add flavor to my baked chicken breast?
There are numerous ways to add flavor to baked chicken breast. You can season it with a variety of herbs and spices, such as paprika, garlic powder, cumin, or Italian seasoning. Rubbing the chicken with olive oil before seasoning can also enhance the flavors and help the spices stick.
If you want to take it up a notch, consider stuffing the chicken breast with ingredients like cheese, spinach, or sun-dried tomatoes. This adds both flavor and an element of surprise to your dish. Just make sure to adjust your cooking time accordingly to ensure the chicken is cooked through.
BAKED CHICKEN BREAST | juicy, tender, easy, and oh, so flavorful!
In conclusion, mastering the art of baking chicken breast is a skill that every aspiring chef should strive for. With the tips and techniques shared in this guide, you can elevate your chicken dishes to new heights of flavor and tenderness. Remember to choose high-quality chicken, marinate it for maximum flavor, and bake it at the right temperature and time to achieve juicy and succulent results. Whether you’re cooking for yourself, your family, or your guests, a perfectly baked chicken breast will always be a crowd-pleaser. So, put on your apron, fire up the oven, and get ready to create delicious and unforgettable chicken dishes that will tantalize taste buds and leave everyone wanting more. Happy cooking!