Welcome to the wonderful world of baking! As a professional chef, I have had the pleasure of creating countless mouthwatering breads that have delighted taste buds and filled homes with the irresistible aroma of freshly baked goodness. Today, I am thrilled to share with you the art of baking bread. Whether you’re a seasoned home cook or a beginner in the kitchen, this guide will equip you with the essential knowledge and techniques to create your own delectable loaves. So, roll up your sleeves, dust off your apron, and let’s dive into the fascinating journey of bread making. Get ready to knead, proof, and bake your way to bread baking mastery!
How to Bake Bread: A Step-by-Step Guide
Baking bread from scratch is a rewarding culinary experience that allows you to savor the delightful aroma and spongy texture of fresh, homemade bread. Whether you’re a novice in the kitchen or an experienced baker, this step-by-step guide will take you through the process of baking bread with ease. Get ready to roll up your sleeves, embrace the kneading, and create a loaf of delicious goodness.
Ingredients:
- 4 cups all-purpose flour
- 2 teaspoons active dry yeast
- 2 teaspoons salt
- 2 tablespoons sugar
- 1 ½ cups warm water
- 2 tablespoons olive oil
General Information:
- Making Difficulties: Moderate
- Preparation Time: 2 hours
- Cooking Time: 30 minutes
- Servings: 1 loaf
Instructions:
Step 1: Activate the Yeast
Begin by activating the yeast. In a small bowl, combine the warm water and sugar. Sprinkle the yeast over the mixture and give it a gentle stir. Let the yeast sit for about 5-10 minutes until it becomes foamy and frothy. This indicates that the yeast is alive and ready to leaven the bread.
To ensure that the yeast activates properly, make sure the water is warm but not hot. Water that is too hot can kill the yeast, resulting in a flat loaf of bread. If the yeast doesn’t foam after the designated time, it may be expired, and you’ll need to start with fresh yeast.
Step 2: Combine the Dry Ingredients
In a large mixing bowl, whisk together the all-purpose flour and salt. This helps distribute the salt evenly throughout the dough. If you prefer, you can use a stand mixer fitted with a dough hook instead of mixing by hand. This will save you some elbow grease and make the process quicker.
It’s important to use all-purpose flour for this recipe as it provides the right amount of gluten development, resulting in a well-structured bread with a good texture.
Step 3: Mix the Wet and Dry Ingredients
Slowly pour the activated yeast mixture and olive oil into the bowl with the dry ingredients. Use a wooden spoon or the paddle attachment on your stand mixer to mix the ingredients together until a rough, shaggy dough forms. The dough should be slightly tacky to the touch but not overly sticky. If it feels too sticky, add a tablespoon of flour at a time until it reaches the desired consistency.
Kneading the dough will develop the gluten strands, making the bread light and airy. If you’re using a stand mixer, switch to the dough hook attachment and continue mixing until the dough comes together and starts to pull away from the sides of the bowl.
Step 4: Knead the Dough
Transfer the dough onto a clean, floured surface. With lightly floured hands, begin kneading the dough by pushing it away from you with the heel of your hands, then fold it back toward you. Repeat this motion for about 10 minutes until the dough becomes smooth and elastic.
Kneading is a crucial step in bread-making as it strengthens the gluten, allowing the dough to rise properly during baking. You can also knead the dough using a stand mixer with the dough hook attachment for about 5-7 minutes on medium-low speed.
Step 5: First Rise
Shape the kneaded dough into a ball and place it in a lightly oiled bowl. Cover the bowl with a clean kitchen towel or plastic wrap and let the dough rise in a warm, draft-free area for about 1 hour or until it doubles in size.
The first rise, also known as proofing or fermentation, allows the yeast to metabolize the sugars in the dough, releasing carbon dioxide that creates air pockets and gives the bread its light and airy texture.
Step 6: Shape and Second Rise
Punch down the risen dough gently to release the air. Transfer it to a floured surface and shape it into a loaf by flattening the dough and folding it into thirds like a letter, then rolling it up tightly from one end to the other. Place the shaped loaf into a greased loaf pan, cover it again, and let it rise for another 30 minutes.
The second rise is shorter than the first, but it is still important to allow the dough to relax and rise slightly before baking. This step ensures a final burst of fermentation that contributes to the bread’s flavor and texture.
Step 7: Bake the Bread
Preheat your oven to 425°F (220°C). Once the loaf has completed its second rise, remove the cover and place the pan in the preheated oven. Bake for 25-30 minutes or until the bread is golden brown and sounds hollow when tapped on the bottom.
It’s important to note that different ovens may vary, so keep an eye on the bread as it bakes. If the top is browning too quickly, tent it with aluminum foil to prevent over-browning while ensuring that the center of the loaf bakes through.
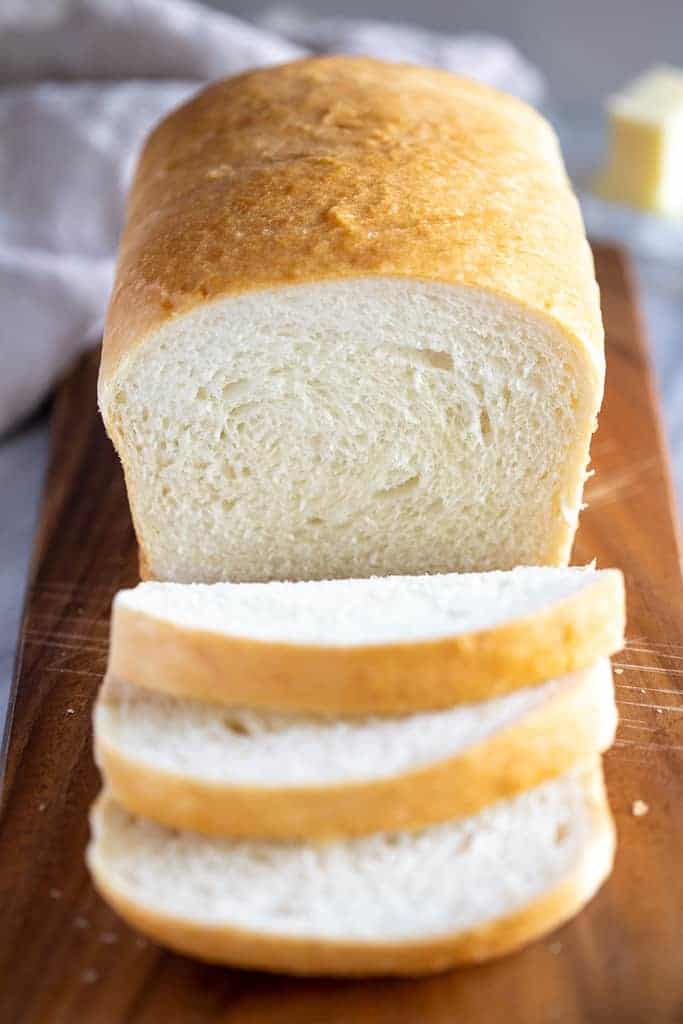
Finally, remove the bread from the oven and let it cool in the pan for about 10 minutes before transferring it to a wire rack to cool completely. Once cooled, slice the bread and enjoy it fresh or toast it for a delightful crunch. Remember, there’s nothing quite like the satisfaction of baking your own bread – the heartwarming aroma and warm slice of homemade goodness await you!
Important Things to Keep in Mind When Making the Perfect Homemade Bread
Picture this: you step into a kitchen filled with the aroma of freshly baked bread. The crispy crust, the soft and fluffy crumb – there’s nothing quite like homemade bread. But before you embark on your culinary journey, it’s important to keep a few things in mind to ensure your bread turns out absolutely divine. From choosing the right flour to perfecting the kneading technique, here are some key tips to help you master the art of baking bread.
1. The Magic of Flour: When it comes to bread, the type of flour you use makes all the difference. Opt for high-quality bread flour or all-purpose flour, as it contains a higher protein content that gives bread its desirable structure. Additionally, experiment with different flours like whole wheat or rye to add depth of flavor. Remember to measure your flour accurately, as too much or too little can be detrimental to your baking success.
2. The Importance of Kneading: Kneading is a crucial step in bread-making, as it helps to develop gluten, which gives the bread its elasticity. It also evenly distributes the yeast and creates air pockets for that beloved fluffiness. Set aside some time to knead your dough properly, using the heel of your hand to push and fold it. Aim for a smooth, elastic texture that bounces back when stretched out. Don’t rush this process – patience is key.
3. The Art of Rising: One of the most important stages in bread-making is the rising process. Yeast needs warmth and time to work its magic, so find a warm spot in your kitchen for your dough to rise. Cover it with a damp towel or plastic wrap to prevent it from drying out. To test if your dough has risen enough, gently press it with your fingertip – if it springs back slowly, it’s ready to move on to the next step.
4. The Power of Patience: Baking bread requires a certain level of patience, as you must resist the temptation to cut into it immediately. After taking your masterpiece out of the oven, allow it to cool completely before slicing. This allows the starches to settle and the flavors to develop fully. While you may be eager to savor your creation, trust that the wait will be worth it.
In conclusion, making homemade bread is a rewarding and fulfilling experience that can elevate your culinary skills to new heights. By keeping these key tips in mind, you’ll be well on your way to creating bread that is both delicious and impressive. So put on that apron, roll up your sleeves, and get ready to embark on a journey filled with the comforting scent of freshly baked bread.
Frequently Asked Questions
In this section, we will answer some common questions about the art of baking bread.
1. How long does it take to bake bread from scratch?
The time it takes to bake bread from scratch depends on various factors, such as the type of bread, the recipe you are following, and the room temperature. However, on average, the process can take around 3 to 4 hours. This includes the time needed for mixing the dough, proofing, and baking. Keep in mind that some bread recipes may require overnight fermentation or longer proofing times. Patience is key when baking bread!
It’s important to note that artisan bread, like sourdough or those with complex flavors, may take longer to prepare. So, if you’re new to baking, you might want to start with simpler recipes that have shorter preparation and baking times.
2. Can I bake bread without a bread machine?
Absolutely! You don’t need a bread machine to bake delicious homemade bread. In fact, many bakers prefer the traditional method of baking bread without a machine. All you need is a few basic tools like mixing bowls, a wooden spoon, measuring cups, and a sturdy oven-safe baking dish or loaf pan. Some people even shape the dough by hand to give it a rustic touch!
Baking bread without a machine allows you to have more control over the process and experiment with different techniques. It can be a fun and rewarding experience, and the aromas that fill your kitchen will be absolutely heavenly!
3. Why is it important to “proof” the dough?
Proofing the dough is a crucial step in bread baking because it allows the yeast to ferment and create those lovely air bubbles that give bread its light and fluffy texture. During proofing, the dough rests and rises, giving the yeast time to consume sugars and release carbon dioxide. This process strengthens the dough structure and develops complex flavors.
Proofing is typically done in two stages: bulk fermentation and the final proof. Bulk fermentation is the initial resting period after the dough is mixed and involves letting it rise slowly. After bulk fermentation, the dough is shaped and left to rise again during the final proof. This second rise ensures the dough is fully fermented and ready for baking.
4. How do I know when the bread is fully baked?
Knowing when bread is fully baked can be tricky, but there are a few indicators to look out for. First, tap the bottom or sides of the loaf with your fingers. If it sounds hollow, that’s a good sign that the bread is done. Additionally, the crust should be golden brown and crusty, not doughy or pale. Keep in mind that different types of bread may have different baking times and characteristics.
Using a food thermometer can also be helpful. Stick it into the center of the bread – if it reads around 190-210°F (88-99°C), the bread is most likely done. Lastly, experience plays a role in determining doneness. With practice, you will be able to recognize when the bread is perfectly baked based on its appearance, aroma, and texture.
5. How do I achieve a crispy crust on bread?
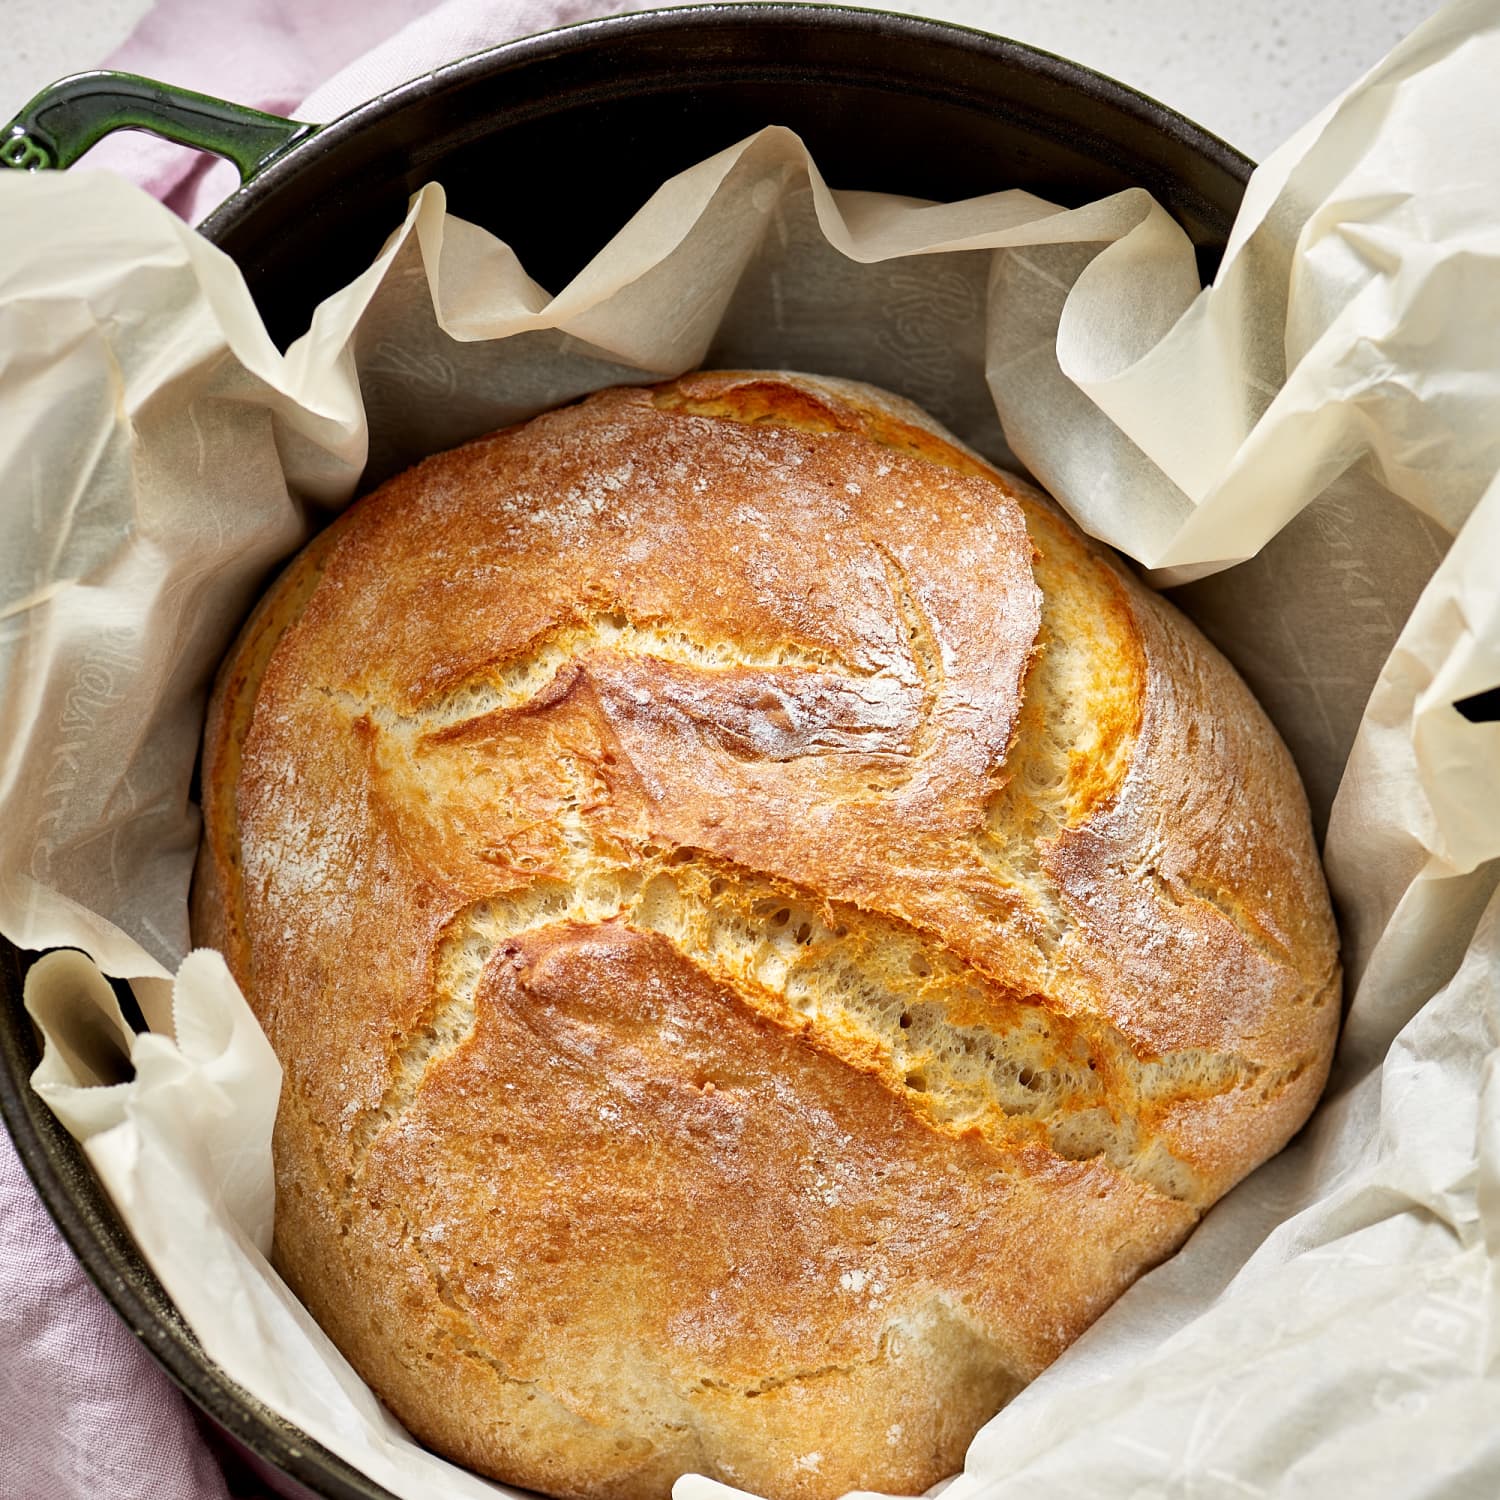
To achieve a crispy crust on bread, you need to create the ideal environment during baking. One of the key elements is steam. The steam helps keep the outside of the dough moist, allowing it to expand and create a crisp crust. There are a few methods to introduce steam in your oven:
You can place a tray or pan filled with hot water on the bottom rack. The hot water will turn into steam and create a humid environment. Alternatively, you can spritz the dough with water right before putting it in the oven. The steam will form naturally from the moisture. Lastly, using a Dutch oven or other covered baking dish traps the steam released by the dough, resulting in a beautifully crispy crust. Experiment with these methods to find the one that works best for you!
Homemade Bread for Beginners – Easy
In conclusion, mastering the art of bread baking is truly an invaluable skill for any aspiring chef. As we have explored throughout this guide, the process of baking bread requires patience, precision, and a deep understanding of the ingredients. From selecting the right flour to perfecting the kneading technique, every step plays a crucial role in achieving that golden, crusty loaf we all love.
But beyond the technical aspects, baking bread is also a labor of love. It is an opportunity to connect with our culinary heritage, to create something nourishing and comforting from scratch. The aroma that fills the kitchen as the bread bakes, the satisfaction of seeing the dough rise and transform into a beautiful loaf – these are the rewards that await those who embark on this journey.
So, whether you are a seasoned chef looking to expand your culinary repertoire or a passionate home cook eager to delve into the world of bread baking, I encourage you to embrace the adventure. Experiment with different types of bread, explore various flavor combinations, and let your creativity shine.
Remember, baking bread is not just about following a recipe; it is an opportunity to express yourself through the medium of food. So, roll up your sleeves, gather your ingredients, and let the aroma of freshly baked bread fill your home. With practice and dedication, you will soon become a master of the oven, delighting others with your warm, homemade loaves.
Happy baking!