Welcome, aspiring bakers and pie enthusiasts! Today, we embark on a delectable journey into the art of baking blind pie crusts. As a professional chef with years of experience in the culinary world, I am thrilled to guide you through this fundamental technique that will elevate your pie-making skills to new heights. Whether you’re a novice in the kitchen or a seasoned pro, mastering the art of blind baking is an essential skill that opens up a world of possibilities for creating perfectly crisp and flaky pie crusts. So, sharpen your knives, dust off your rolling pins, and prepare to unlock the secrets behind this culinary technique that will leave your taste buds begging for more. Get ready to dive into the wonderful world of blind pie crust baking!
How to Bake Blind Pie Crust: A Foolproof Guide to Perfectly Flaky Crusts
Are you tired of struggling with soggy pie crusts? Look no further! In this guide, we will show you how to bake a blind pie crust that is perfectly crisp and flaky every time. Whether you’re making a classic apple pie or a savory quiche, mastering the art of blind baking will take your pie game to the next level. Get ready to impress your family and friends with your baking skills!
Ingredients:
- 1 1/4 cups all-purpose flour
- 1/2 teaspoon salt
- 1/2 cup cold unsalted butter, cut into small cubes
- 3-4 tablespoons ice water
- Pie weights or dried beans for blind baking
General Information:
- Making Difficulty: Moderate
- Preparation Time: 15 minutes
- Cooking Time: 15-20 minutes
Instructions:
Step 1: Prepare the Dough
Start by combining the flour and salt in a large mixing bowl. Add the cold butter cubes and use a pastry cutter or your fingertips to cut the butter into the flour until the mixture resembles coarse crumbs. It’s important to work quickly to keep the butter cold.
Next, drizzle the ice water over the mixture, one tablespoon at a time, while gently stirring with a fork. Keep adding water until the dough comes together and forms a rough ball. Be careful not to overmix as this will result in a tough crust.
Step 2: Shape and Chill the Dough
Transfer the dough onto a lightly floured surface and shape it into a disc. Wrap the disc tightly in plastic wrap and refrigerate for at least 30 minutes. Chilling the dough allows the gluten to relax and the fats to solidify, resulting in a flakier crust.
While the dough is chilling, preheat your oven to 375°F (190°C) to ensure it reaches the desired temperature by the time you’re ready to bake the crust.
Step 3: Roll Out the Dough
Once the dough has chilled, remove it from the refrigerator and let it sit at room temperature for a few minutes to soften slightly. Lightly flour your work surface and rolling pin, then start rolling out the dough from the center outward. Rotate the dough occasionally to ensure even thickness.
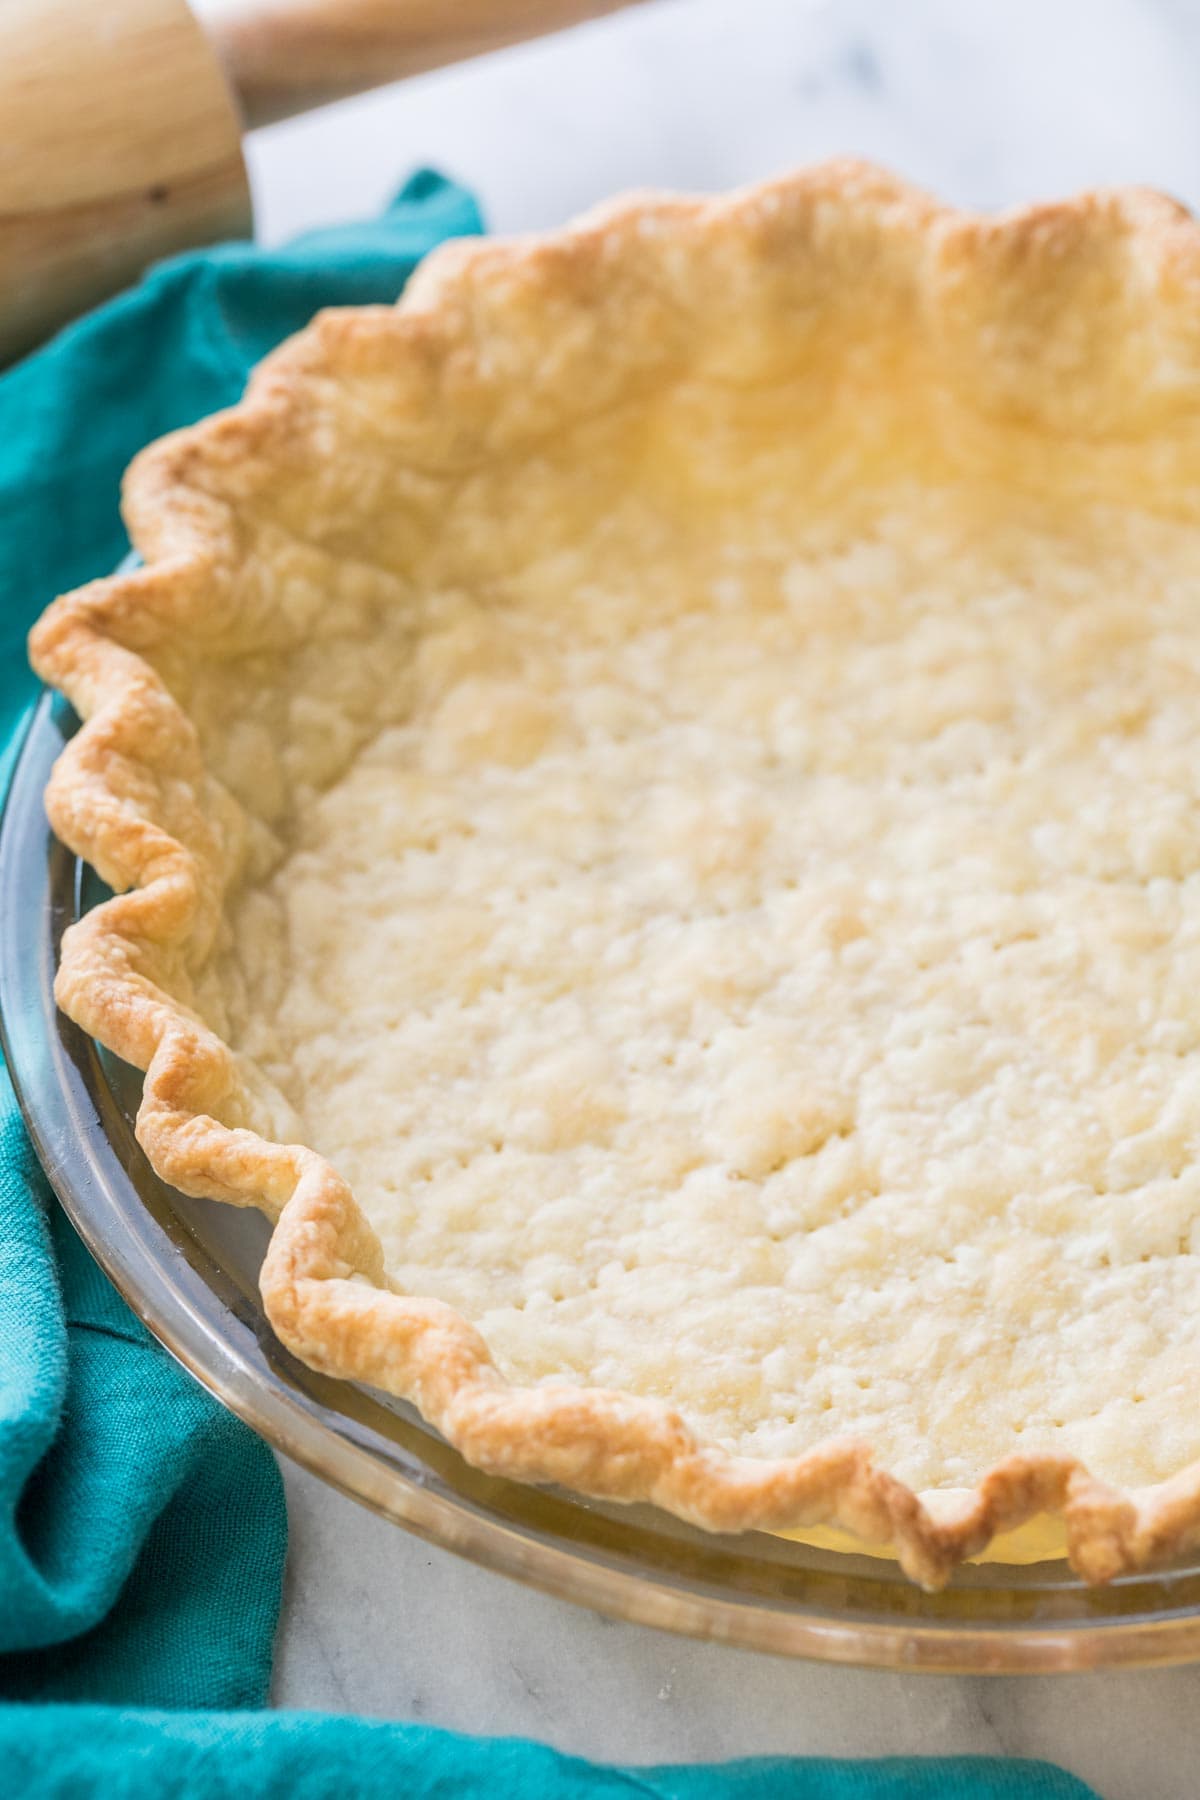
Roll the dough large enough to fit your pie dish, with some extra overhang. This overhang will prevent the crust from shrinking during baking. Transfer the rolled-out dough to your pie dish, gently pressing it against the bottom and sides. Trim off any excess dough from the edges.
Step 4: Blind Bake the Crust
Blind baking means partially baking the pie crust before adding the filling. This is done to ensure the crust is fully cooked and remains crisp, especially for fillings that don’t require extensive baking.
To blind bake the crust, line it with parchment paper or aluminum foil, then fill it with pie weights or dried beans. The weights will prevent the crust from puffing up or shrinking during baking. Make sure the weights are evenly distributed.
Place the pie dish on a baking sheet and transfer it to the preheated oven. Bake for approximately 15-20 minutes, or until the edges are lightly golden. Remove the weights and parchment paper/foil, then return the crust to the oven for an additional 5 minutes to allow the bottom to dry out.
Step 5: Cool and Fill
Once the blind-baked crust has cooled completely, it’s ready to be filled with your desired filling. Whether you’re making a sweet or savory pie, be sure to follow the specific recipe instructions for the filling.
If your recipe calls for a filling that requires further baking, you can place the filled pie back in the oven to finish cooking according to the recipe’s instructions. The blind-baked crust will provide a sturdy base for the filling and ensure a crisp bottom.
Step 6: Store and Serve
If you’re not serving the pie immediately, store it in the refrigerator to keep it fresh. To maintain the crispness of the crust, avoid covering the pie with plastic wrap or airtight containers, as this can cause condensation and make the crust soggy.
When you’re ready to serve the pie, carefully slice it into wedges and plate each slice. Pair your pie with a dollop of whipped cream or a scoop of ice cream for the perfect finishing touch.
Step 7: Enjoy!
Now that you know how to bake a blind pie crust, the possibilities are endless. Experiment with different fillings and get creative with your flavor combinations. From classic fruit pies to savory quiches, your homemade pies will be a hit at any occasion. Happy baking!
In summary, baking a blind pie crust involves preparing the dough, chilling it, rolling it out, blind baking it, cooling it, filling it, and finally, serving it. By following these steps, you’ll achieve a perfectly crisp and flaky crust that will elevate the taste and presentation of your pies. Remember to take your time and enjoy the process. Happy baking, and savor every delicious bite!

Important Things to Keep in Mind When Making a Perfect Blind Pie Crust
Are you ready to embark on a delicious baking adventure, where flakiness and buttery goodness await? Making a blind pie crust is an essential skill for any home baker, as it forms the foundation of various sweet and savory treats. Whether it’s a classic apple pie or a rich quiche, mastering the art of blind baking will elevate your culinary creations to new heights. But before you dive into the dough, there are a few important things to keep in mind to ensure a flawless result. Let’s explore the key tips and tricks for achieving the perfect blind pie crust!
1. Choose the Right Pie Crust Recipe
The first step towards success is selecting a reliable pie crust recipe. There are countless variations out there, from all-butter to shortening-based crusts, each yielding slightly different results. An all-butter crust, for example, will give you that heavenly flakiness and a rich, buttery flavor. On the other hand, a shortening crust will lend a more tender and delicate texture. Consider the kind of pie you’re making and the flavors you want to bring out, then choose a recipe that aligns with your preferences.
2. Keep Your Ingredients Cold
When it comes to pastry, there’s one golden rule: keep everything cold. This helps maintain the integrity of the fat, whether it’s butter or shortening, resulting in a tender and flaky crust. Ensure that your butter is chilled and cut it into small cubes before incorporating it into the flour. Similarly, refrigerate any liquid ingredients and use ice-cold water when the recipe calls for it. Remember, the colder your ingredients, the better chance you have of achieving that coveted flakiness.
3. Don’t Overwork the Dough
Once you’ve combined your dry and wet ingredients to form the dough, resist the temptation to overmix. Overworking the dough can cause gluten development, resulting in a tough and chewy crust. Instead, gently bring the dough together just until it forms a cohesive mass. If there are a few visible bits of butter or shortening, don’t worry, this will contribute to the flakiness. Trust the process and remember that a little imperfection can go a long way in creating a memorable pie crust.
4. Preparing and Using a Blind Baking Method
Blind baking, also known as baking a pie crust without the filling, is essential for achieving a crisp and fully cooked crust. To prevent the dough from puffing up during blind baking, it’s important to use a method called “docking.” Using a fork or a pastry docker, prick the bottom and sides of the crust to create small holes. This allows steam to escape and prevents unsightly air bubbles. To keep the shape of your crust intact, line it with parchment paper or aluminum foil and fill it with pie weights or dried beans. Bake it in a preheated oven according to your recipe’s instructions, then remove the weights and continue baking until golden brown.
Now armed with these essential tips, you’re well on your way to becoming a blind pie crust expert. Remember, practice makes perfect! Try different techniques, experiment with flavors, and most importantly, have fun. Baking is an art, and the joy is in the process and the end result. So go ahead, roll out that dough, and delight in the symphony of flavors that a perfectly baked blind pie crust can bring.
Frequently Asked Questions
Are you ready to bake the perfect blind pie crust? We’ve got you covered with some helpful Q&A!
1. How do I blind bake a pie crust?
Blind baking a pie crust is a method used to ensure a crisp and evenly cooked shell. Start by preheating your oven and chilling the pie dough. Roll out the dough and line your pie dish. Next, prick the bottom of the crust with a fork, line it with parchment paper, and fill it with pie weights or dried beans. Bake the crust in a preheated oven for a specified time, then remove the weights and paper and bake for a few more minutes until the crust is golden brown.
Blind baking helps prevent the crust from becoming soggy when filled with wet ingredients. It’s essential to follow the specific recipe instructions for blind baking, as different recipes may require slight variations in time and temperature.
2. Can I blind bake a frozen pie crust?
Yes, you can blind bake a frozen pie crust. Start by thawing the crust at room temperature for about 15 minutes. Once thawed, follow the same steps for blind baking as you would for a homemade pie crust. However, you might need to adjust the baking time since a frozen crust may require a bit longer in the oven.
Blind baking a frozen pie crust can yield great results, just make sure to keep an eye on the crust’s color and doneness to achieve the desired outcome.
3. Should I use pie weights or dried beans when blind baking?
When blind baking a pie crust, you can use either pie weights or dried beans to weigh down the crust and prevent it from puffing up. Both options work well, but there are a few things to consider. Pie weights are specially designed ceramic or metal beads that distribute heat evenly, yielding a more even crust. They can be reused and are easier to remove from the crust.
Dried beans, on the other hand, are a more accessible alternative. They also distribute heat evenly and can be used multiple times. Just make sure to reserve the beans you use for blind baking and avoid using them for cooking afterwards.
4. Can I blind bake a crust without using any weights?
Yes, you can blind bake a pie crust without using any weights. This method is known as “docking” the crust. After lining the pie dish with the crust, simply use a fork to prick several holes in the bottom. These holes allow steam to escape and prevent the crust from puffing up during baking.
However, it’s important to note that docking alone may not yield as consistently crisp results as using weights. Some recipes may recommend combining docking with other methods, like chilling the dough, to achieve the best outcome.
5. Can I reuse pie weights or dried beans after blind baking?
Yes, both pie weights and dried beans can be reused after blind baking. If using pie weights, allow them to cool completely before storing them. Once cooled, you can simply store them in an airtight container or bag until your next baking adventure.
If using dried beans, allow them to cool completely as well. Once cooled, strain and store them separately from the ones you use for cooking. Make sure they are stored in an airtight container to maintain their quality.