Welcome, aspiring artists and creative souls! As a professional chef, I know that the world of art and culinary delights often intertwine in the most unexpected ways. Today, we embark on a fascinating journey into the realm of acrylic painting on glass. Just like baking a delectable masterpiece in the kitchen, baking acrylic paint on glass requires precision, patience, and a touch of artistic flair. So, grab your aprons, gather your tools, and let’s dive into the artistry of baking acrylic paint on glass, where creativity knows no bounds!
How to Bake Acrylic Paint on Glass: A Vibrant DIY Project
Are you looking to add a pop of color and creativity to your glassware? Baking acrylic paint on glass is a fantastic DIY project that allows you to transform plain glass objects into stunning works of art. Whether you want to personalize wine glasses, create decorative vases, or make unique gifts for your loved ones, this guide will walk you through the process step-by-step. Get ready to unleash your inner artist and bring a vibrant touch to your glass pieces!
Ingredients:
- Clean glass object(s)
- Acrylic paints
- Paintbrushes
- Clear gloss varnish
- Disposable palette or paint mixing surface
- Painter’s tape (optional)
- Oven
General Information:
- Making Difficulties: This project is suitable for beginners and does not require any advanced artistic skills. However, it’s important to follow the instructions carefully to ensure the best results.
- Preparation Time: The preparation time will depend on the complexity of your design and the number of glass objects you wish to decorate. Allow at least 30 minutes for cleaning the glass and gathering your materials.
- Cooking Time: The baking time will vary depending on the type of acrylic paint you use. Typically, it ranges from 20 to 40 minutes. Make sure to allocate enough time for the baking process.
- Cooling Time: Once the baking is complete, allow the glass objects to cool inside the oven for at least one hour. This cooling process is essential to prevent any cracks or damage to the painted surface.
Instructions:
Step 1: Prepare the Glass Object
Before you begin, ensure that your glass object is clean and free from any dust or fingerprints. Wash it with warm soapy water and dry it thoroughly. For the best adhesion, it’s essential to have a clean surface to work on.
If desired, you can also use painter’s tape to mask off any areas that you wish to keep unpainted. This technique can be helpful for creating clean lines or specific designs.
Step 2: Choose Your Acrylic Paints
Acrylic paints come in a wide range of colors, allowing you to unleash your creativity. Select the colors that best suit your project and gather them on a disposable palette or a paint mixing surface. It’s always a good idea to have a variety of colors at hand to experiment and create unique combinations.
Remember, some acrylic paints are specifically designed for glass painting. These paints often provide better adhesion and durability. If you’re planning to use your glass object regularly or wash it frequently, consider investing in specialized glass paints.
Step 3: Begin Painting
Dip your paintbrush into the acrylic paint and start applying it to the glass surface. Experiment with different brush strokes, blending techniques, and layering to create your desired effect. Whether you want bold, vibrant colors or a delicate and subtle design, acrylic paints offer endless possibilities.
Be sure to allow each layer of paint to dry completely before adding additional layers. This will prevent smudging or mixing of colors. Patience is key in achieving a professional-looking result.
Step 4: Add Details and Patterns
Once your base layers are dry, it’s time to add details and patterns to your design. You can use smaller brushes or even toothpicks to create intricate designs. Let your imagination run wild and have fun exploring different patterns, shapes, and textures.
If you make a mistake or want to change a part of your design, don’t worry! Acrylic paints are forgiving and can be easily corrected. Wait for the paint to dry, and then gently scrape it off with a razor blade or a fine-grit sandpaper.
Step 5: Seal the Design
After you’re satisfied with your painted design, it’s important to seal it to protect it from wear and tear. Apply a clear gloss varnish over the painted surface using a clean paintbrush. This varnish will not only protect the paint but also enhance the colors and give your glass object a professional finish.
Allow the varnish to dry according to the manufacturer’s instructions. This will usually take a few hours. Be patient and resist the temptation to handle the glass object before it’s completely dry.
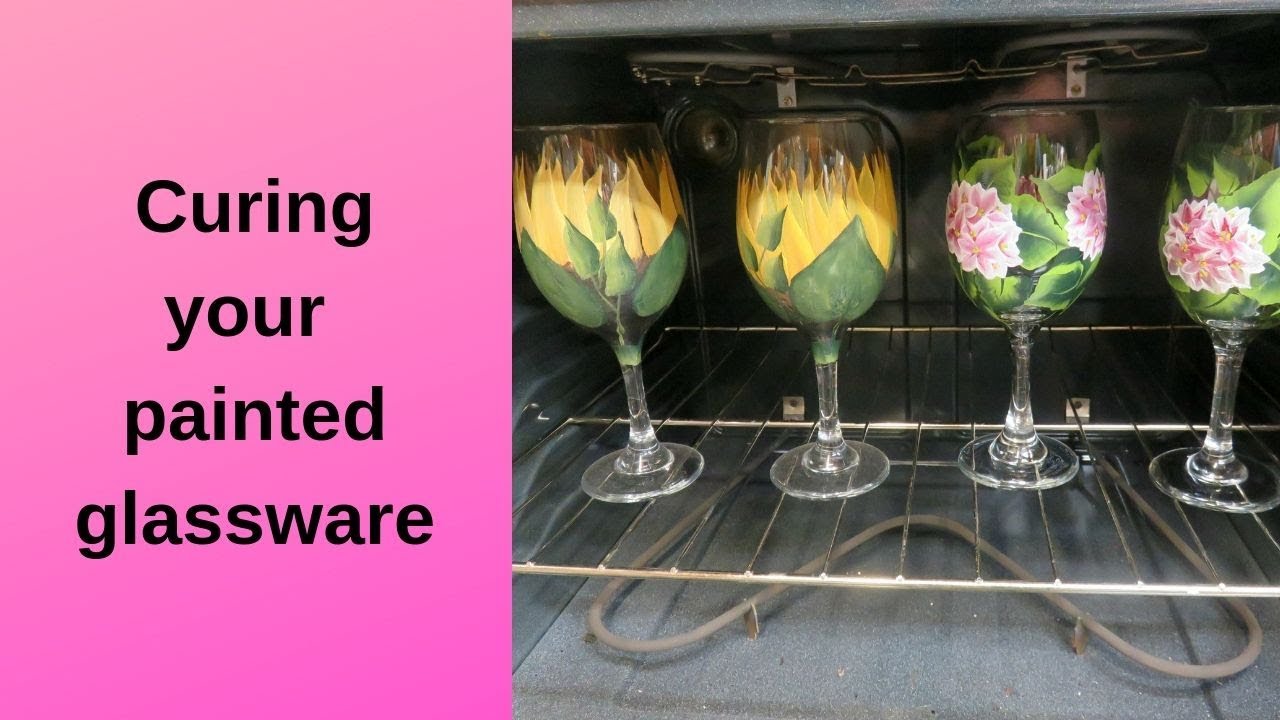
Step 6: Bake the Glass Object
This step is where the magic happens! Preheat your oven to a low temperature, around 275°F (135°C). Place the painted glass object on a baking sheet lined with parchment paper to prevent sticking. Carefully put the baking sheet with the glass object into the preheated oven.
Bake the glass object for approximately 20 to 40 minutes, depending on the specific acrylic paint you’re using. Refer to the paint manufacturer’s instructions for the recommended baking time and temperature. Keep a close eye on the glass object while it’s baking to ensure the paint doesn’t overheat or burn.
Step 7: Cool and Enjoy
Once the baking time is up, turn off the oven and leave the glass object inside to cool slowly. This gradual cooling process helps prevent any sudden temperature changes that could cause the glass to crack.
After the glass object has cooled for at least one hour, carefully remove it from the oven. Congratulations! You now have a beautiful piece of art that is not only decorative but also functional. Pour a refreshing beverage into your painted wine glass or display your flower arrangement in your vibrant painted vase. Enjoy your creation and admire the colorful transformation!
In conclusion, baking acrylic paint on glass is a simple and rewarding DIY project that allows you to express your creativity and add a personal touch to your glassware. With the right materials and techniques, you can transform plain glass objects into vibrant works of art. Remember to follow the instructions carefully, allow for drying and cooling times, and have fun experimenting with different colors and designs. Get ready to impress your friends and family with your artistic skills and show off your stunning painted glass creations!
If you’re looking to add a touch of creativity to your glassware, baking acrylic paint on glass is a fantastic way to achieve stunning results. Whether you’re creating personalized gifts or decorating your own home, this technique can transform ordinary glass items into beautiful works of art. However, there are a few important things to keep in mind to ensure that your project turns out perfectly. From choosing the right materials to mastering the baking process, here’s a guide to help you along the way.
To start, it’s crucial to select the right type of acrylic paint for your project. Opt for paints specifically designed for glass or ceramics, as these are specially formulated to adhere to the smooth surface of glassware. Regular acrylic paints may not provide the same level of durability and may peel or crack over time. It’s also important to clean and prepare the glass surface properly before painting. Make sure to wash the glass thoroughly with soap and water, then wipe it down with rubbing alcohol to remove any residual oils or dirt.
Next, when it comes to painting on glass, less is more. Applying multiple thin layers of paint is much more effective than slathering on one thick layer. This not only ensures better adhesion to the glass, but it also allows for more control when applying intricate designs or details. Remember to let each layer dry thoroughly before applying the next one. Patience is key in this process, but the end result will be worth it.
Now, let’s move on to the baking process. Perhaps the most important thing to keep in mind is to follow the instructions provided by the manufacturer of your chosen paint. Different brands may have varying recommendations for temperature and baking time. It’s crucial to adhere to these guidelines to avoid any mishaps and to ensure the longevity of your painted glassware. Set your oven to the designated temperature, and place your glass items on a baking sheet lined with parchment paper. This will protect both the glass and your oven from any potential damage.
Finally, it’s vital to allow your painted glassware to cool down slowly after baking. If you remove them from the oven too quickly or expose them to drastic temperature changes, the glass could crack or shatter. Once the baking time is complete, turn off the oven and leave the glass items inside to cool gradually. This will help them solidify and set the paint properly. After they have cooled, you can carefully remove your beautiful, painted glass items from the oven, ready to be used or displayed.
In conclusion, baking acrylic paint on glass is a fantastic way to create unique and personalized items that will impress everyone who sees them. By remembering these important tips, such as choosing the right paint and properly preparing the glass surface, you’ll be well on your way to achieving stunning results. Additionally, taking your time and following the baking instructions diligently will ensure the longevity and durability of your painted glassware. Now, gather your materials, unleash your creativity, and start transforming plain glass items into captivating works of art.
Frequently Asked Questions
Introduction: Painting on glass with acrylic paint can create beautiful and vibrant designs. If you’re wondering how to bake acrylic paint on glass to make it more durable and long-lasting, we’ve got you covered! Check out these frequently asked questions to learn more.
1. Can you bake acrylic paint on glass?
Acrylic paint can be baked on glass to make it more durable and resistant to chipping. The baking process helps to set the paint and create a stronger bond with the glass surface. However, not all acrylic paints are suitable for baking, so it’s essential to check the label for specific instructions. Make sure you’re using a high-quality, oven-safe acrylic paint for the best results.
When baking acrylic paint on glass, preheat the oven to a low temperature, typically around 275°F (135°C). Place your painted glassware in the oven and let it bake for about 30 minutes to an hour. Allow the glass to cool down completely before handling it. Keep in mind that thicker layers of paint may require longer baking times, and it’s always a good idea to test a small area first before baking the entire piece.
2. What types of glass can you bake acrylic paint on?
Acrylic paint can be baked on various types of glass, including glassware, windows, and glass ornaments. However, it’s important to note that certain types of glass may require special precautions. For example, heat-resistant borosilicate glass is more suitable for baking compared to regular soda-lime glass. Always check the manufacturer’s guidelines to ensure the glass you’re using is safe for baking.
When painting on glass, make sure the surface is clean and free from any oils or residues. You can use rubbing alcohol or glass cleaner to thoroughly clean the glass before applying the acrylic paint. This will help the paint adhere better and prevent any unwanted effects during the baking process.
3. Why should you bake acrylic paint on glass?
Baking acrylic paint on glass offers several benefits. Firstly, it helps to set the paint and create a stronger bond with the glass surface, making it more durable and resistant to chipping. Baked acrylic paint also has a smoother finish and is less likely to smudge or peel off over time. If you plan to use the painted glassware for functional purposes, such as drinking glasses or vases, baking the paint can make it dishwasher safe.
Keep in mind that baking the acrylic paint on glass is optional. If you prefer a more temporary design or if the glassware won’t be exposed to high wear and tear, you can skip the baking step and simply let the paint air dry. However, baking is recommended for projects that require additional durability and longevity.
4. Can you use a regular oven to bake acrylic paint on glass?
Yes, you can use a regular household oven to bake acrylic paint on glass. Preheat the oven to a low temperature, typically around 275°F (135°C), and place your painted glassware on a baking sheet or a wire rack. Avoid placing the glassware directly on the oven rack, as it may cause uneven heating and potential damage. Always keep a close eye on the glass while it’s baking to prevent any accidents.
It’s important to note that once you bake acrylic paint on glass, the glassware should not be used for food items. If you’re planning to paint glassware you intend to use for serving food or beverages, it’s recommended to use food-safe, non-toxic acrylic paints and follow the manufacturer’s instructions for curing.
5. How do you care for acrylic-painted glassware after baking?
After baking acrylic-painted glassware, allow it to cool completely before handling it. Once cooled, it is recommended to gently wash the glassware by hand using a mild dish soap and lukewarm water. Avoid using abrasive sponges or harsh chemicals that can damage the paint. You can also choose to place the glassware on the top rack of a dishwasher, as long as it is labeled as dishwasher safe.
To maintain the vibrant colors and longevity of the paint, avoid using sharp objects or utensils that may scratch the painted surface. It’s also a good idea to store the glassware in a cool, dry place away from direct sunlight, as prolonged exposure to UV rays can cause the colors to fade over time.
By following these simple care instructions, you can enjoy your acrylic-painted glassware for years to come.

While baking acrylic paint on glass may seem like a daunting task, with the right techniques and knowledge, you can achieve stunning and durable results. Remember to properly clean and prepare your glass surface, choose high-quality acrylic paints suitable for glass, and follow the correct baking instructions to ensure a successful outcome.
Whether you’re designing personalized glassware, creating unique home decor pieces, or simply wanting to experiment with a new artistic medium, baking acrylic paint on glass opens up a world of possibilities for you to explore and showcase your creativity.
So, put on your chef’s hat and apron, and let your artistic skills shine through as you embark on this exciting journey of baking acrylic paint on glass. With practice and patience, you’ll be able to create beautiful and long-lasting pieces that will be admired by all. Happy baking and may your glass artistry bring joy and inspiration to those who behold it.