To apply credit to a bill in QuickBooks, navigate to + New, select Pay bills, choose the vendor’s bill, and apply the available credit in the Credit Applied field before filling in the remaining payment details. Effectively managing vendor credits can streamline your accounting processes and improve financial accuracy.
Understanding how to apply credits to bills in QuickBooks ensures accurate vendor transactions and optimized financial tracking. By following simple steps within the QuickBooks interface, you can easily apply vendor credits to bills, enhancing your bookkeeping efficiency and maintaining financial precision.
Mastering this process empowers you to effectively manage vendor accounts and enhance your overall financial operations.
Understanding Applying Credit To Bills
What Is Applying Credit To Bills?
Applying credit to bills in QuickBooks involves utilizing a credit from a vendor to offset an existing bill balance. It essentially allows you to deduct the credit from the amount owed on a bill, ensuring accurate and updated accounting records.
Why Is It Important To Apply Credit To Bills?
Applying credit to bills is crucial as it ensures that businesses accurately reflect their financial position. If not applied, outstanding credit amounts can lead to discrepancies in financial records, affecting the accuracy of financial statements and reports.
Benefits Of Applying Credit To Bills
There are several benefits to applying credit to bills in QuickBooks:
- Accurate Financial Reporting: By applying vendor credits to bills, the financial statements reflect the actual liabilities owed.
- Improved Cash Flow Management: Applying credits to bills reduces the amount payable to vendors, positively impacting cash flow.
- Streamlined Accounting Processes: Properly applied credits ensure that bookkeeping records are up-to-date and accurate.
Credit: quickbooks.intuit.com
Methods To Apply Credit To Bills In Quickbooks
When it comes to managing credits in QuickBooks, there are several efficient methods to apply credit to bills seamlessly. Let’s explore various ways to handle credits in QuickBooks effectively.
Method 1: Using The Pay Bills Feature
When it’s time to use your credit, follow these steps:
- Select + New.
- Select Pay bills.
- Choose the vendor’s bill from the list.
- View the available credit in the Credit Applied field.
- Complete the remaining fields and proceed as usual.
Method 2: Applying Credit Memo To An Invoice
To apply a credit memo to an invoice:
- Access Company and Transaction Center and click on Credit Memos.
- Select the appropriate credit memo and ensure correct customer details.
- Click on the Use Credit to button drop-down.
- Choose Apply to invoice.
Method 3: Changing A Bill To A Credit
To convert a bill into a credit:
- Locate the vendor credit.
- Select Bill to convert it into a credit, then Save & Close.
- Open the bill again, then choose Credit to transform it into a credit, and Save and Close.
Method 4: Applying A Credit Balance To An Invoice
To apply a credit balance to an invoice:
- Select + New.
- Select Receive payment.
- Pick a customer and select the unpaid invoice.
- Under Credits, choose the appropriate journal entry and apply it as a credit.
- Save and close the transaction.
Method 5: Apply Vendor Credit On Bills
For applying a vendor credit on bills:
- Select + New.
- Choose Expense.
- Select the vendor and enter the details.
- Under Category details, enter the vendor credit to be applied.
- Save the transaction after verification.
Step-by-step Guide: How To Apply Credit To Bills In Quickbooks
Learn the simple process of applying credit to bills in QuickBooks with this easy-to-follow guide. Follow these steps to efficiently manage vendor credits and bills in your accounting system.
Step 1: Select + New
Begin by navigating to the + New button in your QuickBooks dashboard. This option allows you to initiate a new transaction and proceed with applying credit to a bill.
Step 2: Select Pay Bills
Next, click on the Pay Bills option to access the screen where you can view and manage outstanding bills for your vendors.
Step 3: Select The Bill For The Vendor
Identify and select the specific bill associated with the vendor to whom you want to apply the credit. Ensure you have the correct bill selected before proceeding.
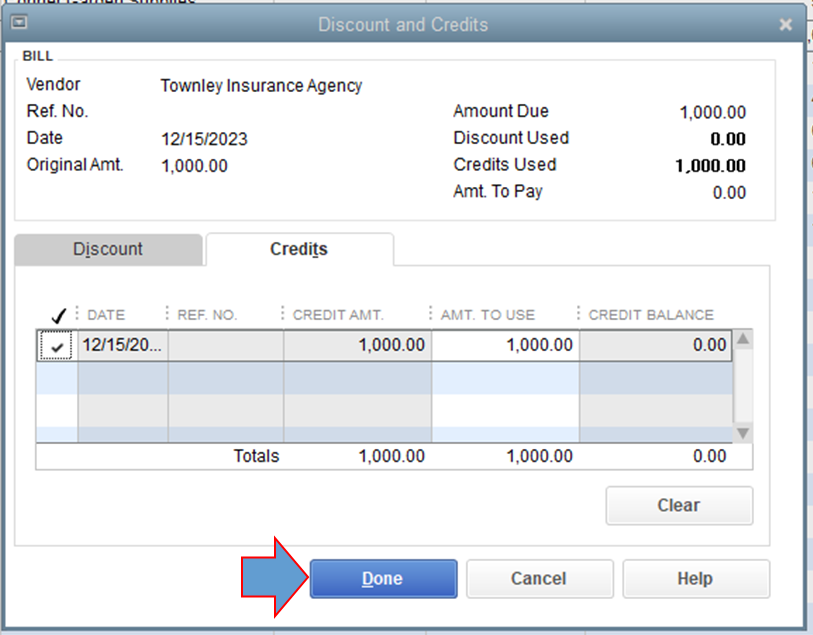
Step 4: Apply The Available Credit
Locate the available credit linked to the vendor and apply it to the selected bill. This step helps in offsetting the bill amount with the existing credit amount.
Step 5: Complete The Remaining Fields
Lastly, fill in the remaining fields with relevant information such as payment details and any additional notes. Ensure all details are accurate before finalizing the credit application process.
Credit: quickbooks.intuit.com
Tips And Best Practices For Applying Credit To Bills
When managing vendor credits and bills in QuickBooks, it’s essential to apply credits accurately to ensure correct accounting records. Here are some best practices and tips to effectively apply credits to bills:
Tip 1: Keep Track Of Available Credits
Regularly monitor and maintain a record of all available credits from vendors. This helps in efficiently utilizing credits when paying bills and prevents oversights.
Tip 2: Regularly Review And Reconcile Vendor Balances
Periodically review and reconcile vendor balances to ensure that all outstanding credits are accurately reflected. This practice helps in maintaining accurate financial records and avoiding discrepancies.
Tip 3: Set Up Automatic Credit Application
Consider setting up automatic credit application in QuickBooks to streamline the process. This feature can help in automatically applying available vendor credits to corresponding bills, saving time and effort.
Tip 4: Double-check Before Applying Credits
Before applying credits to bills, double-check the accuracy of the information. Verify the correct vendor, bill details, and credit amounts to avoid potential errors in the application process.
Tip 5: Seek Professional Help If Needed
If you encounter challenges or complexities in applying credits to bills, don’t hesitate to seek professional assistance. Consulting with accounting professionals can ensure proper handling of credit applications and accounting practices.

Credit: quickbooks.intuit.com
Frequently Asked Questions Of How To Apply Credit To Bill In Quickbooks
How Do I Apply Credits To Bills In Quickbooks?
To apply credits to bills in QuickBooks, follow these steps: 1. Select + New. 2. Choose Pay bills. 3. From the list, select the bill for your vendor. 4. The available credit will be shown in the Credit Applied field. 5.
Complete the remaining fields as usual.
How Do I Apply A Credit To An Invoice That Was Already Paid In Quickbooks?
To apply a credit to an invoice that was already paid in QuickBooks, follow these steps: 1. Select “+ New” 2. Choose “Pay bills” 3. Pick the vendor’s bill from the list 4. Look for the available credit in the “Credit Applied” field 5. Complete the remaining fields and proceed as usual.
How Do I Change A Bill To A Credit In Quickbooks?
To change a bill to a credit in QuickBooks, follow these steps: First, locate the vendor credit. Then select “Bill” to change the credit into a bill and save. Alternatively, open the bill and select “Credit” to change it to a credit, then save.
How To Apply A Credit Balance To An Invoice In Quickbooks Online?
To apply a credit balance to an invoice in QuickBooks Online, go to + New, then Receive Payment. Choose a customer and the invoice. Select the journal entry under Credits to apply it. Save and close to complete the process.
Conclusion
After learning how to apply credit to a bill in QuickBooks, you can now efficiently manage your vendor credits. By utilizing simple steps outlined in this guide, you can streamline the payment process and maintain accurate financial records. This will help in maintaining a smooth and efficient accounting system for your business.
Mastering this process can significantly enhance your financial management in QuickBooks.