Incorporating DIY Ornaments into Christmas Curtain Display
Christmas is my favorite time of year, and I love all the decorating that goes along with it! This year, I wanted to mix things up a bit and add some DIY ornaments to my Christmas curtain display.
It was really easy to do, and it added a really personal touch to my holiday decor. If you’re looking for a way to add a little bit of your own personality to your Christmas decorations, then follow these simple steps to create your own DIY ornaments.
Christmas Curtain Display

What You Need
To incorporate DIY ornaments into your Christmas curtain display, gather the following materials:
– Assorted plain or clear ornaments
– Craft paint in various colors
– Paintbrushes
– Glitter or sequins
– Ribbon or string for hanging
– Hot glue gun and glue sticks
– Scissors
– Small beads or charms for embellishment
– Stencils or stickers for designs
– Clear craft sealant spray
Crafting tools you will need:
– Cutting mat or protective surface
– Craft knife or scissors
– Hole punch
– Pliers (optional, for bending wire)
– Fine-tipped markers or pens for detailing
Crafting supplies:
– Disposable gloves (optional, for mess-free painting)
– Paper towels
– Plastic cups or containers for mixing paint
– Newspaper or drop cloth to protect your workspace
Once you have gathered all the necessary materials and tools, you are ready to start creating your personalized DIY ornaments.
💡 key Takeaway: Gather a variety of materials such as plain ornaments, craft paint, glitter, and ribbon. Equip yourself with crafting tools like paintbrushes, scissors, and a hot glue gun to bring your DIY ornaments to life.
List of materials
List of Materials for DIY Ornaments:
To create your own DIY ornaments for your Christmas curtain display, you’ll need the following materials:
1. Clear glass or plastic ornaments: These can be found at craft stores or online. Opt for either glass ornaments for a more delicate look or plastic ornaments for added durability.
2. Acrylic craft paint: Choose a variety of colors that match your desired color scheme or theme. Metallic paints can add an elegant touch, while glitter paints can provide a festive sparkle.
3. Paintbrushes: Have a set of different sizes of paintbrushes on hand to accommodate various ornament designs and painting techniques.
4. Glitter: Add some extra shimmer to your ornaments with different colors of glitter. Whether you prefer fine glitter or chunky glitter, it’s a great way to make your ornaments stand out.
5. Ribbon or twine: Get some ribbon or twine in coordinating colors to hang your ornaments. You can also use ribbon to tie bows or create decorative accents on your ornaments.
6. Assorted decorations: Consider including small artificial flowers, beads, sequins, or other decorative elements that match your theme. These can be attached with craft glue or hot glue.
7. Protective gloves: While optional, wearing gloves can help protect your hands from paint and glue messes during the crafting process.
Remember, these materials can be adjusted based on your personal preferences and the specific DIY ornament designs you wish to create.
💡 key Takeaway: Creating DIY ornaments for your Christmas curtain display requires clear glass or plastic ornaments, acrylic craft paint, paintbrushes, glitter, ribbon or twine, assorted decorations, and protective gloves.
Crafting tools
Crafting Tools:
To create DIY ornaments for your Christmas curtain display, you will need a few essential crafting tools. Here are some tools that will come in handy during the ornament-making process:
1. Scissors: A good pair of sharp scissors is crucial for cutting various materials such as fabric, paper, and ribbons.
2. Glue Gun: Invest in a reliable glue gun for secure and long-lasting adhesion. It will make attaching ornaments to your curtains much easier.
3. Paintbrushes: Different sizes of paintbrushes will be useful if you plan on painting or adding details to your ornaments. Opt for synthetic or natural bristle brushes depending on the type of paint you are using.
4. Pliers: Pliers are handy for bending wire or manipulating small parts of ornaments, especially if you are incorporating beads or metallic elements.
5. Sewing Needles: If you’re planning to sew ornaments or attach fabric to your curtain display, keep a set of sewing needles in your crafting toolkit.
6. Hole Punch: A hole punch is essential for creating holes in materials like paper or cardstock, allowing you to hang ornaments or attach strings easily.
7. X-Acto Knife or Craft Knife: This tool is useful for cutting precise shapes and intricate designs on various craft materials.
8. Modelling Clay or Polymer Clay Tools: If you decide to sculpt your own ornaments using clay, have some modeling tools on hand to shape and texture the clay.
Quotes:
– “Having the right crafting tools can make the ornament-making process much smoother and enjoyable.”
– “Investing in good-quality tools will ensure that your DIY ornaments turn out beautifully and last for years to come.”
💡 key Takeaway: Having essential crafting tools such as scissors, glue gun, paintbrushes, pliers, sewing needles, hole punch, X-Acto knife, and modeling clay tools will help you create stunning DIY ornaments for your Christmas curtain display.
Crafting supplies
Crafting Supplies:
To successfully create DIY ornaments for your Christmas curtain display, you’ll need a few essential crafting supplies. Here’s a list of items you should have on hand:
1. Baubles and Ornaments: Choose a variety of baubles, ornaments, and decorative elements such as ribbons, beads, and glitter. These will serve as the base for your customized ornaments.
2. Glue and Adhesives: To securely attach the decorative elements to the baubles, you’ll need craft glue or adhesive. Make sure to use a strong adhesive that will hold up throughout the holiday season.
3. Paint and Brushes: If you want to add a personal touch to your ornaments, gather some acrylic paints and brushes. These will allow you to paint intricate designs or patterns on your baubles.
4. Markers and Pens: Alternatively, you can use colorful markers or pens to draw or write on your ornaments. These will give you more flexibility in creating personalized messages or intricate designs.
5. Glitter and Sparkles: For that extra touch of glam, include some glitter and sparkles in your crafting supplies. These will add a festive and joyful sparkle to your DIY ornaments.
“Don’t be afraid to experiment and try different techniques with your crafting supplies. The possibilities are endless!”
💡 key Takeaway: To create eye-catching DIY ornaments for your Christmas curtain display, gather essential crafting supplies such as baubles, glue, paint, markers, glitter, and more. Let your creativity shine through as you personalize each ornament.
How to Make the Ornaments
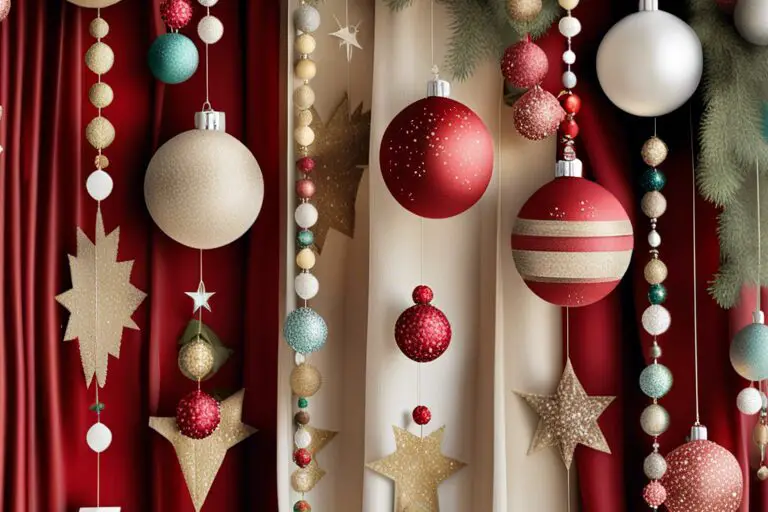
Christmas Curtain Display

Are you tired of the same old Christmas decorations year after year? Do you long for a festive display that reflects your creativity and personal style? Imagine transforming your plain curtains into a dazzling holiday showcase with the help of DIY ornaments. Picture this: a curtain adorned with handcrafted baubles, unique trinkets, and whimsical creations, all adding a touch of magic to your living space.
In this blog, we will delve into the art of incorporating DIY ornaments into your Christmas curtain display, giving you tips, inspiration, and step-by-step instructions to create a one-of-a-kind festive look. We understand the pain of wanting to make your home feel special during the holiday season, but not knowing where to start. That’s why we’re here to guide you through this exciting journey, helping you infuse your home with joy and charm. Get ready to dive into the world of DIY ornaments and unlock your inner artist, as we explore different techniques, materials, and design ideas. Let’s make this Christmas a truly magical experience for you and your loved ones.
How to Make the Ornaments:
Creating your own DIY ornaments is a fun and rewarding way to add a personal touch to your Christmas curtain display. Here’s a step-by-step guide on how to make your own festive ornaments:
1. Choose Your Design: Start by deciding on the style and theme of the ornaments you want to create. Whether it’s traditional, modern, or whimsical, select designs that complement your overall holiday decor.
2. Gather Your Materials: Here’s a list of materials you’ll need for this DIY project:
– Clear glass or plastic ornaments
– Acrylic paint in various colors
– Paintbrushes
– Glitter
– Ribbon or twine
– Stickers or embellishments
– Craft glue
3. Prep Your Ornaments: Remove the tops of the ornaments and set them aside. Pour a small amount of paint into each ornament and swirl it around, ensuring the entire interior is evenly coated. Choose colors that match your desired theme. You can also add glitter for some extra sparkle.
4. Add Personal Touches: Once the paint is dry, it’s time to add personal touches to your ornaments. Use paintbrushes to create intricate designs, or apply stickers and embellishments for a more effortless look. You can also write personal messages or names with a permanent marker.
5. Attach the Tops: Once your ornament design is complete, carefully reattach the tops, making sure they are secure. Tie a ribbon or twine around the top to create a hanger.
6. Let Them Dry: Leave your ornaments to dry completely before handling them. This will prevent smudging or smearing of the paint and ensures a long-lasting finish.
7. Hang and Enjoy: Once your ornaments are dry, it’s time to hang them on your Christmas curtains. You can use curtain hooks, ornament hangers, or simply tie them directly onto the fabric. Get creative with the placement and mix and match different sizes and designs for an eye-catching display.
8. Don’t Limit Yourself: These DIY ornaments aren’t just limited to your curtain display. You can also incorporate them into other areas of your holiday decor. Hang them on your Christmas tree, create a festive garland, or even use them as table centerpieces. The possibilities are endless!
💡 key Takeaway: Creating your own DIY ornaments allows you to add a personal touch to your Christmas curtain display. With the right materials and a little creativity, you can make unique and festive ornaments that will enhance your holiday
Step-by-step instructions
Step-by-step instructions:
1. Gather Your Materials:
– Assorted clear glass ornaments
– Craft paint in various colors
– Paintbrushes
– Glitter
– Ribbon or twine for hanging
– Newspaper or a drop cloth to protect your work surface
2. Prepare Your Workspace:
– Lay down newspaper or a drop cloth to protect your work surface from any spills or drips.
– Set out all the materials you gathered for easy access.
3. Choose Your Design:
– Decide on the design or theme for your ornaments. Will you go for traditional Christmas colors like red and green, or will you opt for a modern and whimsical look with bright and bold hues?
4. Paint your Ornaments:
– Remove the metal tops from the glass ornaments.
– Pour a small amount of craft paint into each ornament.
– Swirl the paint around to fully coat the inside of the ornament.
– Add more paint or mix different colors to create a marbled effect.
– If desired, sprinkle glitter into the ornament while the paint is still wet for some extra sparkle.
– Let the ornaments dry completely before moving on to the next step.
5. Secure the Tops:
– Once the paint is dry, reattach the metal tops to the ornaments.
– Ensure they are secured tightly to prevent any accidental spills.
6. Add Ribbon or Twine:
– Cut a length of ribbon or twine, approximately 6 inches long.
– Tie a knot at one end and loop the other end through the metal top of the ornament.
– Tie another knot to secure the ribbon or twine in place.
– Trim any excess length if desired.
7. Hang and Decorate:
– Find the perfect spot on your curtain or window display to hang your DIY ornaments.
– Create a visually pleasing arrangement by varying the heights and spacing of the ornaments.
– You can also attach them to curtain rods or tie them onto curtain ties for a festive touch.
8. Maintenance Tips:
– To store your ornaments safely, wrap them individually in tissue paper or bubble wrap and place them in a sturdy storage box.
– Avoid exposing the ornaments to extreme temperatures or direct sunlight to prevent any damage or fading.
– If your ornaments need cleaning, gently wipe them with a soft, lint-free cloth. Avoid using abrasive cleaners that could scratch the surface.
– In case of any damages, use clear adhesive glue to repair any broken or loose parts of the ornament.
💡 key Takeaway: By following these step-by-step instructions,
Tips and tricks
Tips and Tricks for Making DIY Ornaments
Making your own DIY ornaments can be a fun and creative way to add a personal touch to your Christmas curtain display. Here are some tips and tricks to help you create beautiful and unique ornaments:
1. Choose the Right Materials:
– Opt for lightweight materials like foam balls, felt, or paper to ensure your ornaments are easy to hang on your curtains.
– Consider using materials that are durable and can withstand the test of time, such as acrylic paints or metallic markers.
2. Get Creative with Designs:
– Experiment with different types of ornament designs, like snowflakes, stars, or holiday-themed shapes.
– Use stencils or templates to create precise and symmetrical designs, or let your imagination run wild and create freehand designs.
3. Add Personalized Elements:
– Make your ornaments truly special by incorporating personalized elements. Write names or initials on the ornaments, or attach small photos of loved ones.
– Use festive ribbons or strings to attach the ornaments to the curtains, adding an extra decorative touch.
4. Experiment with Different Techniques:
– Try out different crafting techniques like decoupage, painting, or embroidery to enhance the appearance of your ornaments.
– Use glitter, sequins, or beads to add a touch of sparkle and glamour to your creations.
5. Consider Theme and Color Coordination:
– Think about the overall theme and color scheme of your Christmas curtain display. Choose ornaments that complement the existing decor and enhance the visual appeal.
– Don’t be afraid to mix and match different colors and textures to create a visually interesting display.
6. Take Care in Hanging and Arranging:
– Use curtain clip rings or small hooks to attach the ornaments to your curtains securely.
– Arrange the ornaments in a visually pleasing manner, distributing them evenly or creating focal points to draw attention.
7. Use Ornament Accessories:
– Maximize the impact of your DIY ornaments by using additional accessories like fairy lights or garlands to create a magical and eye-catching display.
– Consider adding other decorative elements such as bells or tassels for an extra festive touch.
💡 key Takeaway: Incorporating DIY ornaments into your Christmas curtain display is a fantastic way to personalize your holiday decor. With the right materials, creative designs, and attention to detail, you can create stunning and unique ornaments that will impress your guests and add a festive vibe to your home.
Decorating with Ornaments
Decorating with Ornaments
When it comes to incorporating DIY ornaments into your Christmas curtain display, the options are endless. Here are some creative ideas to make your holiday decor stand out:
1. Ideas for hanging ornaments:
– Attach ornaments directly to the curtain rings using thin ribbons or transparent fishing lines for a suspended effect.
– Create a garland of ornaments by stringing them together with decorative ribbon or twine and draping it across the top of the curtain rod.
– Hang individual ornaments at different heights along the curtain using adhesive hooks or small ornament hooks.
2. Ideas for incorporating ornaments into other displays:
– Place a string of fairy lights behind the curtain and hang ornaments in front of them for a magical glowing effect.
– Add a festive touch by attaching ornaments to wreaths or garlands and draping them over the curtain rod.
– Use clear glass vases or jars to display ornaments on nearby shelves or tables, creating a cohesive holiday theme.
💡 key Takeaway: Incorporating DIY ornaments into your Christmas curtain display adds a personalized touch and brings festive cheer to your holiday decor.
Ideas for hanging ornaments
Ideas for hanging ornaments:
When it comes to displaying your DIY ornaments on your Christmas curtains, there are a variety of creative and visually appealing ideas to consider. Here are some options that will add charm and festive flair to your decor:
1. Ribbon ties: Attach colorful ribbons to your ornaments and tie them securely to the curtain rod or hooks. You can choose ribbons that match your curtain colors or go for contrasting hues to create a striking visual effect.
2. Ornament garlands: String your homemade ornaments together using twine, string, or thin ribbon to create beautiful garlands. Drape them across the top of the curtain or along the sides for a whimsical and festive touch.
3. Curtain clips: Utilize specialized curtain clips or hooks designed to hold ornaments. These clips can be easily attached to the curtain fabric and provide a secure and stylish way to showcase your DIY creations.
4. Ornament curtain tiebacks: Replace traditional curtain tiebacks with your handmade ornaments. Use decorative hooks or loops to hold the curtains back and attach the ornaments to add a unique and personalized touch.
5. Suction cup hooks: If you have a window near your curtains, consider using suction cup hooks to hang your ornaments directly on the glass. This can be a great option for adding a touch of holiday cheer to the outside of your home as well.
6. Cascading ornaments: Create a cascading effect by hanging ornaments at different heights along the curtain. This adds dimension and creates a visually appealing display that catches the eye.
Remember to distribute the ornaments evenly across the curtain, varying the sizes and colors for a balanced and visually interesting arrangement. Play around with different combinations and styles to find what works best for your personal taste and overall decor theme.
💡 key Takeaway: Incorporating DIY ornaments into your Christmas curtain display allows you to add a personal touch and create a festive atmosphere. From ribbon ties to ornament garlands, there are plenty of creative ways to showcase your handmade creations.
Ideas for incorporating ornaments into other displays
Ideas for Incorporating Ornaments into Other Displays
When it comes to Christmas decorations, ornaments are not just limited to the Christmas tree. You can get creative and incorporate DIY ornaments into various other displays throughout your home. Here are some ideas to spark your creativity:
1. Wreath Accents: Add a pop of color and festive charm to your holiday wreath by attaching small ornaments. You can use hot glue or ornament hooks to secure them in place. Mix and match different shapes, sizes, and colors for a visually appealing result.
2. Garland Décor: Take your garland to the next level by hanging ornaments from it. Attach them at regular intervals using decorative ribbons or clear fishing line. This will add depth and dimension to your garland, creating an eye-catching display.
3. Window Ornaments: Bring the holiday spirit to your windows by hanging ornaments from suction cup hooks. Choose lightweight ornaments to avoid damage to the glass. This simple and elegant touch will make your windows sparkle from both inside and outside.
4. Table Centerpieces: Create stunning tabletop displays by incorporating ornaments into your centerpieces. Arrange ornaments of different sizes, colors, and finishes in a decorative bowl or vase. You can also attach ornaments to twigs or branches for an organic and whimsical look.
5. Mantel Magic: Dress up your fireplace mantel by mixing in ornaments with your other Christmas decorations. Arrange them alongside garlands, candles, and stockings for a festive and cohesive look. Hang ornaments from the mantel using ribbon or ornament hooks for added visual interest.
💡 key Takeaway: Incorporating DIY ornaments into various Christmas displays throughout your home allows you to extend the festive spirit beyond the Christmas tree, adding personal touches and creating visually appealing decorations.
Tips for Maintenance
Tips for Maintenance:
1. How to store ornaments:
– Use padded containers or dividers to protect delicate ornaments.
– Store ornaments in a cool, dry place to prevent damage from humidity.
– Avoid storing ornaments in the attic or basement, as extreme temperatures can cause deterioration.
2. How to clean ornaments:
– Dust ornaments regularly with a soft, dry cloth to keep them looking their best.
– For glass or porcelain ornaments, use a gentle glass cleaner and a soft cloth to remove smudges or fingerprints.
– Avoid using harsh chemicals or abrasive cleaners, as they can strip off the paint or finish on the ornaments.
3. How to repair ornaments:
– For minor repairs, such as loose hooks or broken strings, use a hot glue gun or clear tape to secure them.
– If an ornament is chipped or cracked, use clear adhesive designed for glass or porcelain to repair it.
– If the damage is beyond repair, consider repurposing the ornament into a different craft project or contacting a professional for restoration.
💡 key Takeaway: Proper maintenance of DIY ornaments is essential for preserving their longevity and beauty. Store them carefully, clean them regularly, and repair any minor damages to ensure they can be enjoyed for years to come.
How to store ornaments
How to Store Ornaments:
When it comes to storing ornaments, proper packaging and organization are essential to ensure they stay in pristine condition for future use. Here are some tips to help you store your DIY ornaments safely:
1. Choose the Right Containers: Opt for sturdy and durable containers that provide adequate protection. You can use plastic ornament storage boxes with individual compartments or consider repurposing egg cartons, cardboard dividers, or even muffin tins for smaller ornaments.
2. Wrap Each Ornament: Before placing the ornaments in the storage container, wrap each one individually in tissue paper or bubble wrap to prevent them from scratching or breaking. You can also use soft cloths or socks for added cushioning.
3. Label and Categorize: To make it easier to find specific ornaments in the future, label your storage containers according to themes, colors, or types of ornaments. This will save you time and effort when you’re ready to decorate again.
4. Avoid Temperature Extremes: Store your ornaments in a cool and dry environment to prevent any damage caused by extreme temperature fluctuations. Avoid storing them in areas such as attics or basements where the temperature and humidity levels can vary greatly.
5. Hang or Stack: Depending on the size and fragility of your ornaments, you can choose to hang them or stack them in the storage container. Hanging them individually using ornament hooks or strings can help prevent tangling and minimize the risk of damage.
6. Store Lights and Garlands Separately: If you have lights or garlands that are part of your Christmas curtain display, store them separately from the ornaments. This will prevent any entanglement or damage to both the lights and ornaments.
💡 key Takeaway: Ensure the long-lasting preservation of your DIY ornaments by storing them in sturdy containers, wrapping them individually, and categorizing them for easy access during future decoration sessions.
How to clean ornaments
How to Clean Ornaments:
Keeping your DIY ornaments clean and in good condition is important for their longevity and continued beauty. Here are some tips on how to effectively clean your ornaments:
1. Choose the Right Cleaning Method:
– Glass Ornaments: Fill a basin or sink with warm water and a mild dish soap. Gently wash each ornament using a soft cloth or sponge. Rinse with clean water and pat dry with a lint-free towel.
– Fabric Ornaments: Spot clean fabric ornaments using a gentle fabric cleaner or mild detergent. Be sure to follow the instructions on the cleaner and avoid saturating the fabric. Allow the ornaments to air dry.
– Metal Ornaments: Clean metal ornaments by wiping them with a microfiber cloth dampened with water. For stubborn stains, use a mixture of water and vinegar. Dry thoroughly to prevent rust.
2. Avoid Harsh Cleaning Agents:
– Avoid using harsh chemicals, bleach, or abrasive cleaners on your ornaments, as they can damage the materials and colors. Stick to gentle cleaning solutions to maintain their integrity.
3. Handle with Care:
– When cleaning ornaments, handle them with care to prevent any accidental breakage. Hold them securely but gently, and be cautious of any small or delicate parts that may be prone to dislodging.
4. Store Properly:
– After cleaning, ensure your ornaments are completely dry before storing them. Use acid-free tissue paper, bubble wrap, or individual ornament storage boxes to protect them from dust, moisture, and potential breakage.
5. Regular Dusting:
– To maintain the cleanliness of your ornaments throughout the holiday season, regularly dust them with a soft, dry cloth or a feather duster. This will help keep them looking their best and prolong their lifespan.
💡 key Takeaway: Regular cleaning and proper storage of DIY ornaments will help preserve their beauty and ensure they can be enjoyed for many holiday seasons to come.
How to repair ornaments
How to Repair Ornaments
When it comes to holiday decorations, sometimes accidents happen and ornaments can get damaged. But don’t worry, with a few simple steps, you can repair your cherished ornaments and keep them looking beautiful for years to come.
1. Assess the Damage
Take a close look at the ornament and determine the extent of the damage. Is it a minor chip or crack? Or is it a more significant break? This will help you determine the best course of action for repair.
2. Gather Your Supplies
Before you begin the repair process, gather the necessary supplies. You’ll need clear-drying craft glue, a small brush for applying the glue, and any additional materials like small beads or sequins if you want to embellish the repaired area.
3. Clean and Prepare the Ornament
Clean the broken pieces of the ornament with a mild soap and water solution to remove any dirt or debris. Dry them thoroughly before proceeding with the repair.
4. Apply Glue
Using the small brush, apply a thin layer of clear-drying craft glue to both the broken edges of the ornament. Make sure to align the pieces as accurately as possible. Hold them together firmly for a few minutes to allow the glue to bond.
5. Reinforce the Repair (Optional)
If the ornament had a significant break, you may want to reinforce the repair to ensure its durability. You can do this by applying a small strip of clear adhesive tape or by wrapping a thin wire around the repaired area.
6. Let It Dry
Allow the repaired ornament to dry completely according to the manufacturer’s instructions for the glue you used. This typically takes a few hours, but it’s best to leave it overnight to ensure a strong bond.
7. Finishing Touches
Once the ornament is fully dry, you can add any additional embellishments if desired. Consider using small beads, sequins, or glitter to enhance the repaired area and make it blend seamlessly with the rest of the ornament.
💡 key Takeaway: Repairing ornaments is a simple process that can save your beloved holiday decorations from ending up in the trash. With a few basic supplies and careful attention to detail, you can restore your ornaments to their former glory and continue enjoying them for years to come.
Conclusion
Conclusion Do you love decorating for the holidays, but don’t have the time or money to go out and buy everything? You’re not alone! This year, try decorating with DIY ornaments. DIY ornaments are a great way to add a personal touch to your holiday decor. You can find or make ornaments all year long, and they’re perfect for adding a little extra flair to your curtain display. If you’re new to decorating with DIY ornaments, don’t worry. I’ve outlined the steps below, and I’ll be sharing additional tips and tricks in the coming weeks. Stay tuned, and I hope you have a fantastic holiday season!