Adjusting Slack Adjusters
To adjust slack adjusters, release the locking sleeve over the nut and turn the adjusting nut until it goes tight, ensuring the S-cam rotates in the same direction as the brake application. Avoid turning the nut more than one or two full revolutions.
Manually adjusting automatic slack adjusters should only be done during foundation brake repair or initial setup, as it can cause premature wear on internal components and render the adjuster inoperable. Regular maintenance and understanding when the slack adjusters need adjusting are important for optimal performance.
Understanding Slack Adjusters
Slack adjusters play a crucial role in maintaining the optimal performance of a vehicle’s braking system. They are responsible for adjusting the distance between the brake shoe and the drum as the linings wear down, ensuring efficient braking.
Importance Of Proper Adjustment
Proper adjustment of slack adjusters is essential for ensuring safe and reliable braking performance. Inadequate adjustment can lead to brake failure, increased stopping distance, and unsafe driving conditions.
Difference Between Manual And Automatic Slack Adjusters
- Manual Slack Adjusters: Require manual adjustment by the operator using a wrench or tool to turn the adjusting nut.
- Automatic Slack Adjusters: Self-adjust based on the wear of the brake linings without the need for manual intervention.

Credit: m.youtube.com
How To Adjust Manual Slack Adjusters
When it comes to adjusting manual slack adjusters on your vehicle’s brake system, it is important to follow the proper steps to ensure optimal performance and safety. Manual slack adjusters are responsible for maintaining the correct clearance between the brake shoes and drum, allowing for efficient braking. In this guide, we will walk you through the step-by-step process of adjusting manual slack adjusters. But before we get started, let’s first check for any signs of wear and tear.
Checking For Wear And Tear
Prior to adjusting manual slack adjusters, it is essential to check for any signs of wear and tear. Here are a few key indicators that may suggest the need for adjustment:
- Excessive brake shoe drag or noise during braking
- Uneven braking or pulling to one side
- Excessive travel of the brake pedal
- Extended stopping distances
Step-by-step Adjustment Process
Now that we have checked for any wear and tear, let’s move on to the step-by-step adjustment process for manual slack adjusters:
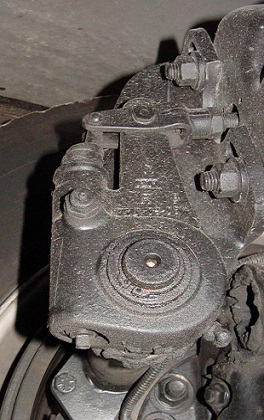
- Start by locating the slack adjuster. It is usually located between the push rod and the S-cam.
- Remove any dust or debris around the slack adjuster to ensure proper visibility.
- Inspect the adjusting nut and locking sleeve for any damage or corrosion. Replace if necessary.
- Release the locking sleeve by pushing it towards the adjusting nut.
- Using an appropriate wrench or tool, turn the adjusting nut in the same direction as the brake application.
- Continue turning the adjusting nut until you feel resistance or tightness. Avoid over-adjusting by not exceeding one or two full revolutions.
- Once you have achieved the desired adjustment, secure the locking sleeve back over the adjusting nut.
- Double-check the adjustment by testing the brake pedal. Ensure there is no excessive travel and that the braking feels smooth and responsive.
- If needed, repeat the adjustment process on the remaining manual slack adjusters.
By following these step-by-step instructions, you can effectively adjust the manual slack adjusters on your vehicle’s brake system. Remember, regular maintenance and inspections are crucial to ensure optimal braking performance and safety. If you are unsure about adjusting your slack adjusters yourself, it is recommended to consult a professional technician.
That concludes our guide on how to adjust manual slack adjusters. We hope you found this information helpful in maintaining your vehicle’s brake system for a safe and smooth ride.
How To Adjust Automatic Slack Adjusters
When it comes to maintaining the safety and functionality of your vehicle’s braking system, properly adjusting automatic slack adjusters is crucial. Automatic slack adjusters play a vital role in ensuring that brake linings are in close proximity to the brake drum, allowing for efficient and effective braking. By understanding the signs of maladjustment, practicing proper maintenance, and following a step-by-step adjustment process, you can ensure your slack adjusters are in optimal working condition.
Identifying Signs Of Maladjustment
Before you dive into adjusting your automatic slack adjusters, it’s important to identify signs of maladjustment. These signs may include:
- Excessive brake pedal travel
- Poor braking performance
- Inadequate stopping power
- Uneven brake pad wear
If you notice any of these signs, it’s essential to take immediate action and adjust your slack adjusters as needed.
Proper Maintenance
Regular maintenance is key to keeping your automatic slack adjusters in optimal working condition. To maintain proper functionality, consider the following:
- Perform routine inspections of your slack adjusters to check for signs of wear or damage.
- Keep the adjuster mechanism clean and free from debris.
- Ensure the adjuster is properly lubricated to prevent excessive friction.
- Check for any loose or worn-out components and replace them as necessary.
By adhering to these maintenance practices, you can prolong the lifespan of your slack adjusters and reduce the risk of maladjustment.
Step-by-step Adjustment Process
Adjusting automatic slack adjusters requires precision and attention to detail. Follow these steps to ensure a successful adjustment:
- Park your vehicle on a level surface and apply the parking brake.
- Locate the automatic slack adjuster on each wheel. It is usually located near the brake chamber.
- Using the appropriate tool, release the locking sleeve over the adjusting nut.
- Turn the adjusting nut to rotate the S-cam in the same direction as the brake application.
- Continue turning the adjusting nut until it becomes tight. Be cautious not to over-tighten.
- Reengage the locking sleeve to secure the adjusting nut in place.
- Perform a pushrod travel test to ensure proper adjustment. Refer to your vehicle’s manual for specific guidelines on acceptable pushrod travel.
- If necessary, repeat the adjustment process on the remaining slack adjusters.
Remember, proper adjustment is vital for maximum braking performance and safety. It’s recommended to consult your vehicle’s manual or seek professional assistance if you are unsure about the adjustment process.
Common Mistakes And Tips
When adjusting slack adjusters, it’s crucial to be aware of common mistakes that can lead to issues. Here are some valuable insights to help avoid problems and optimize the adjustment process.
Avoiding Premature Wear
One key mistake to steer clear of is manually adjusting automatic slack adjusters unnecessarily. This practice can cause premature wear on internal components, leading to inoperability of the adjuster.
Certified Technician’s Role
Remember, only certified technicians should handle the adjustment of automatic slack adjusters. This ensures proper calibration and helps prevent potential malfunctions that could impact safety.
Indications For Adjustment
- Poor braking performance can signal the need for slack adjuster adjustments.
- Unusual noises or vibrations during braking may indicate an issue that requires adjustment.
- Inconsistent braking could be a red flag for slack adjuster calibration.
By staying vigilant for these signs and adhering to best practices, you can maintain the efficiency and safety of slack adjusters.
Troubleshooting Slack Adjuster Issues
Properly functioning slack adjusters are crucial for the safety and efficiency of your vehicle’s braking system. However, maladjustments or issues with slack adjusters can lead to reduced brake performance and potential safety hazards. It’s essential to recognize the symptoms of maladjustment and know how to re-adjust the slack adjusters to ensure optimal performance. Let’s delve into recognizing maladjustment symptoms and the steps for readjustment.
Recognizing Maladjustment Symptoms
- Inconsistent brake response
- Excessive brake pad wear
- Uneven brake temperatures
- Unusual noise during braking
Steps For Re-adjustment
- 1. Secure the vehicle and release the parking brake.
- 2. Locate the slack adjuster and inspect for wear or damage.
- 3. Use appropriate tools to adjust the slack adjuster, following the manufacturer’s guidelines.
- 4. Turn the adjusting nut in the correct direction to achieve proper tension.
- 5. After adjustment, conduct a thorough test of the braking system to ensure proper functionality.

Credit: sgi.sk.ca
Credit: www.cdc.gov
Frequently Asked Questions On Adjusting Slack Adjusters
How Can You Adjust Slack Adjusters?
To adjust slack adjusters, release the locking sleeve and turn the adjusting nut in the same direction as the brake application. Turn until tight, but avoid over-revolution. Manual adjustments should be made during brake repair or initial setup to avoid premature wear.
Regular maintenance checks are essential for optimal performance.
How Many Turns To Adjust Slack Adjuster?
To adjust the slack adjuster, turn the adjusting nut until it goes tight. Avoid more than one or two full revolutions typically indicating the wrong direction.
Is It Ok To Manually Adjust Automatic Slack Adjusters?
Manually adjusting automatic slack adjusters is not recommended. Doing so can cause premature wear and lead to the adjuster becoming inoperable. The only time an automatic brake adjuster should be adjusted is during a foundation brake repair or initial setup.
It is important to properly maintain automatic slack adjusters to ensure their effectiveness.
How Do I Know If My Slack Adjusters Need Adjusting?
To determine if your slack adjusters need adjusting, follow these steps: 1. Release the locking sleeve and turn the adjusting nut in the same direction as the brake application. 2. Continue turning until it becomes tight. 3. If you need to turn more than one or two full revolutions, you may be going the wrong way.
4. Ensure that the brake adjuster is functioning properly by checking the brakes. In case of automatic slack adjusters, it is usually not necessary to manually adjust them unless there is a foundation brake repair or initial setup. Manually adjusting them can cause premature wear and may render the adjuster inoperable.
Conclusion
Adjusting slack adjusters is crucial for optimal brake performance and safety. Proper maintenance is key to ensure smooth operations and prevent premature wear. Remember to follow manufacturer guidelines for adjustments and consult certified technicians when needed. Stay safe on the road!