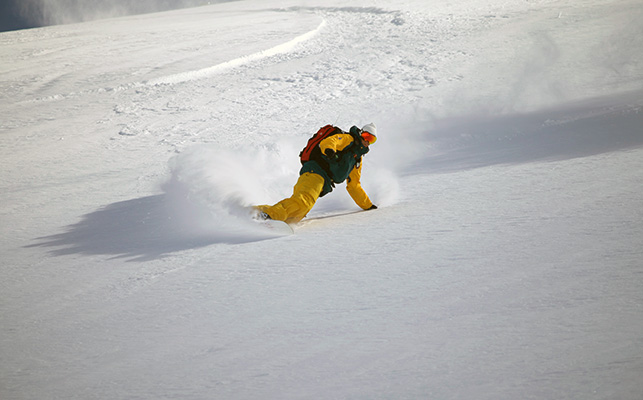
How to Toe Side Snowboarding
Toe side snowboarding is a technique used by many snowboarders to gain speed and control while going down the slopes. The main difference between toe side and heel side Snowboarding is that with toe side, your weight is distributed evenly on both feet, whereas with heel side, most of your weight is on your back foot. Toe Side Snowboarding also allows you to keep your balance more easily and have more control over turns.
Many beginners tend to start out by learning how to turn on their heel sides before moving onto their toe sides, but it is ultimately up to the individual which method they prefer. Here are some tips on how to get started with toe side snowboarding:
1) Firstly, make sure that you are comfortable and confident whenSnowboarding on your heel sides before attempting to move onto your toes.
2) When you are ready, start off by gently shifting your weight onto your front foot while keeping your back foot planted firmly on the ground.
3) Once you feel balanced, slowly lift up your back foot and place it next to your front foot so that you are now standing on both feet equally. You may need to adjust your stance slightly so that you feel comfortable and in control.
4) Now try gently pressing down into the ground with both feet as if you were going to jump – this will help shift your weight onto your toes and give you more control over turns. Remember to keep pressing down into the tails of both boards as this will help prevent nose-dives!
5) Try practicing basic turns on a gentle slope before progressing onto steeper terrain.
Remember to keep equal pressure on both toes as this will help maintain speed and control through each turn.
- Start by standing sideways on your snowboard, with your feet about shoulder-width apart
- Bend your knees and keep your weight centered over your feet
- Point your toes in the direction you want to travel, and shift your weight onto your front foot
- As you start to slide, use your back foot to push off the ground and help propel yourself forward
- Continue sliding down the hill, using small hops to maintain speed and balance
- If you need to turn, simply press down on either edge of the snowboard with your foot
Credit: mcnabsnowboarding.com
How Do I Make My Toe Side Turn Better?
If you’re having trouble with your toe side turn, there are a few things you can do to improve it. First, make sure that you’re pointing your toes in the direction you want to go. If your feet are pointed too far out, it will be difficult to get them back under your body for the turn.
Second, keep your weight centered over your feet and resist the urge to lean too far forward or backward. Lastly, practice keeping your legs relatively straight throughout the turn – this will help you maintain balance and control. With a little practice, you should be able to master the perfect toe side turn!
How Do I Stop My Toe Side When Snowboarding?
One of the most common issues that snowboarders face is how to stop their toe side when snowboarding. There are a few different ways to do this, and the best method may vary depending on your level of experience and comfort with the sport. One way to stop your toe side is to simply turn your front foot so that your toes point in the same direction as your board.
This will cause your board to slow down and eventually come to a stop. Another way to stop your toe side is by using an edge change. To do this, you will need to slightly lean your weight onto your back foot while still keeping your front foot pointing in the same direction as the board.
This will cause your board to dig into the snow and slow down. Once you have slowed down, you can then use an edge change to bring yourself back up onto your feet.
What is a Toe Edge Snowboarding?
A toe edge snowboarding refers to when the rider has their weight on the front of the board, and their toes pointing downwards. This stance is used for most carving turns, and for going down hills. It is also used for performing certain tricks, such as ollies and spins.
Toe edge riding requires more balance than heel edge riding, as the rider’s center of gravity is further forward.
How Do You Carve a Toe Edge?
Assuming you would like tips on how to carve a toe edge:
The first thing you need to do is make sure your skis are freshly waxed and the edges are sharp. Once you have done that, it’s time to start carving.
Toe carving is all about balance and weight distribution. You want to keep your weight evenly distributed between your skis, with a little bit more pressure on your front foot. This will help keep your speed under control and allow you to make tighter turns.
As you start carving, focus on keeping your knees bent and absorbing the bumps as you go. Remember to keep your hips level and resist the temptation to lean back – this will cause you to lose control and increase your chance of falling. Instead, trust your ski edges and let them do the work for you!
How to Toe Slide – Beginner Snowboarding Tutorial
Toe Side Vs Heel Side Snowboarding
There are two main types of snowboarding: toe side and heel side. Toe side is when your toes point downhill, and heel side is when your heels point downhill. Each has its own set of benefits and drawbacks.
Here’s a look at the pros and cons of each type of snowboarding:
Toe Side Snowboarding
PROS
1. Toe side turns are more natural for most people. If you’re new to snowboarding, chances are you’ll find it easier to turn toe side than heel side.
2. You can generate more speed on toe side turns.
Since your bodyweight is evenly distributed over both feet, you can apply pressure more evenly to the edges of your board, which allows you to carve tighter turns and go faster.
3. Toe-side Turns feel more stable than heel-side turns . When you’re carving a turn on your toe edge, your weight is centered over the middle of the board, making it easier to maintain balance and control.
On heel-side turns, your weight is shifted toward the back foot, which can make the turn feel less stable. Heel slide outs (when your back foot comes off the edge of the board) are also more common on heel-side turns .
CONS
1. Toe-side riding requires more upper body strength than heel-side riding . Since you’re constantly leaning forward on toe-side turns , it takes some extra arm strength to keep yourself balanced . This can be tough if you’re just starting out or if you don’t have a lot of upper body strength .
Toe Side Carving Snowboard
Toe side carving is a technique used by snowboarders to make sharp turns. When done correctly, it allows the rider to carve through the snow and turn tightly without losing speed. To perform a toe side carve, the rider shifts their weight onto their front foot and points the toe of their back foot in the direction they want to turn.
They then lean into the turn and use their edges to carve through the snow.
One of the benefits of toe side carving is that it can be used to initiate turns quickly and tightens up your overall riding. It’s also a great way to add variety to your runs and mix up your turns.
If you’re looking to improve your carving skills or just want to add something new to your riding, give toe side carving a try!
Toe Side Turn
Toe side turns are one of the most important techniques in snowboarding. They allow you to change direction quickly and efficiently, and are essential for carving. Here’s how to do them:
1. Start by pointing your toes towards the direction you want to turn. This will help you initiate the turn.
2. Weight your front foot more than your back foot, and keep your knees bent.
This will help you keep your balance as you turn.
3. As you start to turn, lean your shoulders in the direction you want to go. This will help with carving and also keeping your balance.
4. Keep your eyes focused on where you want to go – this will help you stay on course and avoid obstacles!
Turf Toe
Turf toe is a condition that can occur when the big toe is hyperextended, or bent backwards beyond its normal range of motion. This can happen when playing sports on artificial turf, hence the name. The condition is also sometimes called a stubbed toe.
Symptoms of turf toe include pain and swelling in the big toe joint, as well as stiffness and difficulty moving the joint. In severe cases, the toe may become deformed. Turf toe is usually treated with rest, ice and elevation, as well as over-the-counter pain relievers.
In more severe cases, surgery may be necessary to correct the deformity.
Conclusion
This blog post provides readers with a step-by-step guide on how to toe side snowboarding. The author begins by explaining what toe side is and why it’s important to learn how to do it. They then provide clear instructions on how to position your feet and body before taking off, as well as how to turn once you’re already in the air.
The post ends with a few helpful tips on troubleshooting common problems that beginners often face when learning this move.